Perform the following steps in Atmel Studio 7 to build the firmware for EndDevice_Demo.
- 1.Open Atmel Studio and select
File > New > Example Project.Figure 1. Opening an Example Project in Atmel Studio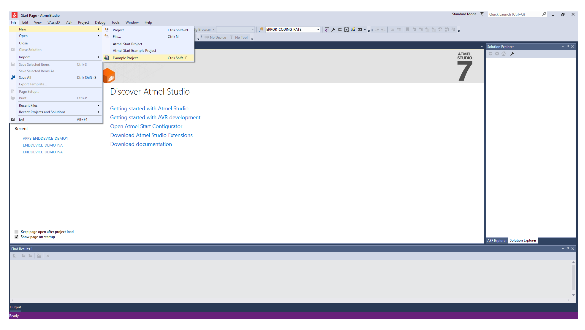
- 2.In the New Example Project from ASF or the Extensions window:
- 2.1.Enter
lorawan
keyword in the search box, which lists all the LoRaWAN EndDevice Demo Applications for SAM R34 Xplained Pro board or WLR089 Xplained Pro board. - 2.2.Select the respective example application of the SAM R34 by expanding the “Atmel - Atmel Corp.” in the All Projects tab. This selection automatically populates the Project Name, Location, Solution, Solution Name and Device.
- 2.3.Click OK.
Figure 2. Searching for LoRaWAN Example Project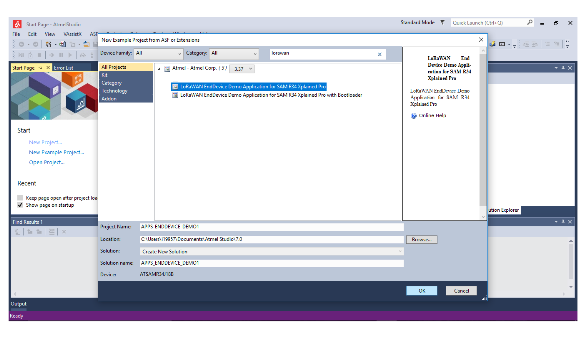
- 2.1.Enter
- 3.Select the
Accept the License Agreement
check box, then click Finish. - 4.The Atmel Studio generates the project files for the selected application example that can be used in the SAM R34 Xplained Pro board or WLR089 Xplained Pro board.
- 5.MLS supports multiple regional bands;
all the regions are enabled in the project by default. To disable certain regions,
perform the following steps:
- 5.1.Go to
Project >
                            Properties
or press <Alt + F7>. - 5.2.From the left-hand pane, select Toolchain.
- 5.3.In the right-hand pane, go to
ARM/GNU C Compiler > Symbols. - 5.4.The regional band macros are
listed in the
Defined Symbols
pane.- AS_BAND = 1
- AU_BAND = 1
- EU_BAND = 1
- IND_BAND = 1
- JPN_BAND = 1
- KR_BAND = 1
- NA_BAND = 1
Figure 3. Modifying Regional Configuration/Band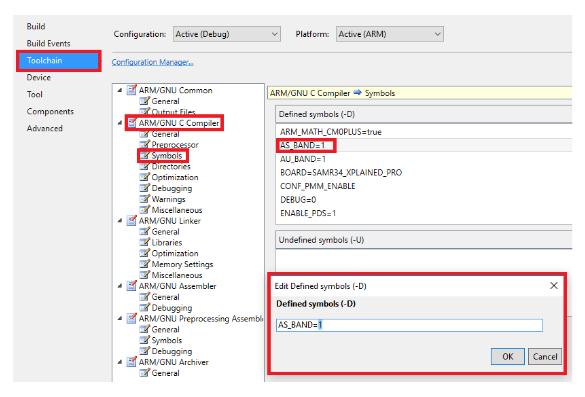
- 5.5.Runtime support for the
regional bands are enabled when the macro for the corresponding regional
band is set to
1, and is disabled when the macro is set to0. For example, the following are the macro values to enable only the North American region (NA_BAND).- AS_BAND = 0
- AU_BAND = 0
- EU_BAND = 0
- IND_BAND = 0
- JPN_BAND = 0
- KR_BAND = 0
- NA_BAND = 1
Note: The above mentioned select bands are from specific releases, provided as an example. Ensure the required band is supported before defining any band. The release notes contain the list of supported regional bands.
- 5.1.Go to
- 6.Go to
Build > Build Solutionto build the firmware.Figure 4. Building the Firmware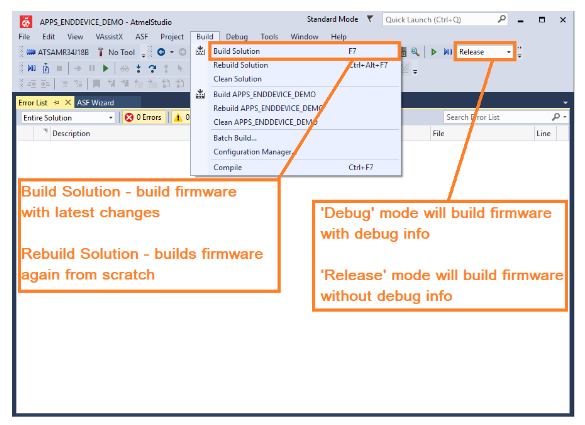
- 7.After successful compilation and
linking, the firmware is displayed in the Output Files section of Solution
Explorer.Figure 5. Build Output

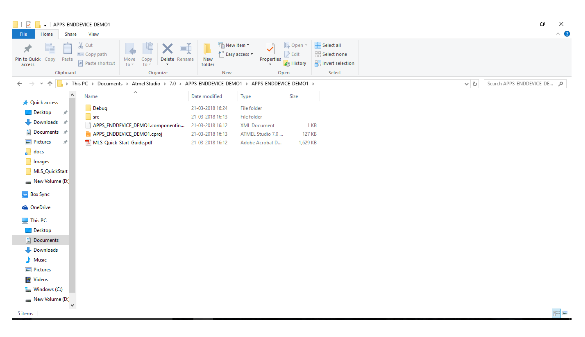
- 8.In the file system, Output files are
saved in Documents\Atmel
Studio\7.0\APPS_ENDDEVICE_DEMO1\APPS_ENDDEVICE_DEMO1/[BuildConfiguration].
Based on the build configuration, the BuildConfiguration directory can be either
Debug or Release.Figure 6. Executable File Location