Firmware upgrade is handled automatically by Atmel Studio, if the firmware distributed with Atmel Studio is newer than the firmware loaded into the Atmel AVRISP mkII.
However, the AVRISP mkII can stop responding to firmware upgrading if the firmware on the AVRISP mkII is corrupted. Corruption of the firmware can happen if the communication between the AVRISP mkII and the PC is broken during firmware upgrading or if the firmware in the AVRISP mkII is re-programmed with the wrong file. Read more on this issue in Atmel Studio Firmware Upgrade.
Follow the steps below to manually upgrade the AVRISP mkII. This procedure should work in all cases:
- 1.
Disconnect the AVRISP mkII from target.
- 2.
Unplug the USB cable.
- 3.
Open the AVRISP mkII by pressing on the four plastic clips that holds the top and bottom parts of the enclosure together.
- 4.
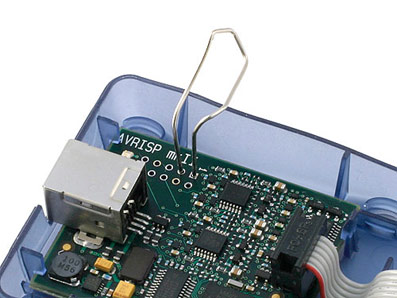
Short-circuit pin 1 and pin 3 on the pinholes next to the AVRISP mkII silk-print on the PCB. See Figure 1.
- 5.
Insert the USB cable. The AVRISP mkII should now start blink red and orange.
- 6.
Proceed with a firmware upgrade as described in Atmel Studio Firmware Upgrade.
- 7.
When the upgrade is finished, remove the short circuit between pin 1 and pin 3 on the AVRISP mkII.
- 8.
Toggle AVRISP mkII power by unplug and re-insert the USB cable.
- 9.
Press the "Close" button.