The Auto-Configuration feature of the Data Stream protocol can be used over any DGI serial interface or Serial Port. In this example, the Virtual COM port of an ATtiny104 Xplained Nano board will be used. This board has a built-in debugger (mEDBG) that can be used to program the target ATtiny104 device, and the emEDBG provides a Virtual COM port over USB that is connected to the UART pins of the ATtiny104.
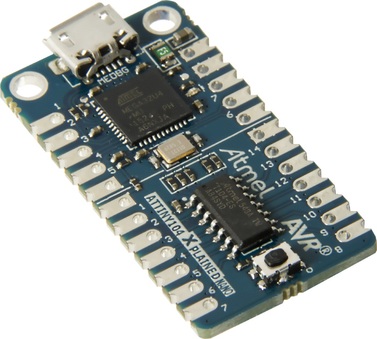
The only hardware connection required to run this example is to connect a USB cable between the host computer and the Xplained Nano board.
The Data Stream protocol will be used to send the state of the button on the Xplained Nano and the value of a 16-bit counter to the host computer.
- Make a new project in Atmel Studio (File → New → Project → GCC C Executable Project)
- Replace the content of the automatically generated main.c file with the code below
#include <avr/io.h>
uint8_t start_token = 0xAB;
uint8_t config_id_packet[] = {
    /* Token */
    0x5F,
    /* Specify checksum LRC8 */
    0xB4, 0x00, 0x86, 0x4A,
    /* Configuration ID */
    0xC0, 0xFF, 0xEE, 0xC0, 0xFF, 0xEE, 0xC0, 0xFF, 0xEE, 0xC0, 0xFF, 0xEE,
    /* The actual checksum */
    0x78,
    /* Inverse of Token */
    0xA0
};
uint16_t count = 0;
uint8_t send_id = 0;
void uart_send(uint8_t byte){
   /* Wait for empty transmit buffer */
   while ( !( UCSRA & (1<<UDRE)) );
   /* Put data into buffer, sends the data */
   UDR = byte;
}
int main(void){
    /* Set clock prescaler to 1 to get a 8MHz main clock */
    CCP = 0xD8; // Change protection register
    CLKPSR = 0x00;
    /* Set baud rate to 38400: UBR = (8000000/(16*38400))-1 = 12 */
    UBRR = 12;
    /* Enable UART transmitter */
    UCSRB = (1<<TXEN);
    /* Enable pull-up on button pin*/
    PUEB |= (1<<PINB1);
    while (1) {
        /* Send configuration ID */
        if (send_id == 0){
            for (int i = 0; i < sizeof(config_id_packet);i++)
                uart_send(config_id_packet[i]);
            send_id = 100;
        }
        /* Send data */
        uart_send(start_token);
        uart_send(count & 0xFF);
        uart_send(count >> 8);
        uart_send (!(PINB & (1<<PINB1)));
        uart_send(~start_token);
        count +=100;
        send_id--;
    }
}
The code continuously sends the value of a 16-bit counter that is incremented by 100 for each iteration. In addition, the state of the ATtiny104 Xplained Nano push button (PINB1) is sent. Note that the push button pin is low when the button is pushed. Every 100th loop iteration the Auto-Configuration ID packet is sent. The Auto-Configuration ID is 0xC0, 0xFF, 0xEE, 0xC0, 0xFF, 0xEE, 0xC0, 0xFF, 0xEE, 0xC0, 0xFF, 0xEE, so the configuration files must be named “C0FFEEC0FFEEC0FFEEC0FFEE”. The Auto-Configuration ID packet format is described in Auto-Configuration and the format of the data packet is described in Stream Format. The target ATtiny104 device is clocked at 8 MHz internal RC oscillator and the UART for the Virtual COM port is run at a baud rate of 38400 with 8-bit character width, one Stop bit and no parity.

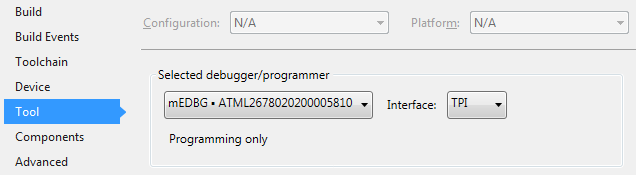
- Open the project properties (right click the project in the Solution Explorer and select Properties)
- On the Tool tab, select the appropriate tool and interface