
1.2 AWS IoT Over-The-Air Update Example Application
Description
This example application uses the AWS OTA Update Library to showcase MQTT based OTA demo update. When a new image is uploaded to AWS S3 bucket at the AWS Cloud server, the device running the OTA demo will download it and if it finds the verison of this downloaded image to be higher than the currently running image, it switches to the newer downloaded image.
Pre-requisite
- Have already created and configured an AWS account
- Have an AWS IoT Thing created with the AWS IoT
User may refer to the official AWS IoT Developer Guide for more details.
Development Tools and Software Dependencies
To see the list of development tools and software dependencies required for this application, please refer to aws_iot/release_notes.md
Hardware Setup - SAM E54 Xplained Pro
The target board for running the application is SAM E54 Xplained Pro.
This section provides essential hardware configuration of this target board to run OTA update application.
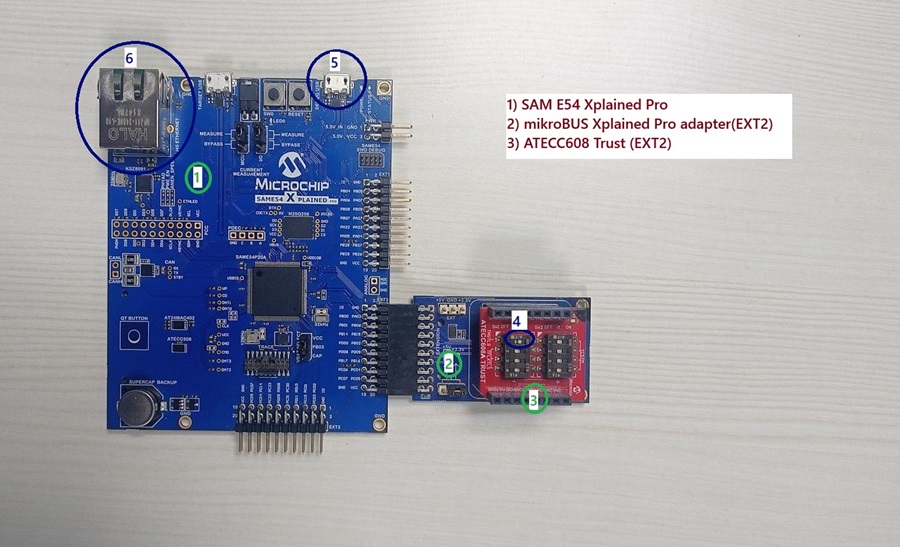
Board Setup
- (4) Turn ON the switch 1 the ATECC608 TRUST to enable the TNGTLS device.
- (5) Connect a USB micro cable to the Debug port.
- (6) Connect the Ethernet cable.
Enable OTA Update Library
From MCC, please enable the OTA update library.
Once the user has selected the OTA update library, then all the dependent libraries/features gets selected automatically.
Note: The demo application already has these settings.

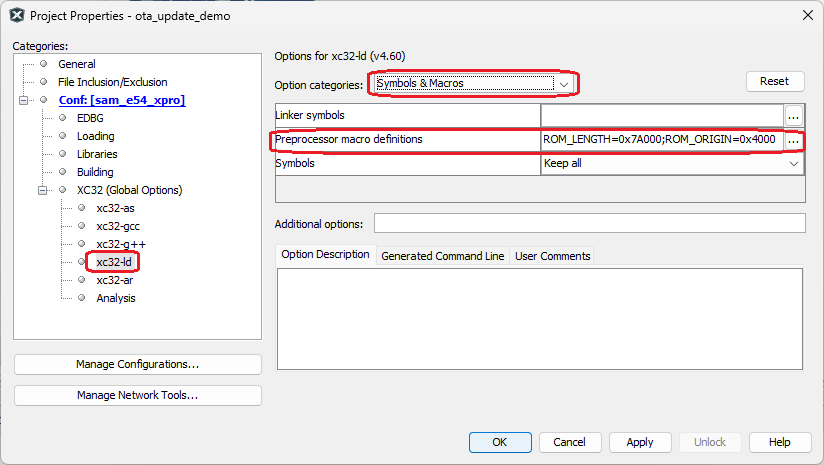
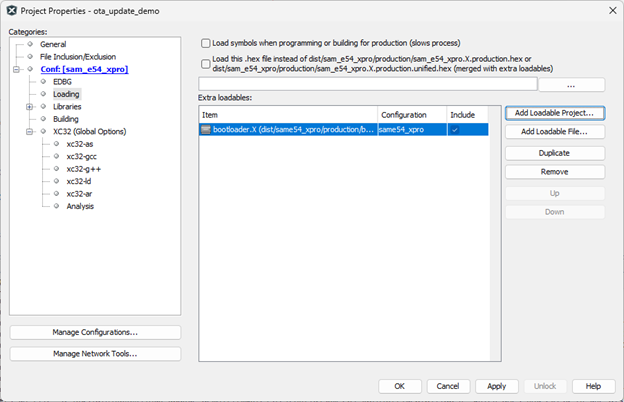
Note: For the ota_update_demo, please verify the following settings are configured in the project properties.:
Running the Application
Note: The OTA demo is based on this implementation. Users are free to adapt or replace them with their own custom demo files and apply modifications as necessary.
In this document, we shall refer to the unified image of the bootloader and ota_update_demo which is programmed using the MPLABX for the first time into the SAME54 XPRO as factory image. The image downloaded from the AWS OTA server shall be referred to as OTA image.
-
Create a code-signing certificate
To digitally sign firmware images, user need a code-signing certificate and private key. For testing purposes, user can create a self-signed certificate and private key. For production environments, purchase a certificate through a well known certificate authority (CA).
The Microchip SAME54-XPRO supports a self-signed SHA256 with ECDSA code-signing certificate and the procedure is described here.
Note: In this above link, do not perform the step#4, instead follow the below steps:-
Go to AWS Certificate Manager: https://console.aws.amazon.com/acm/home
-
On the top right side, user can see a 'Import' button, select it.
-
Upload the certificate and certificate's private key.(which user would have obtained after performing the steps from step#1 to step#3 mentioned in the previous link.
-
Click 'Import Certificate' and the resulting page will give user an identifier, please note down this Id. (As it is used to identify the uploaded certificate)
- This certificate will be used by AWS while creating a OTA job, to sign the firmware images used for OTA update job.
After creating the certificate and the key,- Move the certificate file (ecdsasigner.crt) to this directory: apps\bootloader\utility\codesigner_cert_utility
- Convert the PEM file
(ecdsasigner.crt) to a C string, using this utility:
apps\bootloader\utility\certificate_configuration\PEMfileToCString.py
Note: Use this command to run the .py file “python PEMfileToCString.py ..\codesigner_cert_utility\ecdsasigner.crt”
- Copy and Paste the resulting C string in this file: apps\ota_update_demo\firmware\src\third_party\aws\ota-for-aws-iot-embedded-sdk\source\portable\ota_pal\code_signature_verification\aws_ota_codesigner_certificate.h
Note: A sample certificate file (ecdsasigner.crt) is already present in: apps\bootloader\utility\codesigner_cert_utility. The users must generate and use their own certificate, by following the instructions mentioned above. Please do not use the sample certificate.
-
-
Compiling the OTA Image
-
Open the ota_update_demo project in MPLABX.
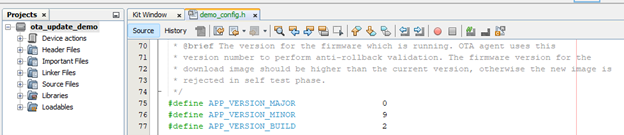
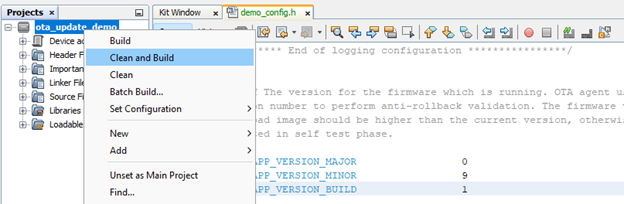
open apps\ota_update_demo\firmware\src\demo_config.h and change the version number higher than the one present currently (for instance, user can change APP_VERSION_BUILD from 1 to 2)
-
In the demo_config.h set the following as per user's configurations:
Parameter Description democonfigCLIENT_IDENTIFIER Use the Thing name here, which you would have created at AWS server side (the pre-requisite step as mentioned above) democonfigMQTT_BROKER_ENDPOINT Use your AWS IoT server's endpoint which can be found in the AWS IoT server's console page -
The GMAC peripheral on the SAME54 Xplained Pro does not have a built-in (pre-programmed) MAC address. Therefore, this demo uses a hard-coded sample MAC address.
Users must update the MAC Address for their hardware setup from here: src\third_party\FreeRTOS-Libraries\FreeRTOS-Plus-TCP\source\portable\NetworkInterface\include\NetworkConfig.h
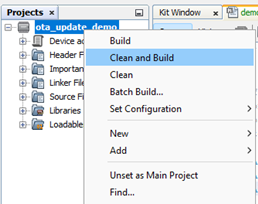
'Clean and Build' the project.
-
Save this file in
apps\ota_update_demo\firmware\sam_e54_xpro.X\dist\sam_e54_xpro\production\sam_e54_xpro.X.production.bin for uploading on AWS OTA server for OTA job creation
Note: The demo project must be configured to run in the application region (outside of the bootloader memory) with maximum size of 488KB (i.e., the ota application binary size should not be more than 488KB)
-
-
Compiling the Factory Image
-
Open the ota_update_demo project in MPLABX.
-
Open apps\ota_update_demo\firmware\src\demo_config.h and revert the version to its original value. (Ensure that the app verison of the factory image is lower than the OTA Image)
-
In the demo_config.h also set the following as per user's configurations:
Parameter Description democonfigCLIENT_IDENTIFIER Use the Thing name here, which you would have created at AWS server side (the pre-requisite step as mentioned above) democonfigMQTT_BROKER_ENDPOINT Use your AWS IoT server's endpoint which can be found in the AWS IoT server's console page Open the project properties and go to 'Loading' section and add the bootloader project as a loadable project.
'Clean and Build' the project.
-
Download SRecord and verify that the directory that contains the srec_cat and srec_info programs is in user's system path.
-
User must make sure that the python3 is installed and verify python3 path is set in system path.
-
Open the Windows Command Prompt and change the directory to apps\ota_update_demo\firmware\sam_e54_xpro.X
-
Run this command on the prompt: python "..\..\..\bootloader\utility\factory_image_generator.py" -b "dist\sam_e54_xpro\production\sam_e54_xpro.X.production.bin" -k "..\..\..\bootloader\utility\codesigner_cert_utility\ecdsasigner.key" -x "..\..\..\bootloader\utility\bootloader.X.production.hex"
-
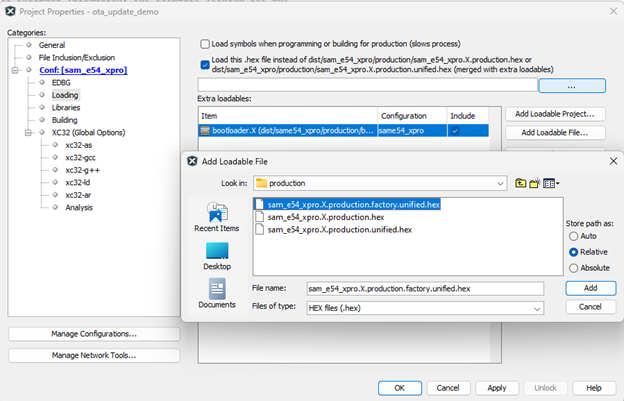
This will create a signed unified hex file "sam_e54_xpro.X.production.factory.unified.hex"
Add this factory image as the image to be programmed from MPLABX IDE, as shown below:
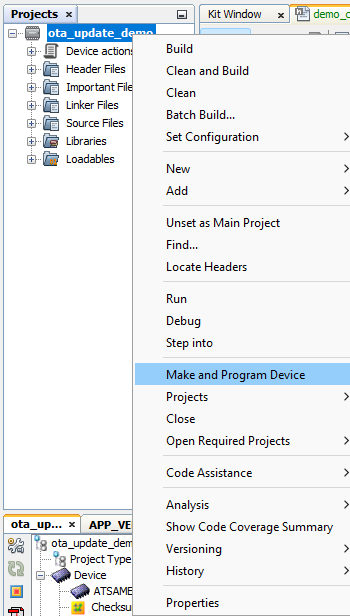
'Make and Program' the project.
-
-
Setting up the Cloud Services
Before the user could proceed with these steps, user must already have (a) Created and configured AWS account. (b) Created an AWS IoT Thing with the AWS IoT Service.
-
Create an Amazon S3 bucket to store an update
Note: Naming the s3 bucket begining with "afr-ota" is recommended. For Example: "afr-ota-mchp-freertos-bucket"
Create an OTA Update service role
Note: In the above link, "Attach policies" and "Add inline policy" options can be found in "Add Permissions" button.

-
Do this only if not logged-in as root user. (i.e., Follow below steps if the user is logged-in as IAM user which requires requires extra permissions)
-
-
Creating the OTA update job using the AWS IoT console
-
Upload the firmware image to the S3 bucket
- Sign in to the Amazon S3 console at https://console.aws.amazon.com/s3/
- Click on the bucket which the user had created.
- Click on the "Upload" button that is under the "Overview" tab.
- Drag and drop ".bin" to the bucket. (here the binary to be uplaoded is the one which we got from (2)Compiling the OTA Image )
- Click "Upload" to add the executable to the bucket.
-
For creating the OTA update job using the AWS IoT console,
See this page for the detailed steps.
Notes:
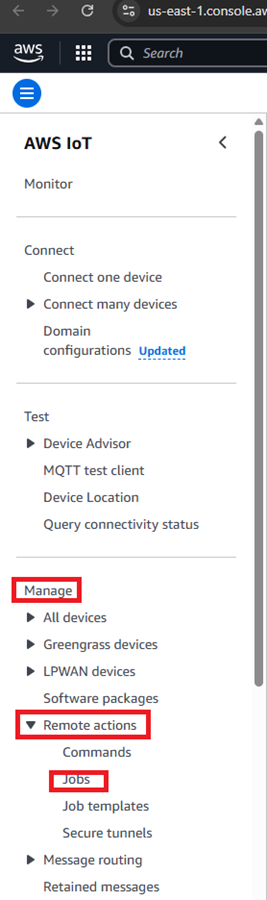
The 'Jobs' section has now moved to Manage->Remote Actions->Jobs
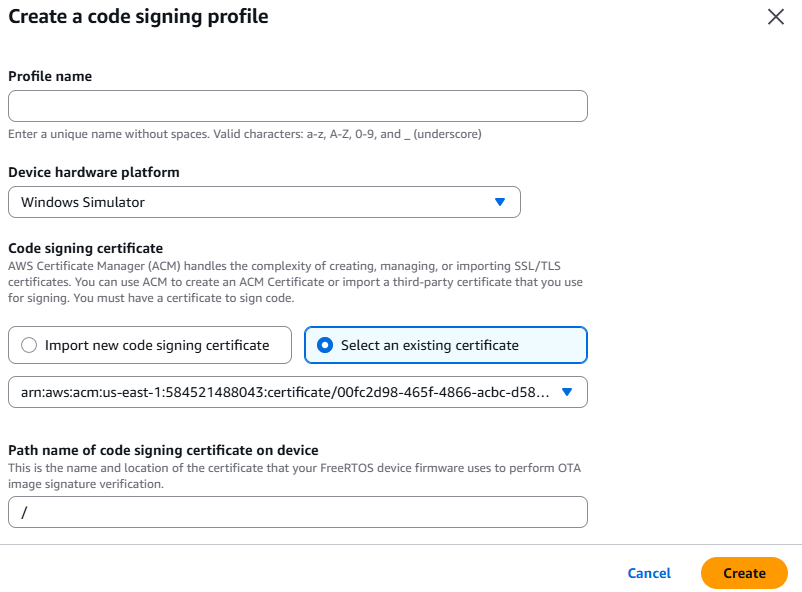
In the above link, the point#6 about the 'Create a code signing profile page'.Under Certificates, select the option 'Select an existing certificate' and then look for the certificate which the user had imported to AWS console in the very beginging section (1)Create a code-signing certificate.User can use the certificate identifier to identify the certificate which the user uploaded in the step (1)Create a code-signing certificate of this document.
-
In the above link, in point#7, the document tells about ".exe" but in our case the file is a ".bin" (which the user had uploaded in the S3 bucket)
-
In the above link, in point#9, keep all the OTA job configurations to default (do not change any settings)
-
In the above link, in point#10, to monitor the status of the job in the AWS Iot Console, go to Manage->Remote Actions->Jobs->"user-custom-job-name"->Job executions.
-
-
Running the Factory Image
On programming the factory image, the bootloader shall come up.

-
The memory is divided into 2 banks, 'bank 0' and 'bank 1'. The bootloader on coming up checks for the valid image(validates the signature associated with both the images) at both the banks. In this case, only the 'bank 0' has a valid image with version 0.9.1
The bootloader shall launch the application.
-
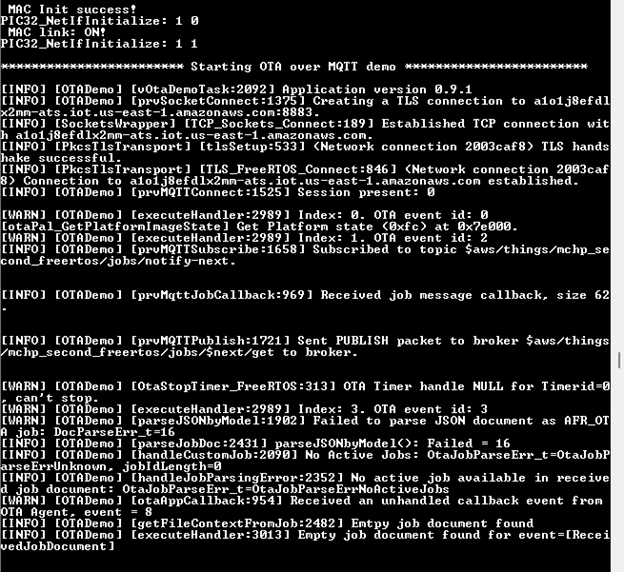
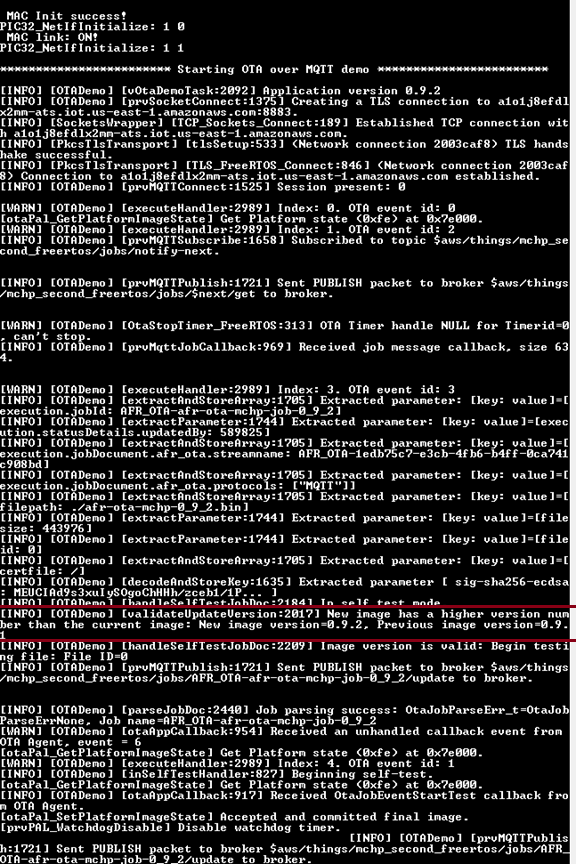
The ota_update_demo on coming up shall connect to AWS OTA server and subscribes the relevant Job related topics.
Whenever the OTA job gets created (See the section(4) and section(5)) on the AWS OTA server, the ota_update_demo application shall get notified via PUBLISH message. On receiving this message the application shall request the OTA image.
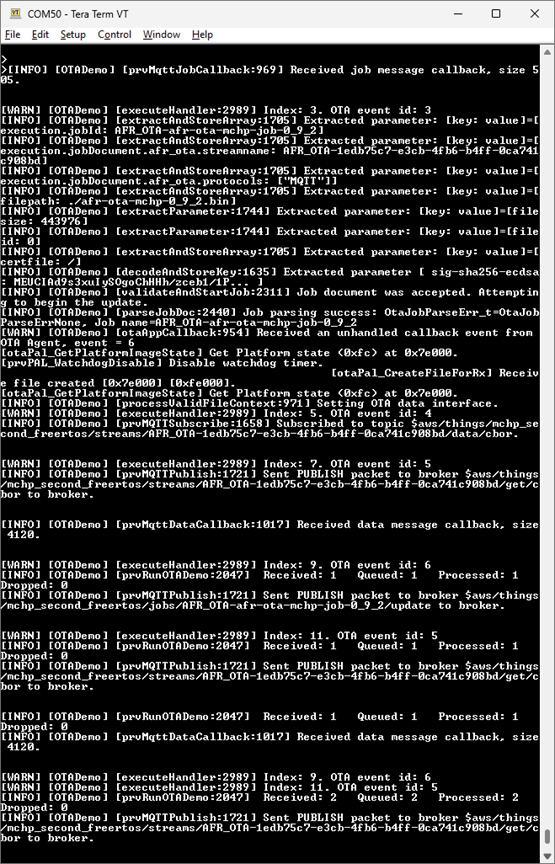
After the OTA image is fully downloaded, the board resets and on coming up the bootloader again checks both the banks for the latest image and launches the application with version 0.9.2
References
- OTA update demo reference.