1.20 QSPI Flash XIP Function
This example shows how to setup the QSPI Flash in the XIP mode to call a function placed in QSPI Flash memory.
Description
The QSPI execute in place (XIP) feature allows the system to execute code directly from a serial Flash memory without code shadowing to RAM. The serial Flash memory appears as memory-mapped device in QSPI region. As Quad SPI mode uses four lines for data transfer, it allows the system to use high-performance serial Flash memories which are small and inexpensive, in place of larger and more expensive parallel Flash memories.
The application defines a blink_led() function to run from QSPI Flash memory using the special section “.code_in_qspi” defined in the custom linker script for the project.
Any Function which is defined in the “.code_in_qspi” section will be loaded into the Internal Flash memory and when called will run from QSPI flash memory.
The application execution sequence is given below:
- Program the blink_led() function into QSPI Flash memory
- Enable Continuous Read Mode to enter into XIP mode
- Verify if blink_led() function is programmed by reading back from QSPI Memory location and comparing it
- If verification passes, it calls the blink_led() function to run from QSPI Flash memory region
- blink_led() function
- Calls function delay_ms() which is defined in internal flash memory and then toggles an LED
- delay_ms() function
- Causes a delay of 1 second
- prints a message which has called function, caller function and caller functions return address on UART console
Downloading and Building the Application
To clone or download this application from Github, go to the main page of this repository and then click Clone button to clone this repository or download as zip file. This content can also be downloaded using content manager by following these instructions.
Path of the application within the repository is apps/qspi/qspi_xip_function/.
To build the application, refer to the following table and open the project using its IDE.
| Project Name | Description |
|---|---|
| sam_e70_xult.X | MPLABX project for SAM E70 Xplained Ultra Evaluation Kit |
Setting Up the Hardware
The following table shows the target hardware for the application projects.
| Project Name | Description |
|---|---|
| sam_e70_xult.X | SAM E70 Xplained Ultra Evaluation Kit |
Setting Up SAM E70 Xplained Ultra Evaluation Kit
- Connect the Debug USB port on the board to the computer using a micro USB cable
Running the Application
- Open the Terminal application (Ex.:Tera term) on the computer
- Connect to the EDBG Virtual COM port and configure the serial settings as
follows:
- Baud : 115200
- Data : 8 Bits
- Parity : None
- Stop : 1 Bit
- Flow Control : None
- Build and Program the application using its IDE
- LED indicates success or failure:
- The LED is toggled when the blink_led function is successfully programmed, verified and called
- The LED is turned ON for any failures during the programming or verification
- The console displays the following message on SuccessNote: Observe the called function, caller function and the return address of the caller function which is in QSPI Flash Memory region.

| Board | LED Name |
|---|---|
| SAM E70 Xplained Ultra Evaluation Kit | LED1 |
Additional Information
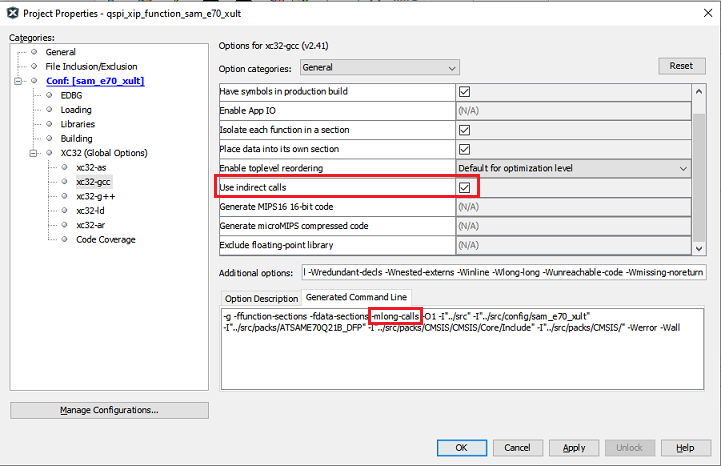
- If a function placed in QSPI memory region needs to call any function in
Internal Flash region then that function has to be defined with attribute
long_call
- In above example delay_ms() function was defined as wrapper function to call SYSTICK PLIB and printf functions
- To avoid defining wrappers like this or having each function in internal flash
defined with long_call attribute, below option from MPLABX IDE can be
used to mark all the function of the firmware as long_callNote: Enabling this option will increase the size of the firmware.

