Developer B receives the Secure
application pre-programmed on the SAM L11 device from Developer A.
The Non-Secure project development
requires creating a TrustZone-enabled MPLAB Harmony v3 project by configuring the
peripherals and memory regions in the Non-Secure mode. For the Non-Secure project
development, any one of the following methods can be used:
Note: When a SAM L11 TrustZone
device is selected for creating the project, the MCC creates and enables
configuring both the Secure and Non-Secure applications in the same
project. The Non-Secure application developer should only follow
instructions relevant to the Secure application.
Use the SAM L11 TrustZone
Getting Started Application demonstration, which is available for download
at saml11_trustzone_getting_started.
Go to the SAM L11 TrustZone Getting
Started Non-Secure application project path:
<Demo Developed or
                        DemoExtracted Path>\firmware\NonSecure\firmware\
                        sam_l11_xpro_NonSecure.X
Note: The Secure and Non-Secure
projects will have the name endings _Secure and _NonSecure
.
In MPLAB X IDE, click on the
Projects tab.
Open the pre-developed Non-Secure application and right-click on the project name
trustzone_sam_l11_xpro_NonSecure and then click Set as Main
Project.
Follow these steps to remove the
Secure project:
Under Projects, click
and expand trustzone_sam11_xpro_NonSecure > Loadables, and then
right-click on the project sam_l11_xpro_secure.
Click Remove.Figure 2-11. Removing Secure
Project Under the Loadables
Place the SG library (ends with an
extension .lib, for example
sam_l11_xpro_Secure_sg_veneer.lib) received from Developer A in
the following path: <Demo Developed or DemoExtracted
Path>\firmware\NonSecure\firmware\sam_l11_xpro_NonSecure.X.
Place the Non-Secure entry header
file (nonsecure_entry.h) received from Developer A in the following
path: <Demo Developed or DemoExtracted
Path>\firmware\NonSecure\firmware\src\trustZone.
Ensure that the Non-Secure header file is added to the project (under Projects tab,
click and expand trustzone_sam_l11_xpro_NonSecure > Header Files >
trustZone > nonsecure_entry.h) as shown in the following figure. Figure 2-12. Non-Secure Entry Header
File
Perform Step 6: Add Application Code to the Non-Secure
Project mentioned in the Training Module, Arm® TrustZone® Getting
Started Application on SAM L11 MCUs. Use the API declarations from the
Non-Secure entry header file (nonsecure_entry.h) to perform Secure
applications requests.
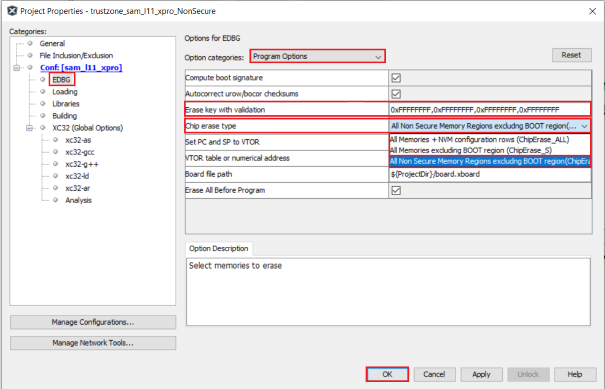
To change the EDBG settings, follow
these steps.
In the MPLAB X IDE Project
Properties window, under Categories, select EDBG.
In the Options for
EDBG section:
For Option categories select Program Options.
For Erase key with
validation enter 0x22222222,0x22222222,0x22222222,0x22222222.
For Chip erase type, select All Non-Secure Memory Regions
excluding BOOT region (ChipErase_NS).
Click OK. Figure 2-13. Non-Secure Project EDBG Program Options Properties
Connect the SAM L11 Xplained Pro
device and click Make and Program in the MPLAB X IDE to program the
Non-Secure memory region with the Non-Secure application.
The online versions of the documents are provided as a courtesy. Verify all content and data in the device’s PDF documentation found on the device product page.