
1.5.1 Configuring the NVM Host Applications
Path of the NVM host applications within the repository are:
- apps/i2c_bootloader/
- apps/i2c_fail_safe_bootloader/
- apps/i2c_bootloader_wlcsp/
Generating Hex Image Pattern Used by NVM Host Application
Follow below steps only when existing test_app is rebuilt or any other application is to be bootloaded:
-
Open the application project to be bootloaded in the IDE.
- If existing test application has to be built open test_app/firmware/*.X
-
Build the application project to generate the binary (Do not program the binary).
-
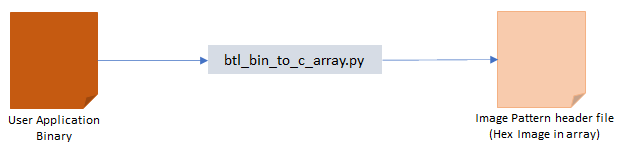
Convert the generated binary (.bin file) to a header file containing the image data in a C style array:
-
On a Windows machine, open the command prompt and launch the btl_bin_to_c_array.py utility to generate a header file containing the image data in an array
python <harmony3_path>/bootloader/tools/btl_bin_to_c_array.py -b <binary_file> -o <hex_file> -d <device>
-
Refer to the btl_bin_to_c_array utility for converting the binary to C array in hex format
-
-
Add the application hex header file generated in above step to the test app images path of the I2C embedded host application host_app_nvm/firmware/src/test_app_images/.
- Example:
- If the application hex header file generated is for sam_d21_xpro.X project, Name it as image_pattern_hex_sam_d21_xpro.h and place it in above path
- Example:
Configuring the NVM Host Application
Follow below steps only when Host development kit is different than Target Development kit:
-
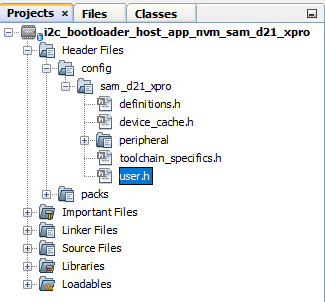
Open the host_app_nvm/firmware/*.X project in MPLAB X IDE.
-
Open the user.h file as shown below:
-
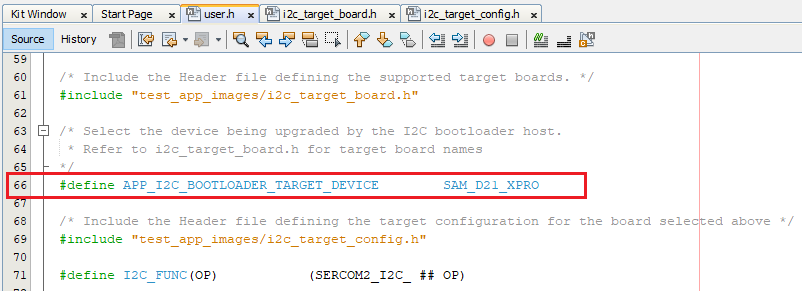
Open test_app_images/i2c_target_boards.h to get predefined macros of supported Bootloader Target Devices.

-
In the user.h file specify the Bootloader Target Device used using the predefined macros from test_app_images/i2c_target_boards.h.
#define APP_I2C_BOOTLOADER_TARGET_DEVICE SAM_D21_XPRO
-
Open test_app_images/i2c_target_config.h to get predefined configuration of supported Bootloader Target Devices.
-
Navigate to the #if block for the specified Bootloader Target Device and verify the below settings are as expected.
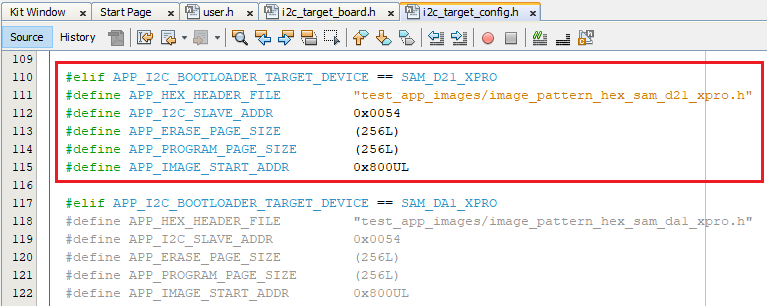
- APP_HEX_HEADER_FILE: Relative path to the generated header file containing the application hex image in an array
- APP_I2C_SLAVE_ADDR: I2C client address
- APP_ERASE_PAGE_SIZE: Erase page size of the target (target = MCU being programmed)
- APP_PROGRAM_PAGE_SIZE: Program page size of the target (target = MCU being
programmed)
- The macro can either be set to the program page size or can be set to the size of the erase page size of the target
- In the demo example, the macro is set equal to the size of the erase page
- On embedded host where RAM is limited, the macro may be set to the actual
program page size to reduce the RAM used to hold the program data.
- For example, the macro can be set either to 64 (program page size) or 256 (erase page size) for SAM D20
- APP_IMAGE_START_ADDR: User application start address (this value should be same as
the application start address specified in Application Configurations steps)
- If the bootloader itself is being upgraded then the APP_IMAGE_START_ADDR must be set to 0x00 (start of bootloader)
- Ensure that the bootloader and application are also configured with the same value of user application start address