1 Provisioning Keys on the PIC32CM LS60 Curiosity Pro Evaluation Kit using the Trust Platform Design Suite
The PIC32CM LS60 family is equipped with secure and ultra-low power PIC32CM LS60 Arm® Cortex®-M23 based microcontrollers. The MCU integrates TrustFLEX ECC608 secure subsystem and Arm TrustZone® technology in one package. Additionally, it features an enhanced Peripheral Touch Controller (PTC) and smart analogs, such as Op Amps, ADC, DAC, and analog comparators.
Note: In the scope of this document, the keys are provisioned without
locking the slots in the secure element to prevent future access to these slots from
becoming permanently locked. For additional information, refer to the "ATECC608B Data Sheet" (DS40002239).
The following software and hardware tools are used for this demonstration:
To provision the keys on the PIC32CM LS60 Curiosity Pro Evaluation Kit, follow these steps:
- From the Start menu, launch
Trust Platform Design Suite.
Figure 1-1. TPDS Launch Console - Once TPDS is open, click on the
Utilities tab.
Figure 1-2. Preferences Configuration - Connect two micro-USB cables: One
cable from the DEBUG USB port on the PIC32CM LS60 Curiosity Pro Evaluation Kit to
the PC, and another cable from the TARGET USB port on the PIC32CM LS60 Curiosity Pro
Evaluation Kit to the PC.This configuration allows for key provisioning through the
TPDS.
Figure 1-3. Hardware Connection - Under TPDS Integrated Utilities,
click Device Interactions, and then under Supported Boards, select
EV76R77A. Note: EV76R77A is the part number of the PIC32CM LS60 Curiosity Pro Evaluation Kit.
Figure 1-4. Board Selection - From the Available Devices
section, choose ATECC608-TFLXTLS.
Figure 1-5. Selection of ATECC608-TFLXTLS - Press the Reset button on the PIC32CM
LS60 Curiosity Pro Evaluation Kit to reset the device as shown below.
Figure 1-6. Reset the PIC32CM LS60 Curiosity Pro Evaluation Kit - Click Factory Program to
program the key provisioning firmware on the PIC32CM LS60 Curiosity Pro Evaluation
Kit.
Figure 1-7. Program of Key Provisioning Firmware - After successful completion of the
programming, click on the Configurators tab.
Figure 1-8. Configurators Selection - In the Provisioning Configurators,
under the TrustFLEX section, click PIC32CMLS60-TFLXTLS Configurator.
Figure 1-9. Selection of PIC32CMLS60-TFLXTLS Configurator - Select the Slot in the PIC32CMLS60
TrustFLEX XML Generator to provision the key as shown below.
Figure 1-10. Slot 5 Selection - Select Enter HEX data in the
Slot 5 section.
Figure 1-11. HEX Data Option in Slot 5 - Enter the Secret Key in the
form of random hex decimal values on the entry section and click Verify to
validate the data length.
Figure 1-12. Entry of Secret Key Note:- Click Modify to
change the content of the Slot 5.
Figure 1-13. Slot 5 Content Modification 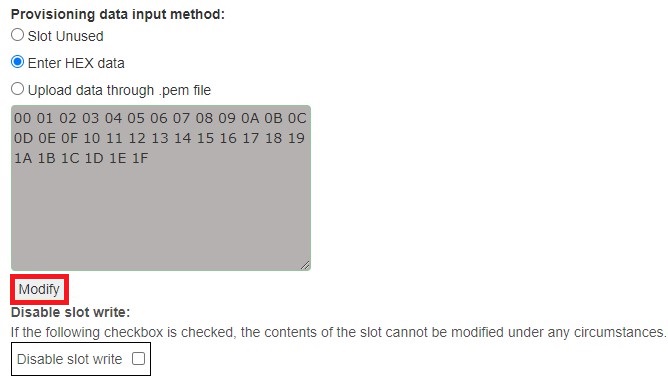
- In this case, the Secret
Key (Slot 5) has the dependency of I/O Protection Keys in Slot 6. This
dependency is crucial because the key must be safeguarded against
physical attacks. Ensure that the I/O Protection Key values are added
according to the steps defined from 10 to 12.
Figure 1-14. Entry of I/O Protection Key
- Click Modify to
change the content of the Slot 5.
- Scroll down and click Generate
Provisioning Package from the Prototyping section.
Figure 1-15. Provisioning Package Generation Note: All user data in the generated XML for the Provisioning Package is unencrypted plain text in the Prototyping Package. Use the Production Package for an encrypted Provisioning Package. - The Provisioning Package is saved at the following location: Users/xxx/Downloads/TPDS_Downloads.
- Select the Provisioning Package and then click OK.
Figure 1-16. Provisioning Package Location 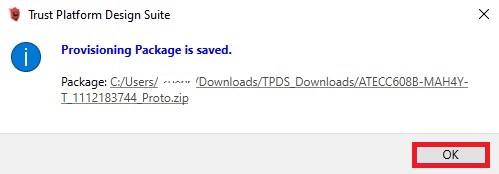
- Click Provision Prototype
Samples to program keys inside the secure element.
Figure 1-17. Provision of Keys 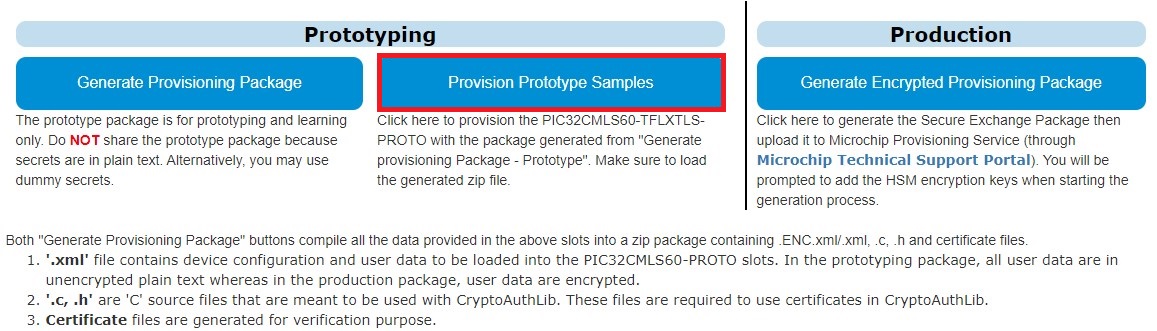
- Go to the Provisioning Package
download location: Users/xxx/Downloads/TPDS_Downloads, and select
ATECC608-***.zip file, and then click Open.
Figure 1-18. Navigate to Provisioning Package Location 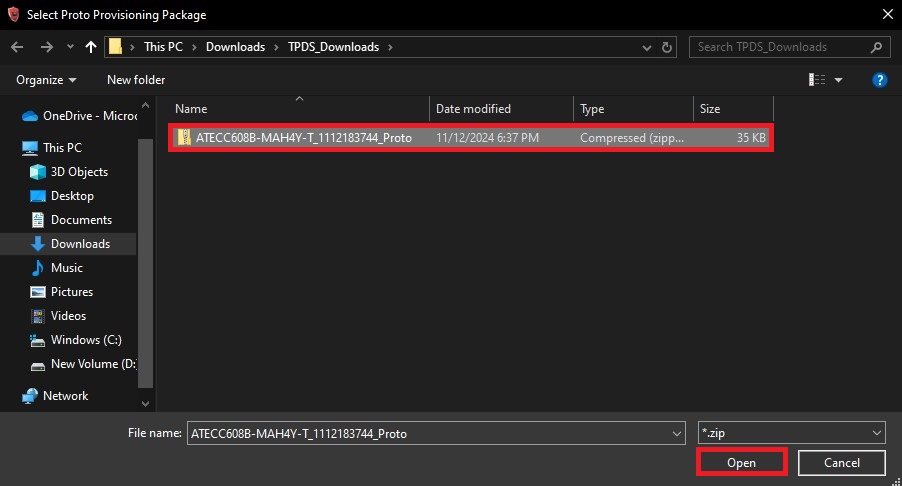
- Select No to generate the CA
Keys using the TPDS tool.
Figure 1-19. Navigate to Provisioning Package Location 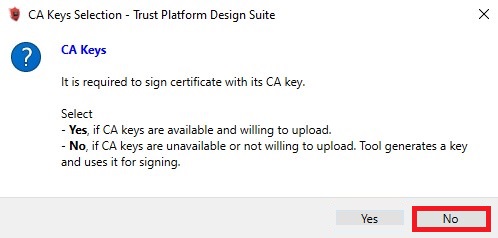
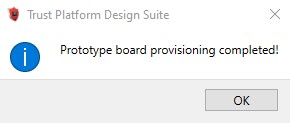
- The following message will be
prompted to indicate the key provisioning is completed.
Figure 1-20. Completion Key Provisioning