1.5 I2C Driver Asynchronous - I2C Multi-client
This example application demonstrates the multi-client feature of the asynchronous mode of the I2C driver by communicating with an external EEPROM and a temperature sensor.
Description
This example uses the I2C driver in asynchronous mode and demonstrates the multi-client feature. The example uses a IO1 Xplained Pro Extension Kit that has a temperature sensor and an EEPROM, both interfaced on the same I2C bus.
Two application tasks are created which act as clients to the same instance of the I2C driver:
APP_I2C_TEMP_SENSOR_Tasks:
Reads temperature every 1 second, prints on console and notifies the EEPROM client. The Time System Service is used to generate a callback every 1 second.
APP_I2C_EEPROM_Tasks:
Writes temperature values to the EEPROM once the temperature read complete notification is received. The task also reads and prints the last five saved temperature data from the EEPROM when user enters any key on the console.
Downloading and Building the Application
To clone or download this application from Github, go to the main page of this repository and then click Clone button to clone this repository or download as zip file. This content can also be downloaded using content manager by following these instructions.
Path of the application within the repository is apps/driver/i2c/async/i2c_multi_slave/firmware.
To build the application, refer to the following table and open the project using its IDE.
| Project Name | Description |
|---|---|
| pic32cx_mtsh_db.X | MPLABX project for PIC32CXMTSH-DB Evaluation Kit |
Setting Up the Hardware
The following table shows the target hardware for the application projects.
| Project Name | Description |
|---|---|
| pic32cx_mtsh_db.X | PIC32CXMTSH-DB Evaluation Kit |
Setting Up PIC32CXMTSH-DB Evaluation Kit
- To run the demo, the following additional hardware are required:
- Connect the IO1 Xplained Pro Extension Kit to the Xplained pro header of the PIC32CXMTSH-DB Evaluation Kit
- Verify the R115, R118 Pull-up resistors should be mounted with 1 KΩ value on PIC32CXMTSH-DB Evaluation Kit
- Connect the Debug USB port on the board to the computer using a micro USB cable
Running the Application
- Open the Terminal application (Ex.:Tera term) on the computer. Configure the
DEBUG port settings as follows:
- Baud : 115200
- Data : 8 Bits
- Parity : None
- Stop : 1 Bit
- Flow Control : None
- Build and program the application using its IDE.
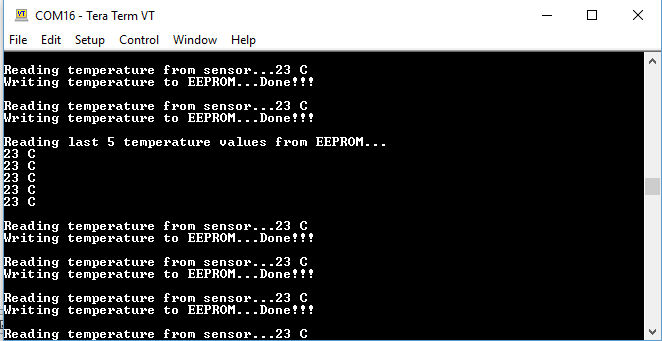
- Observe the temperature values getting printed on the terminal application every 1 second and temperature value written into EEPROM notification as shown below:
- Press any key on the terminal,
last 5 temperature values will be read from the EEPROM and displayed as shown below.