6.2 Multiprotocol Bluetooth®
LE Provisioning MCC Component
Overview
The Bluetooth® LE provisioning component facilitates the users in
selecting a combo application. Additionally, based on the selected combo application option,
the user can select the device role and enable sleep options. The MCC component has certain
dependencies, and the following table outlines these dependencies and their
requirements.
Table 6-8. Bluetooth® LE
Provisioning Component MCC Dependencies
Dependency Component
Dependency Type
Description
Transparent Profile
Mandatory
Bluetooth LE provisioning uses transparent profile as per the functional
design.
PDS_SubSystem
Mandatory
Bluetooth LE provisioning uses PDS for data backup.
IEEE 802.15.4 PHY
Mandatory
Bluetooth LE provisioning utilizes the 15.4 PHY when the selected combo
application is based on the 15.4 PHY and IEEE 802.15.4 radio services.
IEEE 802.15.4 MAC
Mandatory
Bluetooth LE provisioning uses the 15.4 MAC if the selected combo application
is 15.4 MAC.
Thread Stack
Mandatory
Bluetooth LE provisioning uses the thread stack if the selected combo
application is THREAD.
Component Configuration
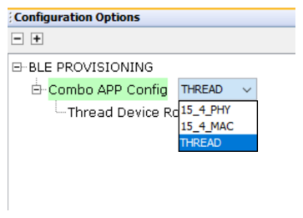
The Bluetooth LE provisioning component facilitates user selection of a combo application
configuration type. The combo application configuration type depends on the respective
stacks, which are activated upon selection. For example, if the user selects the application
configuration type as THREAD, then the Thread stack will be activated.Figure 6-6. Combo App Configuration Option
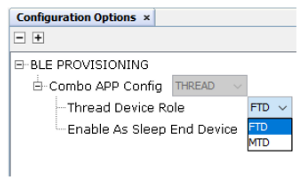
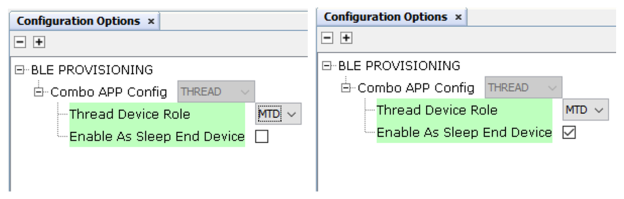
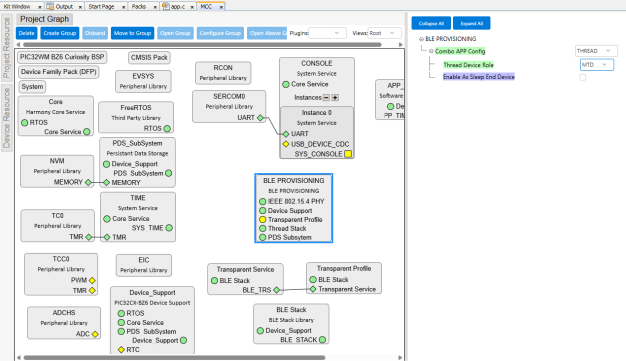
For the combo application configuration as “THREAD”, user can choose between Full Thread Device (FTD) or Minimal Thread Device (MTD) as the device roles. For the “MTD” selection, the user can enable the “Sleepy End Device” option
to allow sleep mode in the “MTD”.Figure 6-7. Thread Device Role Selection
Figure 6-8. Enable As Sleep End Device
Project Generation with
Component
This section is designed to guide users through the process of creating
a Bluetooth LE+THREAD multiprotocol project using MPLAB Code Configurator.
Software
Requirement
Table 6-9. Development Tools
Software Tools and Device Specific Support Packages
Version
MPLAB® X IDE
v6.35 or higher
PIC32CX-BZ6_DFP
v1.3.38
XC32 Compiler
v5.10
MCC
v5.6.4
Table 6-10. Harmony MCC Packages
Package Name
Version
csp
v3.26.0
core
v3.17.0
bsp
v3.25.0
FreeRTOS-Kernel
v11.1.0
wireless_pic32cxbz_wbz
v1.6.0
wireless_ble
v1.5.0
wireless_15_4_phy
v1.4.0
wireless_15_4_mac
v1.2.0
wireless_thread
v1.3.0
openthread
mchp_harmony_wireless_thread_v1.3.0
wireless_system_pic32cxbz_wbz
v1.8.2
Project Generation
This section provides details on the steps required
to develop an application based on the Bluetooth LE Provisioning MCC component, using
MCC.
Note: It is recommended that new users of MPLAB Code Configurator to
go through the overview.
Create a new MCC Harmony Project. For more details, refer to Creating a New MCC
Harmony Project section from Related Links
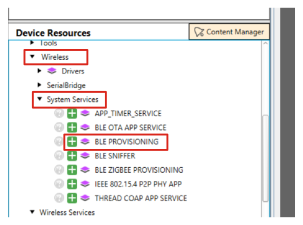
From the “Device Resources” field, go to
Harmony>Wireless>System Services>BLE PROVISIONINGFigure 6-9. BLE Provisioning Component
Click on the plus symbol on the BLE
PROVISIONING component, as illustrated in the above image.
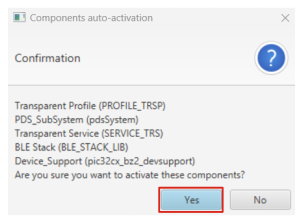
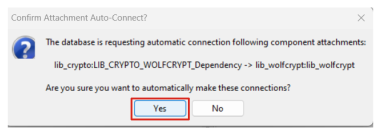
Upon selection, user will receive a prompt for auto-activation and auto-connect request
of different component dependencies. Select Yes to add all the dependent components and
also for all attachment auto-connect requests.Figure 6-10. Auto-Activation Request
Figure 6-11. Auto-Connect Request
Right Click on TIME component on project graph for selecting the timer source
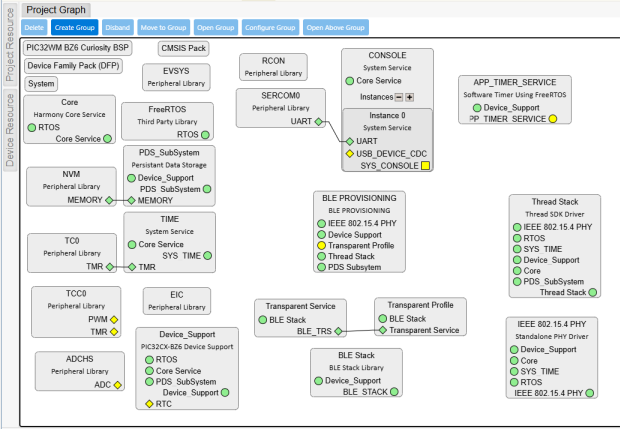
(TMR>TC0), select any of the timer. The project graph will resemble
the following image.Figure 6-12. Timer Selection for Time
ComponentFigure 6-13. Project Graph Complete
View
Click on the BLE PROVISIONING, and open Configuration Options to set up the
component according to the needs. Follow the steps outlined in the Component Configuration
section.Figure 6-14. BLE Provisioning
Configuration
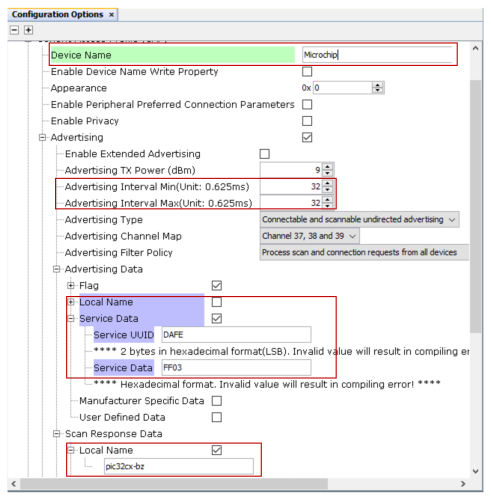
Click on the BLE Stack, open
Configuration Options and,
Expand BLE Stack>Generic
Access Profile (GAP)>Advertising>Advertising Data> to ensure
"Local Name" is disabled and “Service Data” is enabled. Update the “Service UUID” as
0xDAFE and “Service Data” as 0xFF03
Expand BLE Stack>Generic
Access Profile (GAP)>Advertising>Scan Response Data> to ensure
"Local Name" is enabled
Expand BLE Stack>Generic
Access Profile (GAP)>Device Name to update the “Device Name” as per the
application requirement.
Expand BLE Stack>Generic
Access Profile (GAP)>Advertising to update the “Advertising Interval”
as per the application requirement.
Figure 6-15. BLE Stack Configuration
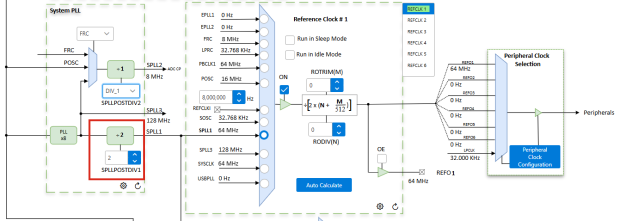
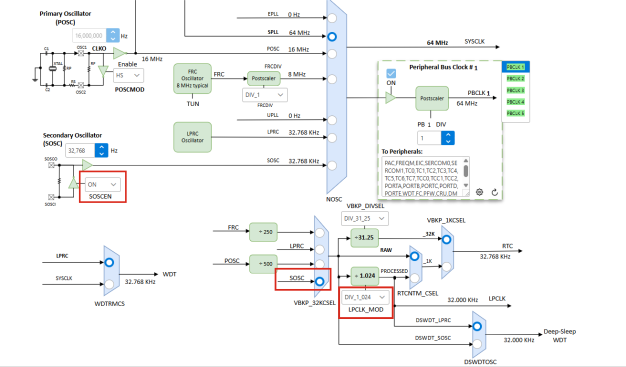
If the device is enabled as “Sleep End Device”. Select Plugins:>Clock
Configurations and configure as illustrated in the following imageFigure 6-16. Clock ConfigurationFigure 6-17. Clock Configuration
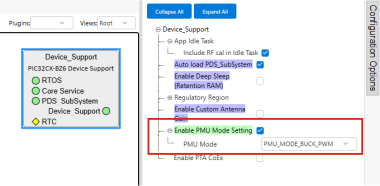
Open Project Graph, and click on the Device Support, open Configuration Options
and,
Expand Device
Support>Enable PMU Mode Setting> to ensure "Enable PMU Mode
Setting" is enabled and set the “PMU mode” to BUCK_PWM mode (PMU_MODE_BUCK_PWM) to
achieve lower power consumption.
Figure 6-18. PMU Mode Settings
Note: This step is applicable only if the
device is enabled as a “Sleep End Device (SED)”.
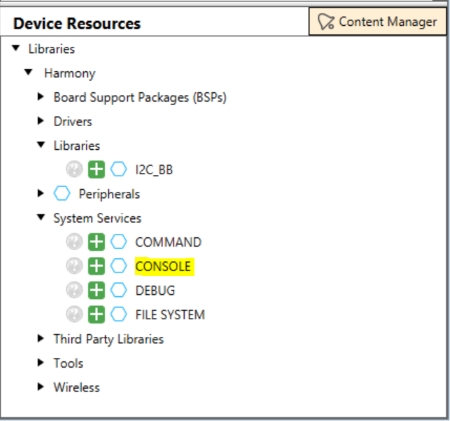
If console prints is required, user can add a “CONSOLE” component to facilitate
application console prints.
Go to “Device Resources” field, and
navigate to Libraries>Harmony>System Services and select
CONSOLEFigure 6-19. CONSOLE Component
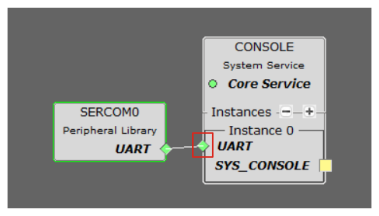
In the project graph, right click
on ◇ UART>Satisfiers>SERCOM0 to add and connect the
SERCOM0 component.Figure 6-20. Console Component
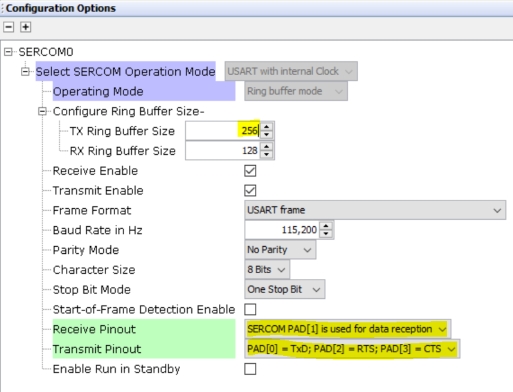
Click on the SERCOM0, open
Configuration Options and, to change “Receive Pinout” and “Transmit Pinout” as
illustrated in the following figure.Figure 6-21. SERCOM0
Configurations
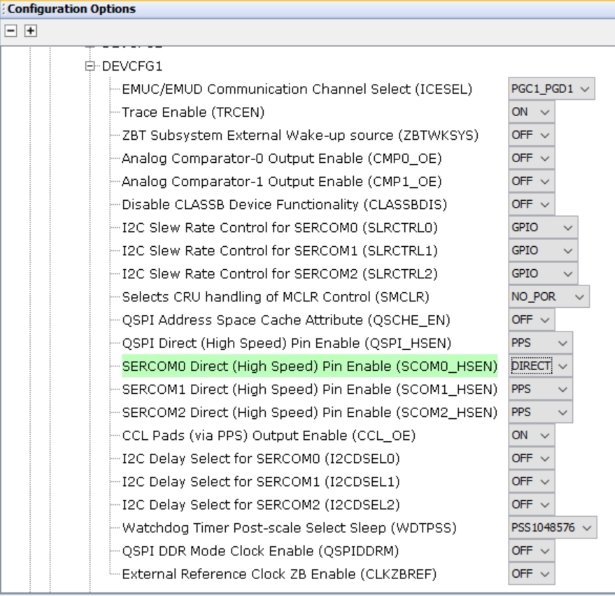
Perform the following to configure
the “SERCOM0” to enable the Direct High Speed.
In Project Graph, click the
System component to open Configuration Options.
To locate “SERCOM0 Direct (High
Speed) Pin Enable (SCOM0_HSEN)”, navigate to System>Device &
Project Configuration>WBZ451 Device Configuration>Generate Fuse
Settings>DEVCFG1
Select DIRECT from the
drop-down list as illustrated in the following figure.
Figure 6-22. System Configuration -
SERCOM0
Click on Generate Tab for code generation. Upon code generation, BLE
provisioning Component related source files will be added to the project. For more
details on code generation, refer to Code Generation section from Related
Links.
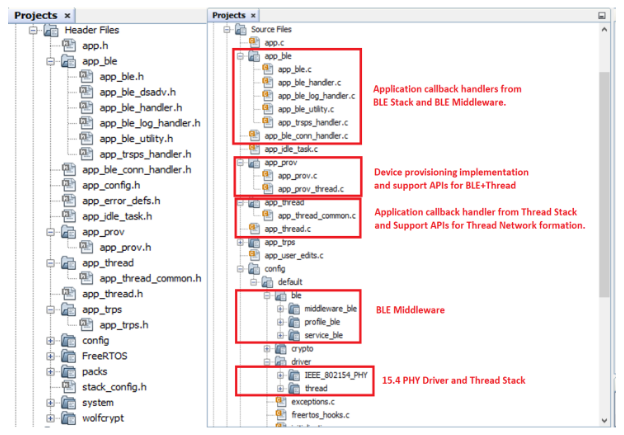
Once generation completes the header and source files of BLE provision service will be
added under project’s Header and Source files based on the configuration.Figure 6-23. Combo Application File
Structure
Manual code configurations is required for the following files:
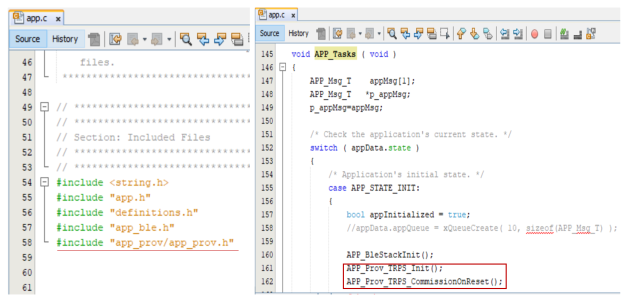
app.c File
Open app.c
file and include the header files app_prov.h (#include
"app_prov/app_prov.h").
In app.c file,
within the APP_Tasks function add the following code snippet
after the APP_BleStackInit() call, as illustrated in the
following figure.
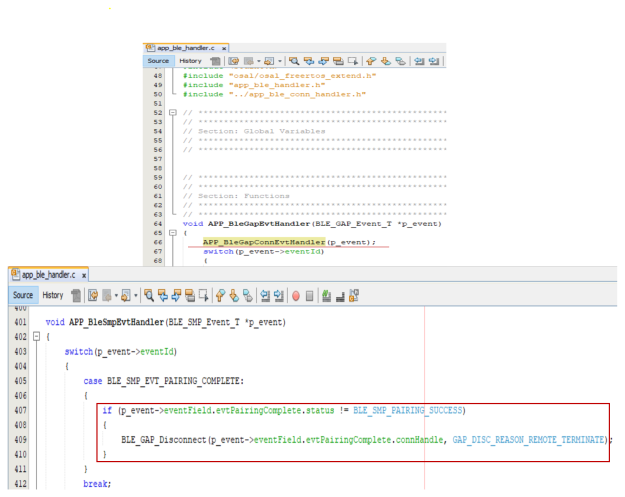
Open
app_ble_handler.c file (located in Source
Files>app_ble>app_ble_handler.c), and include the header file
app_ble_conn_handler.h (#include
"../app_ble_conn_handler.h").
In
app_ble_handler.c file, within the
APP_BleGapEvtHandler function add the following code snippet
as illustrated in the following
figure.
APP_BleGapConnEvtHandler(p_event);
In
app_ble_handler.c file, within the
APP_BleSmpEvtHandler function add the following code snippet
as illustrated in the following
figure.
   if (p_event->eventField.evtPairingComplete.status != BLE_SMP_PAIRING_SUCCESS)
            {
                BLE_GAP_Disconnect(p_event->eventField.evtPairingComplete.connHandle, GAP_DISC_REASON_REMOTE_TERMINATE);
            }
Figure 6-25. app_ble_handler.c File
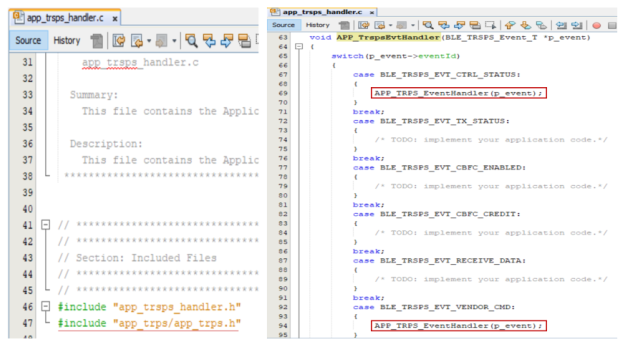
app_trsps_handler.c File
Open
app_trsps_handler.c file (located in Source
Files>app_ble>app_trsps_handler.c), and include the header
file app_trps.h(#include "#include
"app_trps/app_trps.h").
In
app_trsps_handler.c file, within the
APP_TrspsEvtHandler() function add the following code snippet
as illustrated in the following
figure.
APP_TRPS_EventHandler(p_event);
Figure 6-26. app_trsps_handler.c File
app_user_edits.c
File
Comment out or remove the
#error line. Update the freertos_hooks.c as mentioned in
app_user_edits.c file. For more details , refer to Users
Action section from Related Links.
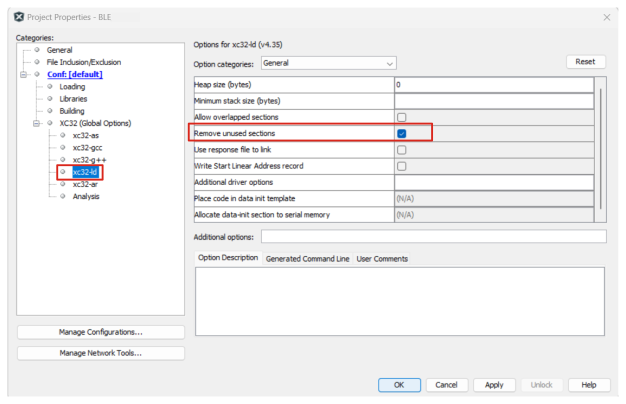
Switch to MPLAB X IDE window and Build Project. The project must compile
successfully. If user encounters the following error “c:166: undefined
reference to `g_adcTiming08” when adding the BLE Stack, enable the
"Remove unused sections" option in the project properties under xc32-ld
options.Figure 6-27. Project Properties
Tab
Figure 6-28. Build Project Icon
Protocol Exchange
The communication protocol exchange between Bluetooth LE Provisioner (mobile app) and the
PIC32 BZ6 Module (Bluetooth LE peripheral) is explained in
Provisioning through Bluetooth® LE section from Related Links.
Following are the additional commands included.
Table 6-11. BLE Provisioning Specific Control
and Command/Response

 Right Click on TIME component on project graph for selecting the timer source (TMR>TC0), select any of the timer. The project graph will resemble the following image.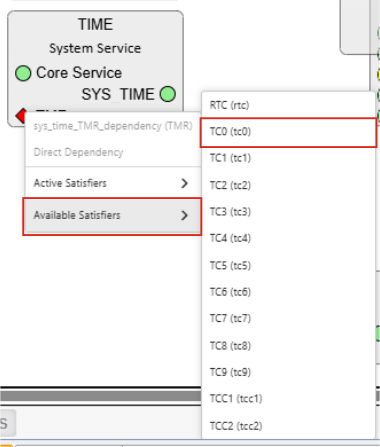
 Open Project Graph, and click on the Device Support, open Configuration Options and,
 Note: This step is applicable only if the device is enabled as a “Sleep End Device (SED)”.