
6.2.5.1 Building and Running the Azure Cloud Demo Application
Building the Application
To build this application, open the project file
(
apps\basic_cloud_demo\firmware\sam_e54_xpro_rnwf_uart.X) in
MPLAB X IDE. For more details on opening the project file in MPLAB X IDE, refer to
the Opening the Project File. The following table provides details on the project file.| Project Name | Description |
|---|---|
sam_e54_xpro_rnwf_uart.X |
|
Running the Application
- Create a Root of Trust Chain
for RNWF Devices:The demo application includes a set of tools in
../apps/azure_cloud/toolsfolder. It enables easy creation of certificate infrastructure and individual device certificates with very minimal user inputs.Note:- On Windows Operating Systems, make sure the GitBash is installed to run these tools.
- These scripts are based on the Azure's Create and Upload Certificates for Testing tutorial.
- Right click and open
the Git Bash in the tools folder
Figure 6-90. Git Bash 
- Run the
create_initial_setup.sh as illustrated in the following
figure. It will request the user to provide the domain suffix and
common name for Root CA.
Figure 6-91. Running create_initial_setup.sh
- Up on successful
execution of above command, following three new folders will be
created
Figure 6-92. Setup Folders 
- Device Certificate
- Run the
create_device_certificate.shto create individual device certificate. It requests the user to provide Subordinate/Intermediate CA folder name and a unique device id (Common Name).Figure 6-93. Unique Device ID  Note:
Note:- Note down the information of device ID or common name for later use in Azure configuration.
- In order
to modify the default subject identifier information,
open the
create_device_certificate.shand update the following macros.
Figure 6-94. create_device_certificate.sh
- On successful
execution of device certificate, a new folder is created inside the
../tools/devcertsfolder as illustrated in following figureNote: Note down the information of certificate and key file names (by default device ID or common name) for use later in the Azure TLS configuration - Use the PC companion
mode of the setup and program the .pem and * .key* files
(highlighted/marked below) using file_upload tools.
Figure 6-95. Certificate and Key File 
- Run the
- Creating a Microsoft Azure
Account and Azure IoT Central Application
- For new users, create a new Azure Account
- Log into the Azure Portal using the new/existing account
- Create an IoT Central
application by clicking on Create a resource>Internet of
Things>IoT Central application
Figure 6-96. Create A Resource 
Figure 6-97. IOT Central Application 
- Under Subscription create a new group (say RNWF) to manage it's resources and cost
- Provide the resource
name and Application URL to view/manage the IoT Central devices
Figure 6-98. IOT Central Application 
- Open the Azure Central Applicaiton and build a
new App
Figure 6-99. Building IOT Application 
Figure 6-100. New Application Details 
- Select the
application and navigate to Permissions>Device connection
groups
Figure 6-101. Application Portal Enrollment 
- Note down the information of ID scope and click + New as illustrated above to create an enrollment group
- Provide a name for
the enrollment group and select Attestation Type as Certificates
(X.509)
Figure 6-102. Creating New Enrollment Group 
- Save the enrollment
group and click on Primary>Manage primary to manage
the Primary certificate and select the subordinate CA
certificate generated in the step 1 (Create a Root of Trust
Chain for RNWF Devices)
subca.crtcertificate inside thesubcafolder.
- Mount the RNWF Add On Board on SAM E54 Xplained Pro evaluation kit at respective headers. For more details about the boards placement in the Curiosity Nano base, see Figure 6-1.
- Connect the debugger USB port on the SAM E54 Xplained Pro evaluation kit to computer using a micro USB cable
- Open the project and launch MCC with Harmony3.
- Configure Home-AP credentials for STA mode, using the Wi-Fi settings configuration. For more details about the Wi-Fi settings configuration, See Figure 3-64.
- Update the Azure
Cloud configuration with following details. For more details about
the Azure Cloud configuration, See Figure 3-70
- ID Scope
noted in step 8 of Creating a Microsoft Azure Account and
Azure IoT Central Application (see Figure 6-101), update this scope ID in Azure Cloud configuration as
illustrated below
Figure 6-103. Scope ID 
- Unique Device
ID (Common Name) noted in step 1 of Device Certificate (see
Figure 6-93), update this Unique Device ID in Azure Cloud
configuration as illustrated below
Figure 6-104. User Name 
Figure 6-105. Publish Topic Name 
- Device
Certificate and Key file names noted in step 2 of Device
Certificate (see Figure 6-95), update this in Azure Cloud configuration as illustrated
below
Figure 6-106. Device Certificate and Key 
- ID Scope
noted in step 8 of Creating a Microsoft Azure Account and
Azure IoT Central Application (see Figure 6-101), update this scope ID in Azure Cloud configuration as
illustrated below
- Generate the code as
illustrated below
Figure 6-107. Generating the Code 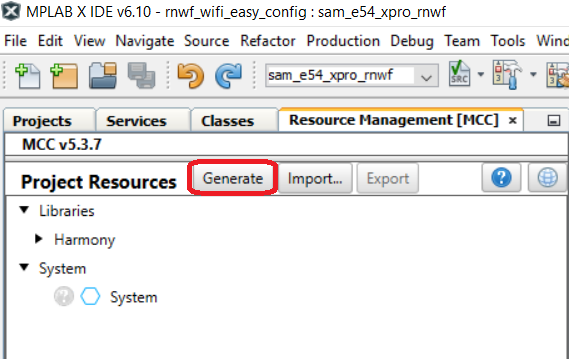
- Build and program the
code to the hardware using MPLABX IDE
Figure 6-108. Programming the Board 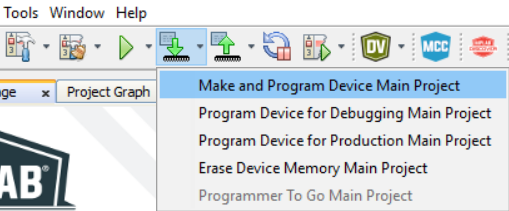
- Open the Terminal
application (for example, Tera Term or PuTTY) on the PC
Connect to the "EDBG Virtual COM Port" and configure the serial settings as follows:
- Baud: 115200
- Data: 8 Bits
- Parity: None
- Stop: 1 Bit
- Flow Control: None
- Press the Reset button on the host board, see Figure 6-70.
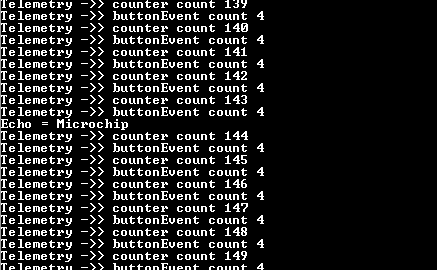
- As the board boots
up, application will list available certificates and keys on RNWF02 board. The board will connect
to Home-AP configured. After this, the demo will attempt to connect
to Azure IoT Hub (using link configured) and starts sending the
telemetry
Figure 6-109. Device Echo Message Log 
- After the successful
connection to Azure IoT Central, the device gets listed in the
Azure Central Applicaiton> Devices view.
Figure 6-110. Device Connection to Azure IoT Central 
- Click on the device
name to view the device About, Overview, Commands, Raw data tabs as
follows
Figure 6-111. Device Details 
- The SW0 press from
the device will be notified to the Azure Cloud in the Raw data
view
Figure 6-112. Raw Data View 