
15.1.5 Programmer Settings and Operations
(Ask a Question)This section describes the FlashPro Express settings and operation.
15.1.5.1 Introduction
(Ask a Question)FlashPro Express supports programming Microchip® FPGAs by connecting multiple programmers to your computer. Additionally, you can program Microchip FPGAs over a network without requiring the programmer hardware to be physically connected to your local computer. When a programmer is connected to a remote machine, you can reserve and use it from your local machine as if it were attached locally.
All of the operations described later in this topic — Programmer Settings, Ping Programmers, Performing a Self-Test, Scanning and Checking a Chain, Enabling and Disabling Programmers, Renaming a Programmer, Removing a Programmer, Selecting and Running an Action — apply to remote programmers in the same way they apply to locally connected programmers.
- Access FPGA programmers from anywhere, including remote offices, lab environments, cloud-based systems, and virtual machines.
- Eliminate the need for Remote Desktop Protocol (RDP) connections.
- Share programmer hardware across multiple users and client applications.
15.1.5.1.1 Working with Local and Remote Programmers
(Ask a Question)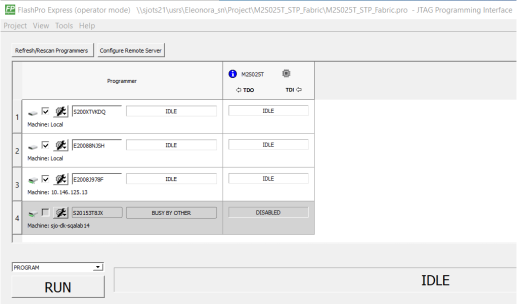
15.1.5.1.2 Configuring and Managing Remote Servers
(Ask a Question)In FlashPro Express, you must create a new project or open an existing project to use the remote functionality, which is available in the dialog box.
The following figure shows the Configure Remote Server Dialog Box view in FlashPro Express.
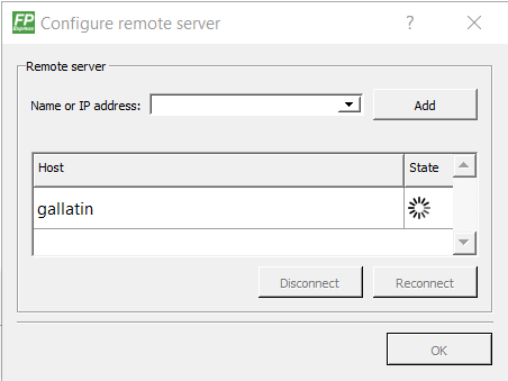
The following are the fields and actions available in the Configure Remote Server dialog box in FlashPro Express:
- Name or IP address
- Indicates the name or the IP address for the remote programmer server.
- Add
- Connects to the specified server and adds it to the Host list.
- Host
- Displays the remote Host(s) that you are connected to.
- State
- Indicates the status of the remote server. If the Host is found, it is confirmed by a green check mark. If the connection has failed, a red cross is shown.
- Disconnect
- Releases all the reserved programmers and disconnects you from the selected Host.
- Reconnect
- Reconnects you to the failed Host selected from the list.
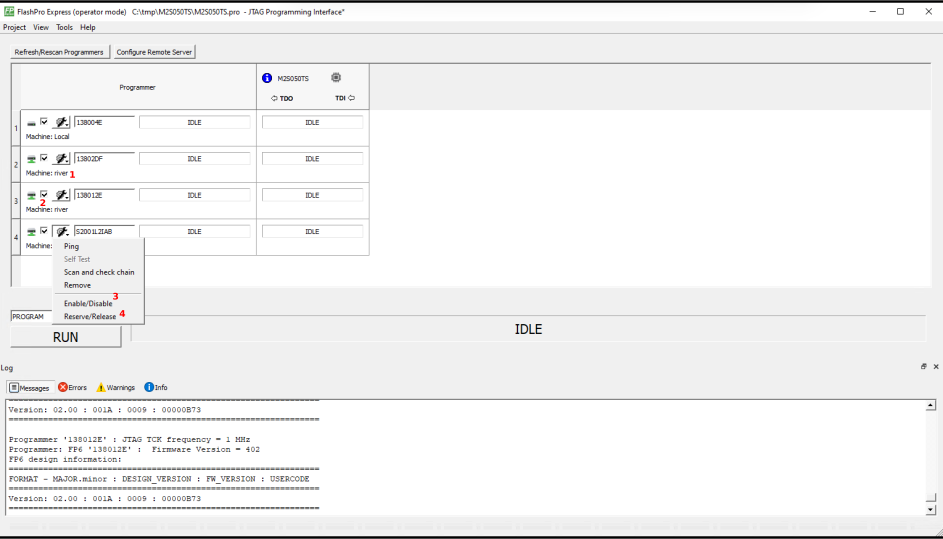
| Option | Name | Description |
|---|---|---|
| 1 | Machine | Machine identifier to which the physical programmer is connected. It could be the host name/IP address of the remote station or if the programmer is connected directly to the local machine, it is indicated as "Local". This option appears for each of the programmers. |
| 2 | Programmer Checkbox | Indicates whether the programmer is enabled and reserved, or
disabled. Works in conjunction with the Enable/Disable and Reserve/Release options (options 3 and 4). If selected, the programmer is reserved under your name. If cleared, the programmer is disabled, but is still reserved by you. |
| 3 | Enable/Disable | Enables or disables the programmer. A checkmark appears in the Programmer Checkbox marking a successful connection with the chosen programmer. |
| 4 | Reserve/Release | Reserves or releases the programmer. A checkmark appears in the Programmer Checkbox marking a successful connection with the chosen programmer. |
15.1.5.2 Programmer Settings
(Ask a Question)You can open the Programmer Settings dialog box for any programmer, whether connected locally or to a remote Host. To view the Programmer Settings dialog box, in the FlashPro Express window, expand Configure Hardware, double click Configure Programmer or right click Configure Programmer and choose Programmer Settings. When you change settings for a remote programmer, FlashPro Express forwards the change to the remote Host before the next operation runs.
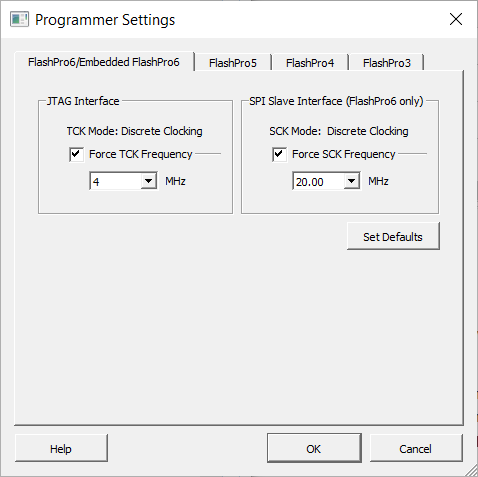
The Programmer Settings dialog box includes options for FlashPro6/5/4/3/3X. Limitations of the TCK frequency for the selected programmer are:
- FlashPro6: 1, 2, 3, 4, 5, 6, 7, 8, 9, 10, 11, 12, 13, 14, 15, 16, 17, 18, 19, 20 MHz
- FlashPro5: 1, 2, 3, 4, 5, 6, 10, 15, 30 MHz
- FlashPro4: 1, 2, 3, 4, 5, 6 MHz
- FlashPro3/3X: 1, 2, 3, 4, 6 MHz TCK frequency limits by target device (refer to the target device data sheet)
During execution, the frequency set by the FREQUENCY statement in the PDB/STAPL file overrides the TCK frequency settings you select in the Programmer Settings dialog box, unless you also select the Force TCK Frequency check box.
Limitation of the SCK frequency for the selected programmer are: 1.00, 2.00, 2.50, 3.33, 4.00, 5.00, 6.67, 8.00, 10.00, 13.33, and 20.00 MHz
15.1.5.2.1 FlashPro5/4/3/3X Programmer Settings
(Ask a Question)For FlashPro5/4/3/3X, if you choose the Force TCK Frequency, select the appropriate MHz frequency. For FlashPro4/3X settings, you can switch the TCK mode between a Free Running Clock and a Discrete Clocking. Use Discrete Clocking when there is a JTAG non-compliant device in a chain with Microchip devices. After selecting, click OK.
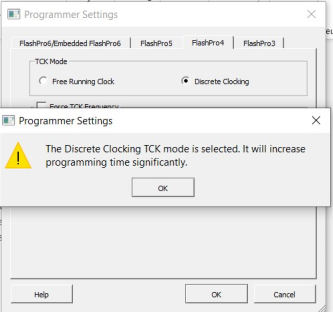
After the pop-up is closed by the user, a warning icon with a message tooltip appears next to the Discrete Clocking radio button. The icon and the tooltip appear when the programmer settings dialog is re-opened.
Default Settings
(Ask a Question)- The Force TCK Frequency option is unchecked to instruct the FlashPro5/4/3/3X to use the TCK frequency specified by the Frequency statement in the PDB/STAPL file(s).
- The FlashPro5/4/3/3X default TCK mode setting is Free running clock.
15.1.5.2.2 TCK Setting for Force TCK Frequency
(Ask a Question)If Force TCK Frequency is checked in the Programmer Setting, the selected TCK value is set for the programmer and the Frequency statement in the PDB/STAPL file is ignored.
15.1.5.2.3 Default TCK Frequency
(Ask a Question)If the IPD/STAPL file or Chain does not exist, the default TCK frequency is set to 4 MHz.
If more than one Microchip flash device is targeted in the chain, the FlashPro Express software passes through all the files and searches for the "freq" keyword and the "MAX_FREQ" Note field. The FlashPro Express software uses the lesser value of all the TCK frequency settings and the "MAX_FREQ" Note field values.
15.1.5.3 Ping Programmers
(Ask a Question)Use Ping to confirm that FlashPro Express can still communicate with a programmer before you run a Self-Test, Scan and Check Chain, or a programming action. Ping queries only the programmer hardware, the FlashPro5/4/3/3X unit itself and does not access the target device on the JTAG chain and does not modify anything.
Right-click a programmer, whether connected locally or to a remote machine and choose Ping. Ping behaves the same way for both: for a remote programmer, FlashPro Express forwards the request to the remote Host and displays the result in the log. A successful ping means the programmer is powered, connected, and responsive; a failure points to a USB, driver, power, or (for a remote programmer) network or Host issue rather than a problem with the job file or the chain.
15.1.5.4 Performing a Self-Test
(Ask a Question)Use Self Test to verify that the programmer hardware itself is operating correctly before you rely on it for a real programming run. Self-test exercises the programmer against the small self-test board that ships with it: the programmer drives its JTAG signals and voltage rails into that known-good reference target and reads back a canned sequence, then reports pass or fail in the log. Self-test does not touch the user's target board and does not modify the design.
Run a self-test when you see intermittent programming errors, unexplained chain errors across multiple boards, after a firmware update, or as a periodic check before a long programming run — a pass result rules out the programmer as the source of the issue.
Before performing a self-test, connect the programmer to the self-test board that came with your programmer. For a remote programmer, attach the self-test board to the remote Host, where the programmer is physically connected. Then right-click the programmer you want to self-test, whether local or remote and choose Self Test. The result is displayed in the log; for a remote programmer, FlashPro Express forwards the request to the remote Host and displays the result returned by that Host.
15.1.5.5 Scanning and Checking a Chain
(Ask a Question)Use Scan and Check Chain to confirm that the JTAG chain on the target board matches the chain configured in the loaded job project before you run a programming action. The programmer walks the JTAG chain, reads the IDCODE of every device in turn, and returns the list of devices found and their order. FlashPro Express then compares what it found against the expected chain (device types, count, and order) and reports pass if they match or fail with specifics (for example, wrong IDCODE, missing device, extra device, wrong order, or an open or short on TDI or TDO) if they do not. The operation is read-only; it does not erase, program, or modify the target device. Run it to verify that the board is wired and powered correctly, to confirm the right job project is loaded for the board in front of you, and to diagnose chain errors before they waste programming time.
The scan chain operation scans and analyzes the JTAG chain connected to the programmers you selected, whether local or remote and checks that the scanned chain matches the chain configured in FlashPro Express. For a remote programmer, the JTAG chain being scanned is the one physically attached to the remote Host; the scan runs on that Host and the result is reported back to your client.
To scan a chain, right-click the programmer you want to scan and choose Scan and Check Chain.
15.1.5.6 Enabling and Disabling Programmers
(Ask a Question)Use the check box next to each programmer in the Programmer column to control whether that programmer is included the next time you click RUN on a programming action. A checked (enabled) programmer is included in the run; an unchecked (disabled) programmer is skipped.
The programmer stays in the list either way. Disabling a programmer is therefore different from removing it: disable when you want to temporarily exclude a unit from a batch programming run (for example, to skip a failing programmer while you troubleshoot, or to program only a subset of the connected programmers in the current run) without losing its configuration; remove when you no longer want the programmer in the session at all.
After loading a job project, whether the programmer is attached to your local computer or to a remote machine, you can check the check box next to a programmer in the Programmer column to enable the programmer or uncheck the check box to disable the programmer. These actions are also available in the right-click menu for each programmer in the programmer column.
For any programmer, the check box controls only the enable/disable state; it does not release the reservation. A disabled programmer remains reserved under your name and is unavailable to other users. To release the reservation and make the programmer available to other users, use Reserve/Release in the programmer's configuration menu.
15.1.5.7 Renaming a Programmer
(Ask a Question)By default, the programmer name is the same as the programmer ID (the serial-number-style identifier burned into the FlashPro unit). The new name is a display label only and is useful when several programmers are connected at once. The rename does not change the programmer's hardware ID, and it is saved with the current job project, so the label is restored the next time you open the same project.
Enter a new programmer name in the Programmer window to rename the programmer. For a remote programmer, the rename is stored in your client application and does not change the programmer name on the remote Host.
15.1.5.8 Removing a Programmer
(Ask a Question)Remove a programmer to take it out of the FlashPro Express programmer list for the current session. When you remove a programmer, FlashPro Express drops it from the programmer list and discards its per-project settings, such as its custom name, TCK frequency override, and enable/disable state.
Remove does not power off, disconnect, or otherwise affect the programmer hardware itself; the physical programmer stays connected, and if you click Refresh/Rescan for Programmers afterward the programmer reappears in the list with default settings. Remove is therefore different from disable. Disable keeps the programmer in the list and preserves its settings but skips it on the next run, while remove takes it out of the list entirely and releases the programmer reserved by you. Use remove when you no longer want the programmer in the session — for example, after physically unplugging a unit, or when swapping the set of programmers managed by the current project.
To remove a programmer, right-click the programmer and choose Remove.
15.1.5.9 Selecting and Running an Action
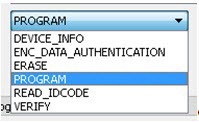
(Ask a Question)Use a programming action to run an operation against the target device on the JTAG chain, the FPGA itself , as opposed to the programmer-level operations described earlier in this topic (Ping, Self Test, and Scan and check chain), which exercise only the programmer hardware. You select the action once from the Programming Action drop-down and then click RUN. FlashPro Express executes that action on every enabled programmer in the list, applies it to each device in the chain whose device die matches the device specified in the project's job file, and writes progress and results to the log for each programmer. The drop-down lists only the actions that are valid for the devices in the loaded job project, so the set of available actions can vary from project to project.
FlashPro Express runs programming actions on the machine where the selected programmer is physically connected: for a local programmer, the action runs on your local machine; for a remote programmer, the action runs on the remote machine, and progress and results are reported back to your client.
FlashPro Express supports the following programming actions:
- DEVICE_INFO: This action queries the device and
gets the information about type and family of device, information about design
programmed on the device (if any), the number of times the device has been
programmed, information about security settings and prints out digests of various
components/segments.Attention: If the erase operation is interrupted for any reason, the cycle count value is lost. However, the device can still be programmed.
- ENC_DATA_AUTHENTICATION: This is visible when each device in the chain contains encrypted bit stream files. Selecting this action checks each bit stream file for authentication.
- ERASE: Erases the programmable fabric and configuration memory on the device, returning it to a blank state. Run ERASE before reprogramming a device with a new design when the job project does not already chain an erase into the PROGRAM action.
- PROGRAM: This action programs the bitstream file
on the device. The resulting programming log contains information about component
digests that are generated while programming the bitstream file as well as digests
that are read out from device after the bitstream has been programmed. The log also
contains the entire bitstream digest that has been precalculated during bitstream
file generation.Attention: The component digests printed during programming differ in value and count from the digests that are read out from the device.
- READ_IDCODE: Reads the JTAG IDCODE of the device and prints it to the log. READ_IDCODE targets the specific device in the chain covered by the job project; it is a lightweight identity check and is narrower than Scan and check chain, which walks the full JTAG chain and validates it against the configured chain.
- VERIFY: Reads back the device contents and compares them against the bitstream file without reprogramming. Use VERIFY to confirm that a previously programmed device still matches the expected bitstream, for example during an incoming-inspection or periodic audit workflow.
15.1.5.10 Remote Programming Server (RPS) Installation Instructions
(Ask a Question)You can make your local machine act as a remote server. This allows other users within the same network to use FlashPro programmers physically connected to it.
The RPS is installed directly with the Libero® SoC Media Installer. Complete the following instructions in the Libero SoC Setup wizard:- Follow the instructions in the wizard from the Welcome to Installation Folder windows.
- In the Select Installation Type window, choose the Custom option.
- In the Select Components window, with other desired components, select the RPS checkbox to include the functionality in the installer.
- In the RPS Server Configuration window, specify the
desired port numbers for programming requests.
- The default ports to accept external connections are 57606 and 57605, which can be changed based on your requirements. These ports must be permitted through the firewall to enable remote access. The Media Installer completes this step for you during the installation.