
3.1 Quick Start
- Insert a compatible PIC32 DIP device
into the socket, as shown in the figure below. Note the orientation of the
device.
Figure 3-1. Board With Correct Device Orientation 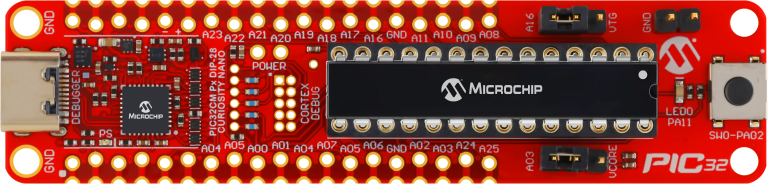 Tip: Use dedicated DIP removal tools to reduce the risk of damaging the device pins when removing it from the socket.
 - Choose your preferred integrated
development environment (IDE):
- MPLAB® Tools for VS Code®
- Partner Toolchains: Microchip supports a range of partner toolchains. For more information and a list of supported tools, visit the Development Tool Partners page.
- For VS Code, follow these steps:
- Download and install VS Code for your operating system.
- Install MPLAB Tools for VS Code.
- Browse and select an example project using MPLAB® Discover .
- Download and open the selected example project in VS Code.
- Connect the PIC32CM Px DIP-28 Curiosity Nano to your computer using a USB cable.
- Program the target device with the example code using MPLAB Tools for VS Code.
- Refer to Learn MPLAB® Extensions for Microsoft® Visual Studio Code for tips and tricks on using the extensions.
Next Steps
- Explore additional example projects in MPLAB® Discover and try customizing them for your application.
- Use the PIC32CM Px DIP-28 Curiosity Nano with a Curiosity Nano Base Board:
- Monitor data output:
- Use the integrated terminal in VS Code, or your preferred terminal, to access the UART interface on your board
- For advanced data monitoring and visualization, use MPLAB Data Visualizer
Tip: Click the following link for the free Microchip
University course: Rapid Prototyping with the Curiosity Nano
Platform.
 | The Curiosity Nano platform enables rapid prototyping and includes built-in debugging capabilities for working with new microcontrollers. |