
6.1.7.1 Building and Running the OTA Demo
Building the Application
To build this application, open the project file (wireless_apps_rnwf\apps\ota_demo\firmware\azure_ota_demo_sam_e54_xpro_wincs02.X) in MPLAB X IDE. For more details on opening the project file in MPLAB X IDE, refer to the Opening the Project File. The following table provides details on the project file
| Project Name | Description |
|---|---|
azure_ota_demo_sam_e54_xpro_wincs02.X |
|
Running the Application
- Mount the WINCS02 Add On Board on SAM E54 Xplained Pro evaluation kit at respective header. For more details about the boards placement in the SAM E54 Xplained host board, see Figure
- Connect the debugger USB port on the SAM E54 Xplained Pro evaluation kit to computer using a micro-USB cable.
- Open the project and launch MCC Harmony3.
- Configure the WINCS02 Wi-Fi® ProvisionMode credentials, using the WINCS02 Wi-Fi configuration options. For more details about the Wi-Fi settings configuration, See Wi-Fi Settings: ProvisionMode
- Please follow the procedures provided in the Azure Cloud demo and MQTT service documentation for configuring settings, generating Azure-related certificates, and uploading these certificates to the Azure portal.
- Configure the OTA Server Socket, File Name and OTA Time Out in OTA System service.
- Please follow the procedures mentioned in the Ota cert create to create OTA-related certificates.
- Generate the code as illustrated below.
Figure 6-32. Generating the code 
- Build and program the code to the
hardware using MPLABX IDE.
Figure 6-33. Programming the board 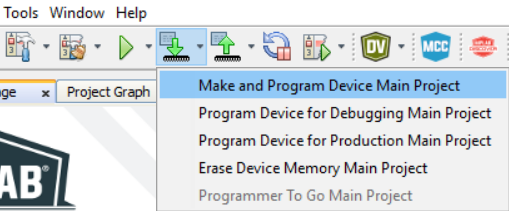
- Open the Terminal application (for example, Tera Term or PuTTY) on the PC
- Connect to the "EDBG Virtual COM
Port" and configure the serial settings as follows:
- Baud: 115200
- Data: 8 Bits
- Parity: None
- Stop: 1 Bit
- Flow Control: None
Device Functionalities
- Provisioning
- Cloud Connectivity
- OTA Update
-
Provisioning
When the provision mode command is issued, the device enters Provision Mode, enabling users to connect via the mobile app and provide home Wi-Fi credentials. Upon successful provisioning, the device switches to Station Mode and connects to the home network.
Note: You may also connect to the home access point directly using the specified command below.Steps to Provision the device:
- Install the WiFiProv Mobile application in Android Mobile from the playstore.
- Command: prov
<REGDOMAIN> start
- REGDOMAIN: GEN, USA, EMEA
Figure 6-34. OTA_prov_mode 
- REGDOMAIN: GEN, USA, EMEA
- Connect Mobile
WiFi to AP shown in the logs :
- SSID: DEMO_AP_SOFTAP
- Password: password
- Turn ON the location on the Mobile.
- After
establishing a successful connection between mobile phone and
the device. Open WiFIProv Mobile Application and select
Unsecured Socket. Provide below details and Click on Connect:
- Server IP Address : 192.168.1.1
- Server
Port Number : 80
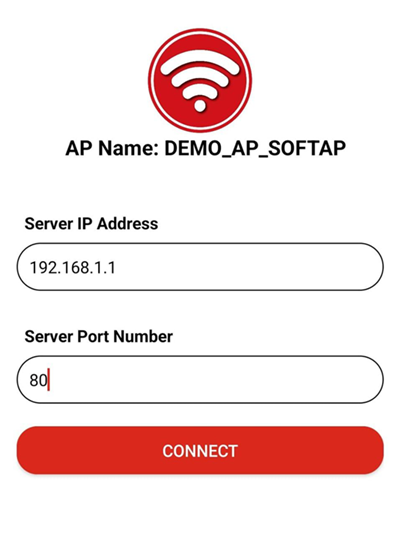
- On the next page,
Select the AP to which the WINCS02 should be connected.
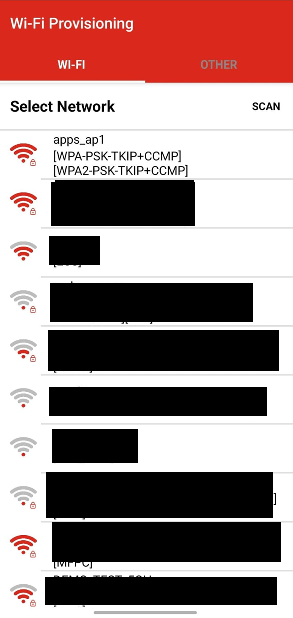
- Provide password
of the AP and Click on Send.
Image
- After successful
provisioning, the board will connect to the AP and get an IP
address. This IP address is displayed on the serial console as
illustrated below.
Figure 6-35. OTA_prov_complete 
-
Cloud Connectivity:
By issuing the azure demo command, the WINCS02 board operates as an MQTT client, facilitating communication with Azure IoT applications. It utilizes built-in X.509 certificates to ensure secure TLS handshakes. Users simply need to enroll the device on Azure establish the connection.
Steps to Connect to Azure Cloud:
- After successful provisioning, the device will be connected to WiFi.
- The access point (AP) must have internet access to connect to the Azure cloud.
- If the device is not provisioned and the user wants the device to connect to the AP directly without provisioning steps, please follow the instructions in Annexure A(STA mode Commands : Link pending).
- If the device is
connected to AP and has valid IP, follow below commands.
- Command: azure connect
- Sending the data to
cloud:
- Once the device
is connected to Azure, press SW0 to transmit the button press
data to the Azure cloud
Figure 6-36. Azure logs 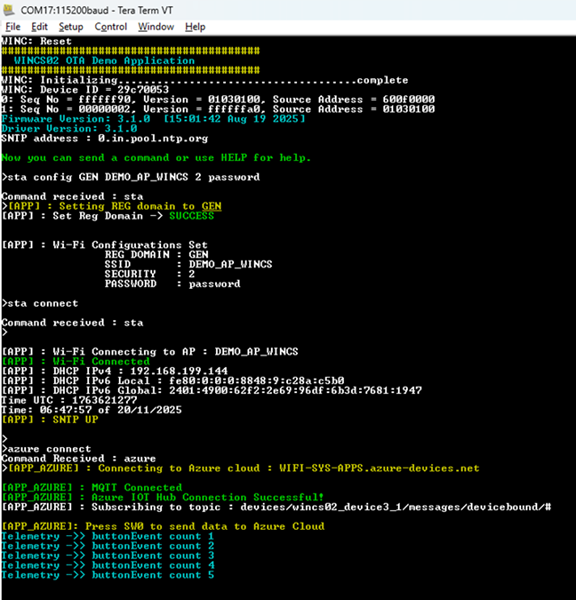
- Once the device
is connected to Azure, press SW0 to transmit the button press
data to the Azure cloud
-
OTA Update:
When ota commands are issued, the example application performs an OTA firmware update for WINCS02. The update is executed by downloading the firmware image from a user-defined OTA HTTPS server.
- Non-TLS OTA FW
Download:
- Download the latest WINCS02 firmware from: here.
- Unzip the downloaded firmware package, then navigate to the “NC_release_x.x.x\bin” directory. Copy the file named wincs02_ota.bin and replace/paste it into the “wireless_apps_rnwf\apps\ota_demo\tools” folder.
- Open the command
prompt and navigate to
“wireless_apps_rnwf\apps\ota_demo\tools” folder.
Figure 6-37. Command Prompt 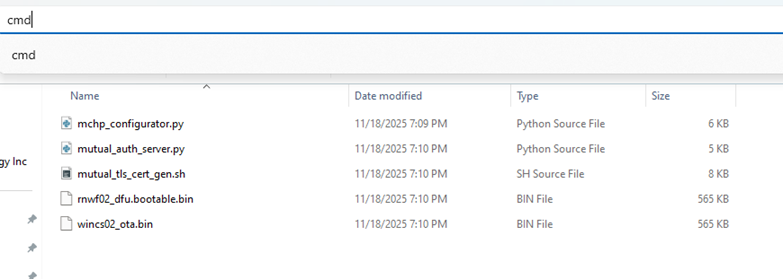
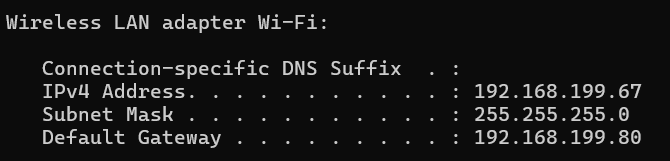
- Connect the PC to
the same AP as WINCS02 is connected and give command ipconfig
(in windows) and copy IP address of the
PC.
- Start the server
by giving command : python -m http.server
Figure 6-38. http server 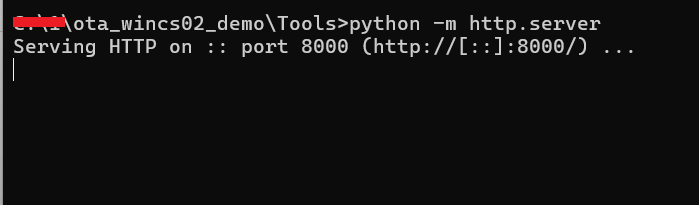
- The device is now
booted up with firmware present at "600f0000" address, as you
can see in the following logs.

- Give the command
to configure OTA credentials. Copy the IP address of the PC
where the server is running to following command to configure
non-TLS OTA .
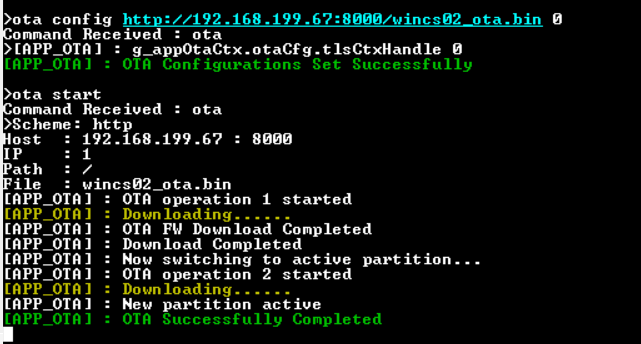
- Syntax: ota config http://<IP_address>:<PORT>/ota_file_name 0
- Command
Ex: ota config http://192.168.11.36:8000/wincs02_ota.bin 0
Figure 6-39. OTA configurations 
- Give command :
ota start to start downloading of FW image and boot
the WINCS02 with the new FW. Wait for OTA download
completion.
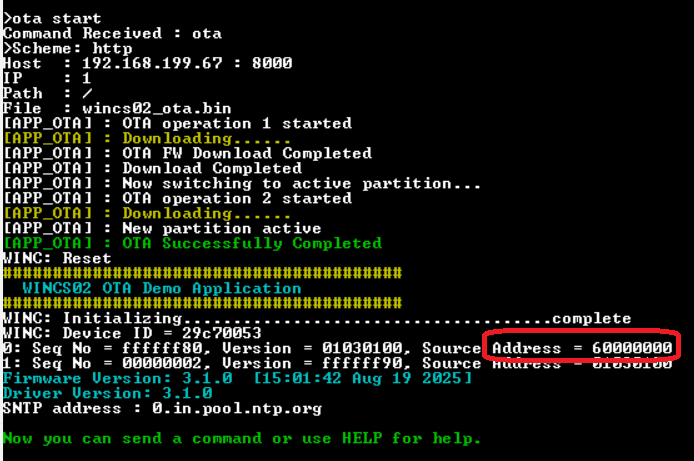
- Reboot the
device.The device boots up with the newly downloaded firmware
(present at "60000000). As you can see in the logs below, the
address has been updated.
- TLS OTA FW
Download:
- Download the latest WINCS02 firmware from: here.(If you have already downloaded the firmware and placed it in the specified folder, you may skip steps 1 and 2).
- Unzip the downloaded firmware package, then navigate to the “NC_release_x.x.x\bin” directory. Copy the file named wincs02_ota.bin and replace/paste it into the “wireless_apps_rnwf\apps\ota_demo\tools” folder.
- Open the command
prompt and navigate to
“wireless_apps_rnwf\apps\ota_demo\tools”
folder.
- Connect the PC to
the same AP as WINCS02 is connected and give command ipconfig
(in windows) and copy IP address of the
PC.
- Start the server
by giving command: python3 mutual_auth_server.py
Figure 6-40. https server 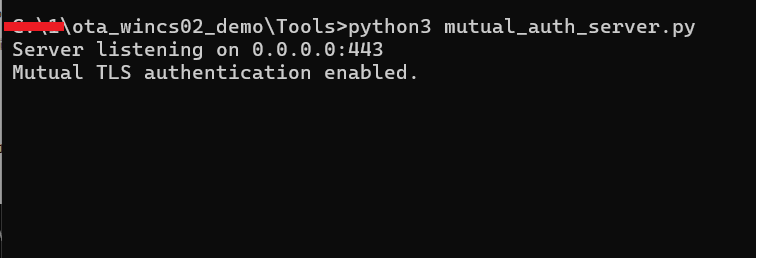
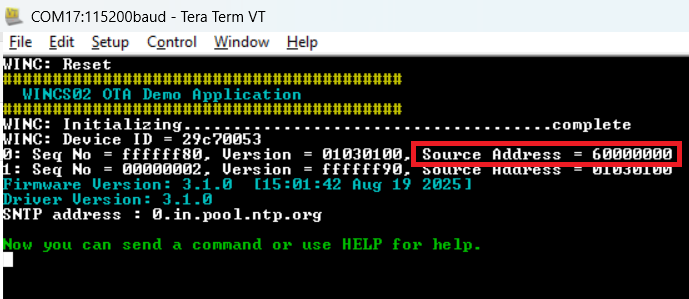
- The device is now
booted up with firmware present at "60000000" address, as you
can see in the following logs.
- Give the command
to configure TLS OTA credentials. Copy the IP address of the PC
where the server is running to device to configure OTA
Credentials.
- Syntax: ota config https://<IP_address>:<PORT>/ota_file_name 1
- Command
Ex: ota config https://192.168.199.67:443/wincs02_ota.bin
1
Figure 6-41. ota https configurations 
- Give command :
ota start to start downloading of FW image and boot
the WINCS02 with the new FW. Wait for OTA download
completion.(The following image also includes server
logs)
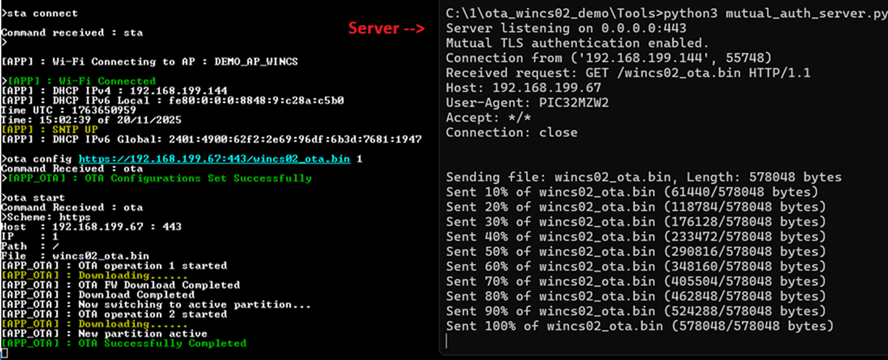
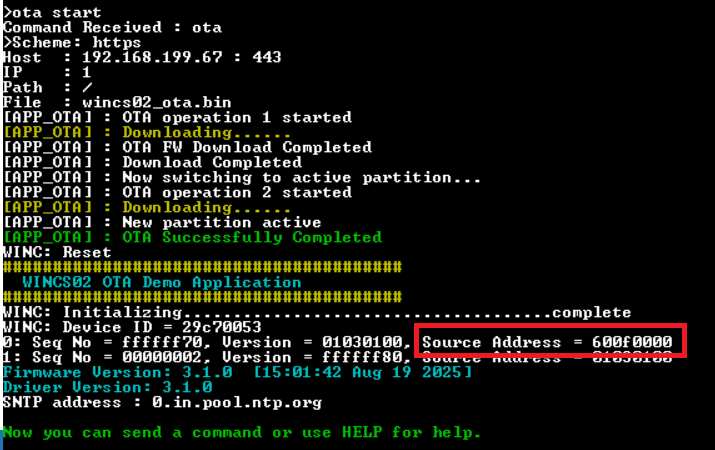
- Reboot the
device.The device boots up with the newly downloaded firmware
(present at "600f0000). As you can see in the logs below, the
address has been updated.
- Non-TLS OTA FW
Download:
ANNEXTURE A: (STA mode Commands)
To connect Device to AP :
- To configure AP Credentials
:
- OPEN mode
security:
- sta config
<REG_DOMAIN> <SSID> <SECURITY>
- REG_DOMAIN : GEN, USA, EMEA
- SECURITY : 0-Open
- sta config
<REG_DOMAIN> <SSID> <SECURITY>
- Other WPA2/WPA3
security:
- sta config
<REG_DOMAIN> <SSID> <SECURITY>
<PASSWORD>
- <REG_DOMAIN> : GEN, USA, EMEA
- <SECURITY> : 2-WPA2 Mixed, 3-WPA2, 4-WPA3 Trans, 5-WPA3
- sta config
<REG_DOMAIN> <SSID> <SECURITY>
<PASSWORD>
- OPEN mode
security:
- To connect to AP with
configured Credentials :
- sta connect
- To disconnect from AP :
- sta disconnect
- To get help :
- sta help