3.2 Atmel | START Project
Overview in Atmel Studio
This section will provide a walk-through of the Atmel | START
project generated in Atmel | START Project
Creation. The generated project contains peripheral driver functions and
files, as well as main() function that initializes all drivers
included in the project.
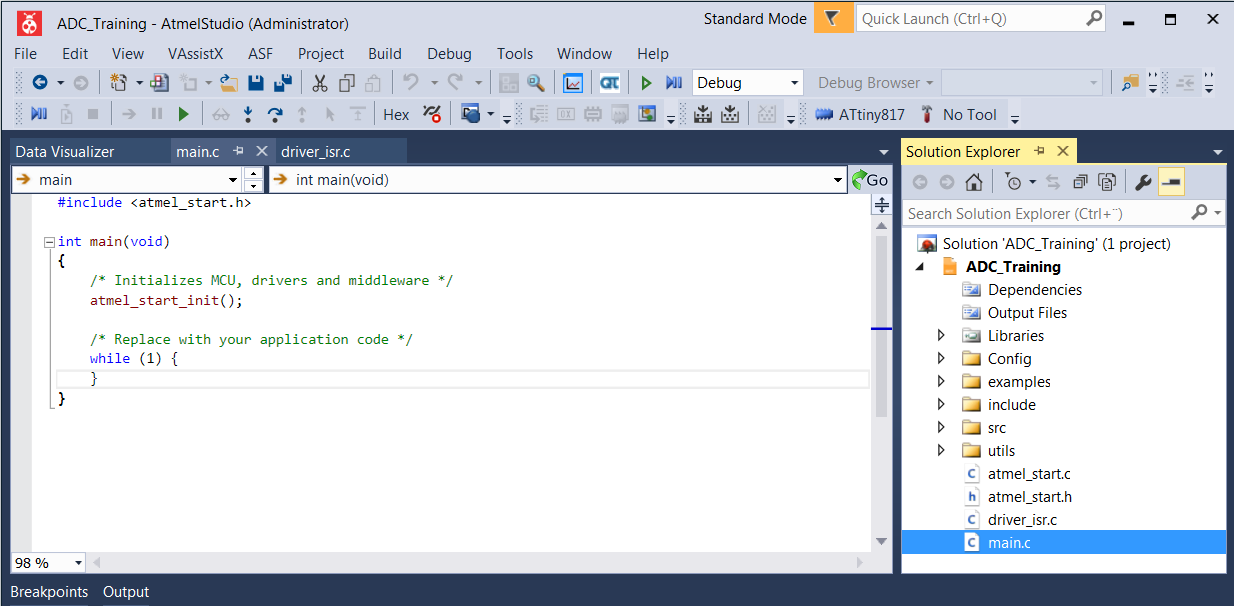
Figure 3-9. Project Overview
Info: The main
window, as seen in Figure 3-9, shows the generated code for the main.c file. On the
right side is the Solution Explorer window, which contains the folders and files
generated by Atmel | START:
The Config folder contains the
clock configuration. The main clock is configured to 5 MHz and is defined by #define F_CPU 5000000 in clock_config.h.
Header and source files of the drivers
are located in the src and include folders. For example, the
adc_basic.c and usart_basic.c files contain the drivers which will be used
for the two modules in the coming sections.
The utils folder contains files
that define some functions to be commonly used by the drivers and application.
In the atmel_start.c file, the
atmel_start_init() function initializes the MCU,
drivers, and middleware in the project.
When interrupts are enabled in the
project's configuration, the driver_isr.c file contains the interrupt service
routines (ISRs).
Todo: Get to know
the structure of the Atmel | START project.
Open the main.c file, by
double-clicking it from the Solution Explorer window.
Go to the implementation of atmel_start_init() by
Hover over atmel_start_init().
Right-click → Goto
Implementation
Info: A menu, showing the different
locations, will appear.
Jump to where the function is
implemented by selecting the first option from the menu.
right-clicking → Goto Implementation
Go to the implementation of system_init() by
Hover over system_init().
Right-click → Goto
Implementation
Info: A menu, showing the different
locations, will appear.
Jump to where the function is
implemented by selecting the first option from the menu.
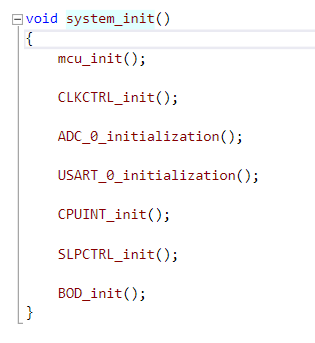
Info: The implementation of
system_init(), as shown in Figure 3-10, should now be visible in Atmel Studio's editor
window.
Figure 3-10. system_init() Function
Info:
The function mcu_init() enables the internal pull-up resistor on all pins to reduce
power consumption.
All driver initialization functions
are called from the system_init() function.
All the module initialization
functions can be right-clicked in the same way as described above to see how each
module is initialized. For example, ADC_0_initialization() and USART_0_initialization() configures the pins and initializes the
registers for the ADC and USART module respectively.
Go to the implementation of USART_0_initialization() by
Hover over USART_0_initialization().
Right-click → Goto
Implementation
Info: A menu, showing the different
locations, will appear.
Jump to where the function is
implemented by selecting the first option from the menu.
Info: The implementation of
USART_0_initialization(), as shown in Figure 3-11, should now be visible in the Atmel Studio
editor window.
Figure 3-11. USART_0_initialization()
FunctionFigure 3-11 shows the initialization code for the USART module, where the
PB2 and PB3 pins are configured for the TX and RX transmission.
Note: In this training, only TX transmission is
used.
Result: The Atmel | START project overview is completed.
The online versions of the documents are provided as a courtesy. Verify all content and data in the device’s PDF documentation found on the device product page.

 Info:
Info: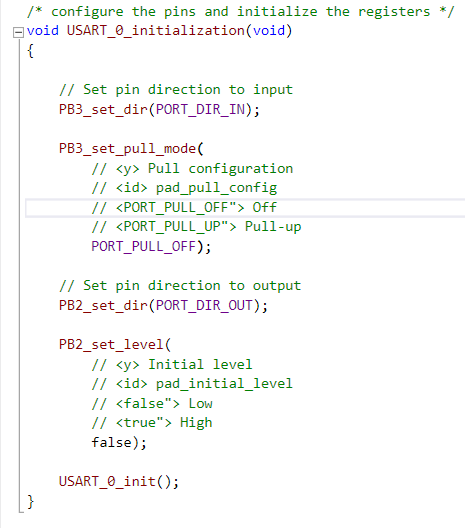 Note: In this training, only TX transmission is used.