
3.1.4 BLE Fitness Tracker with PIC32CX SG61 Curiosity Ultra Evaluation Board
Description
The application demonstrates a solution based on Microchip products for the health care industry and wearable products. The application displays heart rate readings on a display and posts this Heart Rate data to Microchip Bluetooth Data (MBD) android mobile application via BLE (Bluetooth Low Energy).
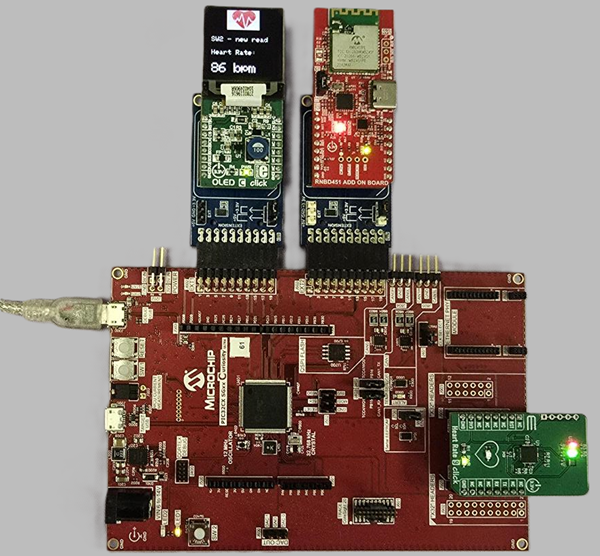
The Mikro Elektronika Heart Rate 9 click board is used to read the heart pulse. Mikroelektronika OLED C Click display is used for displaying the heart rate. RNBD451PE Add On Board using the RNBD451 Bluetooth module is used to send the heart rate data over BLE.
The Heart Rate 9 click introduces Microchip's proprietary method of measuring multiple signals in a body using pseudorandom binary sequence generation and phase division multiplexing This algorithm for processing data from the sensor and it can send data for 3 different diodes (green, ir, red) who give out a diagram of the heartbeat and its frequency per minute.
The host MCU PIC32CX SG61 is interfaced with the Heart Rate 9 click over the USART interface, the RNBD451PE Bluetooth module over UART and the OLED C click over SPI Interface.
Modules/Technology Used
- Peripheral Modules
- SysTick
- EIC
- SERCOM (SPI)
- SERCOM (USART)
- EVSYS
- RNBD Driver
- STDIO Library
Hardware Used
Software/Tools Used
This project has been verified to work with the following versions of software tools:
Refer Project Manifest present in harmony-manifest-success.yml under the project folder firmware/src/config/pic32cx_sg61_cult.
- Refer the Release Notes to know the MPLAB X IDE and MCC Plugin version.
- Install Microchip Bluetooth Data Android App in the Android mobile or
- Install Microchip Bluetooth Data iOS App in the iOS mobile
Because Microchip regularly updates tools, occasionally issue(s) could be discovered while using the newer versions of the tools. If the project does not seem to work and version incompatibility is suspected. It is recommended to double-check and use the same versions that the project was tested with. To download original version of MPLAB Harmony v3 packages, refer to document How to Use the MPLAB Harmony v3 Project Manifest Feature (DS90003305).
Setup
- Mount the Heart Rate 9 click board on the mikro bus connector of PIC32CX SG61 Curiosity Ultra Evaluation Board.
- Mount the OLED C click on one mikroBUS adapter and then connect the adapter to EXT 1 extension header.
- Mount the RNBD451PE Add On Board on one mikroBUS adapter and then connect the adapter to EXT 2 extension header.
- Power the PIC32CX SG61 Curiosity Ultra
Evaluation Board from a Host PC through a Type-A male to Micro-B USB cable connected to
Micro-B port (J300) labeled DEBUG USB.
Programming hex file
The prebuilt hex file can be programmed by following the below steps.
- Open MPLAB X IDE.
- Close all existing projects in IDE, if any project is opened.
- Go to File -> Import -> Hex/ELF File.
- In the Import Image File window,
- Create Prebuilt Project,
- Click the Browse button to select the prebuilt hex file, located into the hex folder in the downloaded zip file (pic32cx_sg61_fitness_tracker/hex/pic32cx_sg61_cult.X.production.hex).
- Select Device as PIC32CX1025SG61128.
- Ensure the proper tool is selected under Hardware Tool and click on Next button.
- Select Project Name and Folder,
- Select appropriate project name and folder and click on Finish button
- Create Prebuilt Project,
- In MPLAB X IDE, click on Make and Program Device button to program the device.
- Follow the steps in Running the Demo section below.
Programming/Debugging Application Project
- Open the project (pic32cx_sg61_fitness_tracker/firmware/pic32cx_sg61_cult.X) in MPLAB X IDE.
- Ensure PIC32CX SG61 Curiosity Ultra is selected as hardware tool to program/debug the application.
- Build the code and program the device by clicking on the Make and Program Device button in MPLAB X IDE tool bar.
- Follow the steps in Running the Demo section below.
Running the Demo
Before proceeding, install the Microchip Bluetooth Data app on a Smartphone.
- Enable Bluetooth and location from Smartphone settings.
- Perform reset by unplugging and re-plugging the power cable of PIC32CX SG61 Curiosity Ultra Evaluation Board.
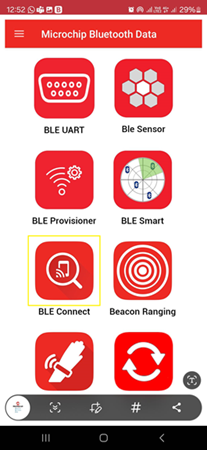
- Open the Microchip Bluetooth Data
(MBD) app on the smartphone.
- Tap on Bluetooth Smart icon on the
dashboard. If prompted, allow the application to turn on Bluetooth.
- After power-up, the application displays the Microchip logo on the OLED C click board and initializes the bluetooth module if necessary, and the heart rate sensor.
- The two LEDs (LED1 and LED2) on the PIC32CX SG61 Curiosity Ultra Evaluation Board will toggle until initialization finishes.
- After successful initialization of the heart rate sensor, two integrated LEDs on the Heart Rate 9 click lights up.
- On the OLEC C display a message is shown that the application is initializing.
- After the application initializes, a message to put the finger on the sensor and press the SW2 switch is shown.
- LED0 on the PIC32CX SG61 Curiosity Ultra Evaluation Board will switch OFF.
- LED1 on the PIC32CX SG61 Curiosity Ultra Evaluation Board will switch ON.
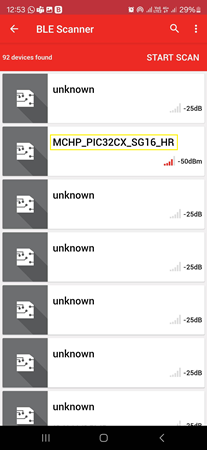
- Scan for Bluetooth devices by tapping START SCAN option on the MBD APP.
- The RNBD451PE device should appear as
MCHP_PIC32CX_SG16_HR in the list of Bluetooth devices.
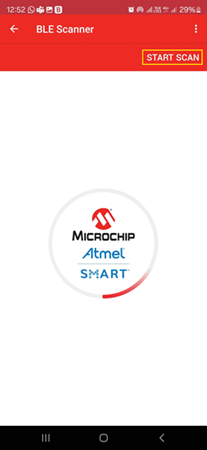
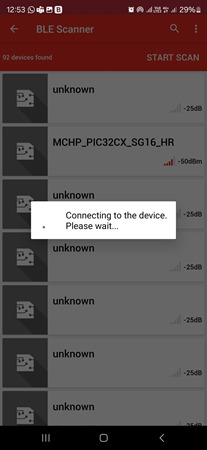
- Stop the scan and connect the MCHP BLE
device by clicking on MCHP_PIC32CX_SG16_HR. This will establish a connection
between the MBD BLE application and the RNBD451PE BLE device.
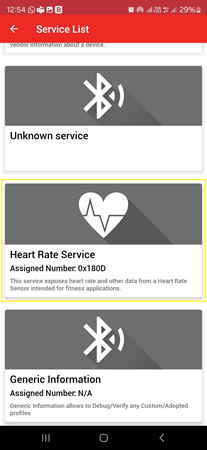
- Once BLE device is connected, the application shows the different services screen.
Scrolll down and tap on the Heart Rate Service, it will redirect to Sensor
Location screen.
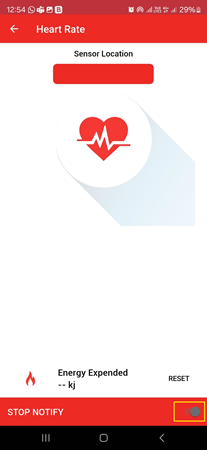
- In the bottom right corner of the Sensor Location screen, disable and enable the
Notify Button.

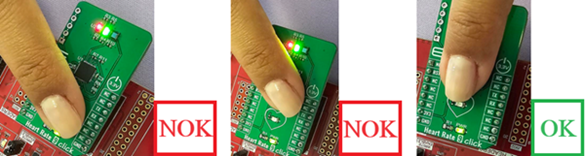
- Place and keep the finger on Pulse Detection Indicator on the heart rate 9 click sensor as shown in the figure below.
- Observe the red LED in the middle of the
heart lits shortly at short intervals of time. This would be the indication the sensor is
correctly reading the pulse.
- Press on SW2 to read the sensor.
- LED0 on the PIC32CX SG61 Curiosity Ultra Evaluation Board will switch ON.
- LED1 on the PIC32CX SG61 Curiosity Ultra Evaluation Board will switch OFF.
- Wait till the LED0 on PIC32CX SG61 Curiosity Ultra Evaluation Board goes OFF and LED1 goes ON.
- The user can more reads by clicking SW2
without removing the finger from the sensor. Note: Make sure smartphone screens are not turned off and do not switch to any other App(s) on the smartphone.
- The heart rate value (in bpm - beats per
minute) should be displayed on the Sensor Location screen as shown in the image
below.
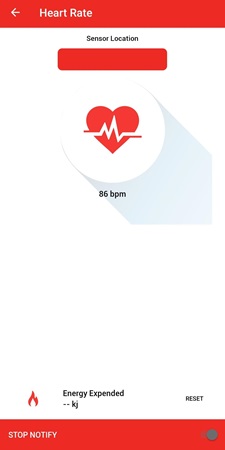
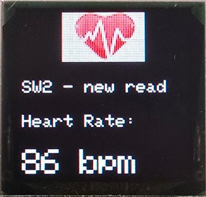
- Also, the same heart rate value should be
displayed on the OLED C display.
Running the Demo without BLE
- Follow the same steps mentioned above, into the Running the Demo section, skipping the steps that are mentioning the Phone Bluetooth Application.
Comments
- Place the index finger gently on the heart rate 9 click sensor, do not push or put pressure on the sensor (the heart rate values may not be accurate).
- Make sure the smartphone screen is not turned off when reading Heart Rate Sensor data using the MBD smartphone APP and also, do not switch to any other smartphone App(s).
- Reference Technical Briefs:
- Video references:
- This application demo builds and works
out of box by following the instructions above in Running the Demo section. If the
user needs to enhance/customize this application demo, should use the MPLAB Harmony v3
Software framework. Refer links below to setup and build the applications using MPLAB
Harmony.
- How to Setup MPLAB Harmony v3 Software Development Framework (DS90003232).
- How to Build an Application by Adding a New PLIB, Driver, or Middleware to an Existing MPLAB Harmony v3 Project (DS90003253).
- How to Set up the Tools Required to Get Started with MPLAB® Harmony v3 and MCC
- Create a new MPLAB Harmony v3 project using MCC
- Update and Configure an Existing MHC-based MPLAB Harmony v3 Project to MCC-based Project