
1.2.1 SAM E54 Xplained Pro Evaluation Kit: Building and Running the I2C Fail Safe Bootloader
Building the Application
Path of the application within the repository is apps/i2c_fail_safe_bootloader/.
To build the application, refer to the following table and open the project using its IDE.
Bootloader Application
| Project Name | Description |
|---|---|
| bootloader/firmware/sam_e54_xpro.X | MPLAB X Project for SAM E54 Xplained Pro Evaluation Kit |
Test Application
| Project Name | Description |
|---|---|
| test_app/firmware/sam_e54_xpro.X | MPLAB X Project for SAM E54 Xplained Pro Evaluation Kit |
Setting Up SAM E54 Xplained Pro Evaluation Kit
-
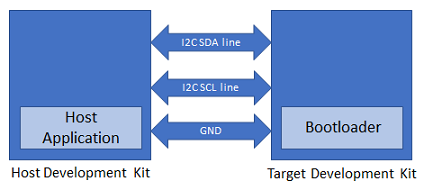
SAM E54 Xplained Pro Evaluation Kit is used for both Host development kit and Target development kit
-
Connect the I2C SDA line Pin 11 (SERCOM7 PAD/PD08) on EXT3 of the Host development kit to the I2C SDA line Pin 11 (SERCOM3 PAD/PA22) on EXT1 of the Target development kit
-
Connect the I2C SCL line Pin 12 (SERCOM7 PAD/PD09) on EXT3 of the Host development kit to the I2C SCL line Pin 12 (SERCOM3 PAD/PA23) on EXT1 of the Target development kit
-
Connect a ground wire between the Host development kit and Target development kit
-
Connect the Debug USB port on the Host development kit to the computer using a micro USB cable
-
Connect the Debug USB port on the Target development kit to the computer using a micro USB cable
Running the Application
-
Open the bootloader project bootloader/firmware/sam_e54_xpro.X in the IDE.
-
Build and program the application using the IDE on to the Target development kit.
- LED0 will be turned-on to indicate that bootloader code is running on the target
- LED0 will also turn on when the bootloader does not find a valid application; i.e., the first word of the application (stack pointer), contains 0xFFFFFFFF
-
Open the NVM host application project host_app_nvm/firmware/sam_e54_xpro.X in the IDE.
-
Build and program the NVM host application using the IDE on to the Host development kit.
-
The prebuilt combined bootloader and application HEX header file host_app_nvm/firmware/src/test_app_images/image_pattern_hex_sam_e54_xpro_bootloader_app_merged.h will be programmed to the Target development kit
-
This must be programmed once to program both bootloader and application into the inactive Flash bank
-
-
Open the Terminal application (e.g., Tera Term) on the computer.
-
Configure the serial port settings for Target development kit as follows:
- Baud: 115200
- Data: 8 Bits
- Parity: None
- Stop: 1 Bit
- Flow Control: None
-
Press the Switch SW0 on the Host development kit to trigger programming of the binary.
-
Once the programming is complete:
-
LED0 on the Host development kit will be turned on indicating success
-
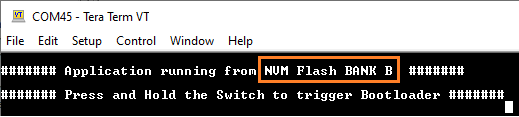
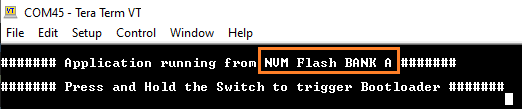
LED0 on the Target development kit should start blinking and the user should see below output on the console
- The NVM Flash Bank can be BANK A or BANK B based on from where the test application is running
-
-
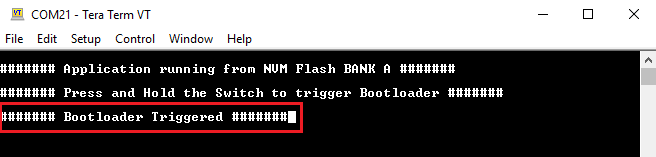
Press and hold the Switch SW0 on the Target development kit to trigger Bootloader from test application.
- This is to program the application binary in other bank and the user should see below output
-
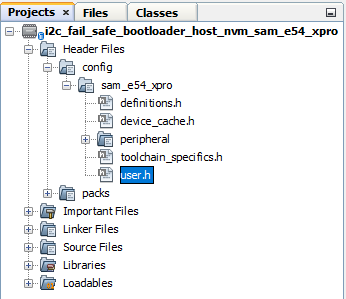
To program the prebuilt application image host_app_nvm/firmware/src/test_app_images/image_pattern_hex_sam_e54_xpro.h to the inactive bank of Target development kit, open the user.h file of the NVM host application project host_app_nvm/firmware/sam_e54_xpro.X as shown below:
-
In the user.h file update the APP_HEX_HEADER_FILE and APP_IMAGE_START_ADDR values as mentioned below.
#define APP_HEX_HEADER_FILE         "test_app_images/image_pattern_hex_sam_e54_xpro.h"

#define APP_IMAGE_START_ADDR        0x82000UL
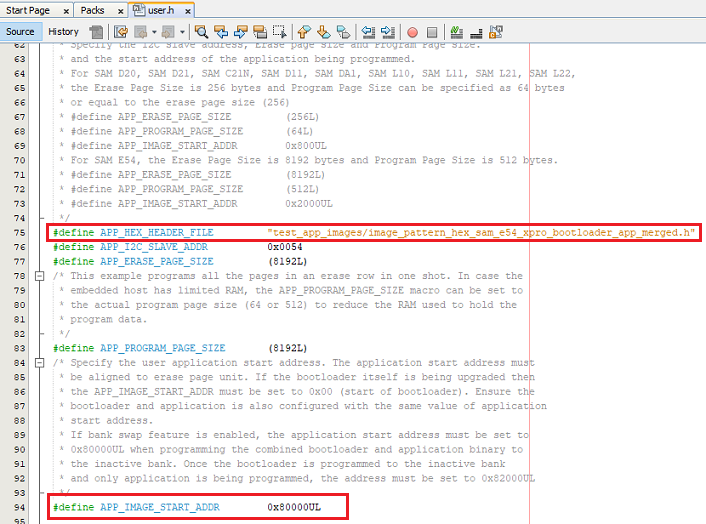
- APP_HEX_HEADER_FILE: Relative path to the generated header file containing the application hex image in an array
- APP_I2C_SLAVE_ADDR: I2C client address
- APP_ERASE_PAGE_SIZE: Erase page size of the target (target = MCU being programmed)
- APP_PROGRAM_PAGE_SIZE:
Program page size of the target (target = MCU being programmed)
- The macro can either be set to the program page size or can be set to the size of the erase page size of the target
- In the demo example, the macro is set equal to the size of the erase page
- On embedded host where RAM is limited, the macro may be set to the actual program page size to reduce the RAM used to hold the program data
- APP_IMAGE_START_ADDR:
User application start address
- It must be set to 0x80000UL when programming the combined bootloader and application binary to the inactive bank
- It must be set to 0x82000UL when programming the application binary only to the inactive bank
-
Build and program the NVM host application using the IDE on to the Host development kit.
-
On the Target development kit (the board being programmed), press and hold the Switch SW0 and then press Reset button or Power cycle to force trigger bootloader at startup.
- LED0 will be turned-on to indicate that bootloader code is running on the target
-
Press Reset button on the Host development kit to program the application binary.
-
Repeat Steps 7-8 once.
- The user should see other Bank in console displayed compared to first run
Additional Steps (Optional)
Generating Hex Image Pattern for an Application to be Bootloaded
-
To bootload any application other than host_app_nvm/firmware/src/test_app_images/image_pattern_hex_sam_e54_xpro.h refer to the Configuring an Application to be Bootloaded for Cortex-M Based MCUs.
-
Build the application project to generate the binary (Do not program the binary).
-
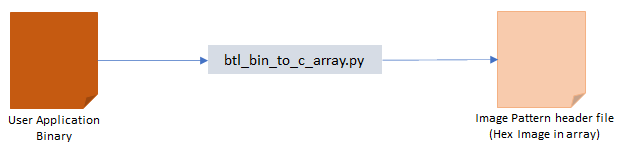
Convert the generated binary (.bin file) to a header file containing the image data in a C style array:
- On a Windows machine, open the command prompt and run the btl_bin_to_c_array utility to generate a header file containing the image data in an array
python <harmony3_path>/bootloader/tools/btl_bin_to_c_array_gen.py -b <binary_file> -o <harmony3_path>/bootloader_apps_i2c/apps/i2c_fail_safe_bootloader/host_app_nvm/firmware/src/test_app_images/image_pattern_hex_sam_e54_xpro.h -d same5x
-
Once done, repeat the applicable steps mentioned in Running the Application.
Generating Hex Image Pattern for Combined Bootloader and Application Binary
-
Launch MCC for the bootloader project bootloader/firmware/sam_e54_xpro.X.
-
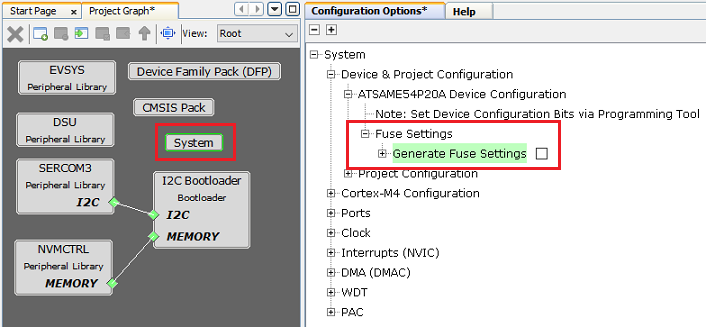
Select System component from the project graph and disable fuse settings.
-
Disable Fuse Settings:
- Fuse settings needs to be disabled for the bootloader which will be bootloaded as the fuse settings are supposed to be programmed through programming tool
- The fuse settings are not programmable through firmware
- Enabling the fuse settings increases the size of the binary when generated through the hex file
-
Regenerate the project.
-
Specifying post build option to automatically generate the binary file from hex file once the build is complete.
${MP_CC_DIR}/xc32-objcopy -I ihex -O binary ${DISTDIR}/${PROJECTNAME}.${IMAGE_TYPE}.hex ${DISTDIR}/${PROJECTNAME}.${IMAGE_TYPE}.bin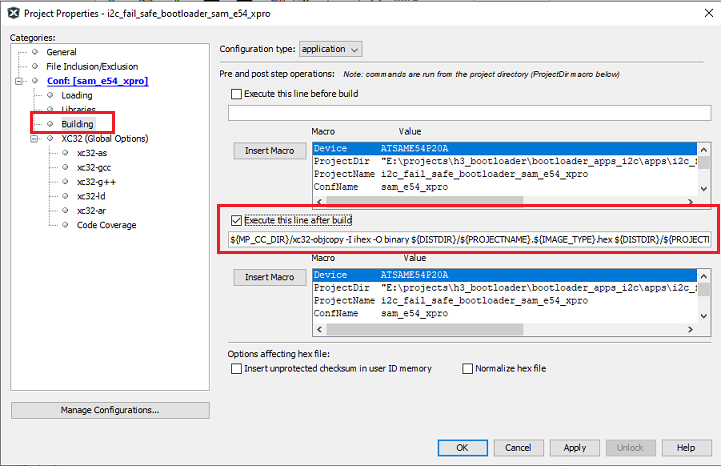
-
Build the bootloader project to generate the bootloader binary (Do not program the binary).
-
Build the sample application test_app (or any other application configured to bootload) using IDE to generate the application binary (Do not program the binary).
-
On a Windows machine, open the command prompt.
-
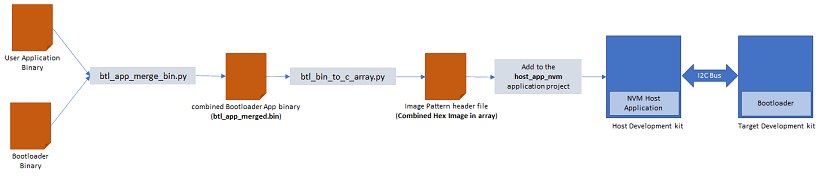
Run the btl_app_merge_bin.py utility from command prompt to merge the generated Bootloader binary and test application binary. Below output should be displayed on command prompt.
python <harmony3_path>/bootloader/tools/btl_app_merge_bin.py -o 0x2000 -b <harmony3_path>/bootloader_apps_i2c/apps/i2c_fail_safe_bootloader/bootloader/firmware/sam_e54_xpro.X/dist/sam_e54_xpro/production/sam_e54_xpro.X.production.bin -a <harmony3_path>/bootloader_apps_i2c/apps/i2c_fail_safe_bootloader/test_app/firmware/sam_e54_xpro.X/dist/sam_e54_xpro/production/sam_e54_xpro.X.production.bin
-
Run btl_bin_to_c_array utility to convert the generated merged binary btl_app_merged.bin to a header file containing the image data in a C style array.
- The merged binary will be created in the directory from where the script was called
python <harmony3_path>/bootloader/tools/btl_bin_to_c_array.py -b <Path_to_merged_binary>/btl_app_merged.bin -o <harmony3_path>/bootloader_apps_i2c/apps/i2c_fail_safe_bootloader/host_app_nvm/firmware/src/test_app_images/image_pattern_hex_sam_e54_xpro_bootloader_app_merged.h -d same5x
-
Once done, repeat the applicable steps mentioned in Running the Application.