
1.5 TCP/IP WEB NET Super Set SD Card FATFS
This application demo enables almost all the Application Layer modules in MPLAB® Harmony 3 TCP/IP Stack. It is also based on Web Net Server SD Card application.
Description
The TCP/IP WEB NET Super Set application is based on MPLAB® Harmony 3 TCP/IP Stack.
The Harmony TCP/IP stack is a collection of different network protocols.
The source files of Harmony 3 TCP/IP stack is available here.
The demo is created with MPLAB X IDE and MCC plugin.
MCC Project Graph - TCP/IP WEB NET Super Set
The following Project Graph shows the Harmony components included in the TCP/IP WEB NET Super Set demo application.
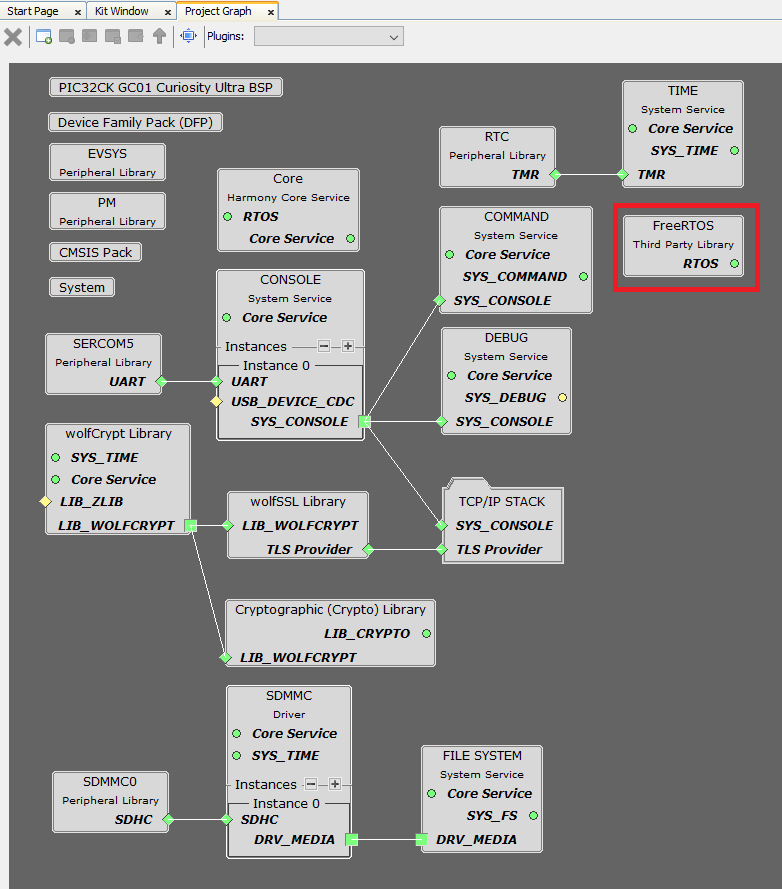
wolfSSL component is added for secure connection which supports TLS.
wolfCrypt module enabled with MD5 and SHA authentication
FILE SYSTEM is added to read and write from the SDMMC( sdcard ) module with FAT file system.
FreeRTOS component is required for RTOS application. For bare-metal (non-RTOS) FreeRTOS component should not be selected.
NOTE - The above diagram contains FreeRTOS component and that is required for RTOS application. For bare-metal(non-RTOS) FreeRTOS component shouldn't be selected.
TCP/IP Configuration - TCP/IP WEB NET Super Set
The TCP/IP modules enabled for the demo is shown in the TCP/IP Configuration Overview
More details of TCP/IP Configuration plugin is available here
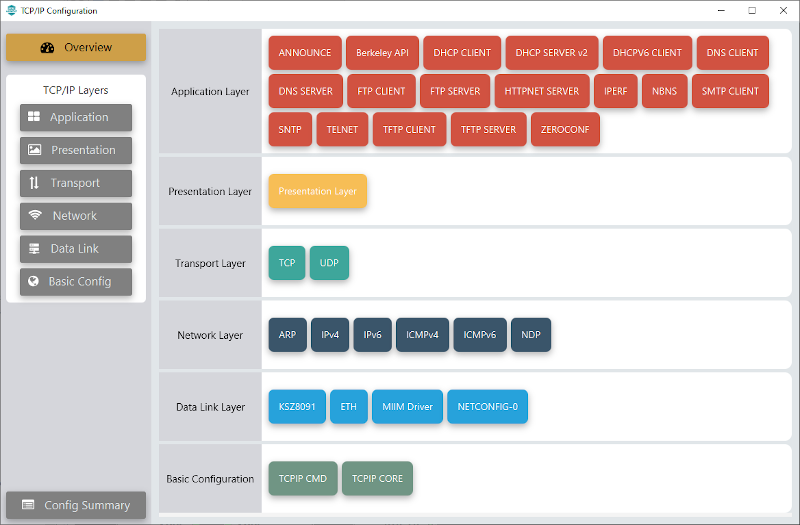
The Application Layer modules enabled in the demo are as follows:
- Application Layer
Modules
- HTTPNET SERVER enables the target board to act as a Web Server.
- DHCP Client to discover the IPv4 address from the nearest DHCP Server.
- DNS Client provides DNS resolution capabilities to the stack.
- Announceto discover the Microchip devices within a local network.
- TFTP SERVER is a simple protocol used to transfer files. It waits for client requests to read and write files.
- IPERF implements the iPerf protocol to measure networking bandwidth and performance
- FTP SERVER facilitates the uploading of files to, and downloading of files from, a network device.
- NBNS, NetBIOS Name Service protocol associates host names with IP addresses. This assign of human-name host names to access boards on the same subnet.
- Berkeley API provides the Berkeley_Socket_Distribution (BSD) wrapper to the native Harmony TCP/IP Stack APIs.
- DNS SERVER translate domain names into IP addresses.
- TFTP CLIENT module supports reading and writing of files (or mail) from/to a remote server.
- DNS CLIENT also known as the DNS Resolver, will try to resolve the IP address from its local resources, which includes the Name to Address mappings in the local DNS cache.
- SMTP CLIENT let applications send e-mails to any recipient worldwide.
- TELNET provides bidirectional, interactive communication between two nodes on the Internet or on a Local Area Network.
- DHCP SERVER is used to assign IP addresses to DHCP clients from the configured IP address database.
- DHCP CLIENT module will allow application to dynamically obtain an IP address and a subnet mask from a DHCP server on the same network.
- DHCPv6 CLIENT module will allow your application to dynamically obtain an IPv6 address from a DHCPv6 server.
- ZEROCONF, enables devices on an IP network to automatically configure themselves.
- SNTP, Simple Network Time Protocol updates its internal time periodically using a pool of public global time servers.
- FTP CLIENT module allows application to upload the files to, and download the files from, any FTP server.
Downloading and Building the application
To clone or download this application from Github, go to the main page of this repository and then click Clone button to clone this repository or download as zip file.
This content can also be downloaded using MCC content manager available as part of the MPLAB® X IDE.
Path of the application within the repository is apps\web_net_super_set_sdcard_fatfs\firmware
To build the application, refer to the following list of demo configurations and open the project using MPLAB X IDE.
| Project Name | Target Device | Development Board | Description |
|---|---|---|---|
| pic32ck_gc01_cult.X | PIC32CK2051GC01144 | PIC32CK GC01 Curiosity Ultra | TCP/IP WEB NET Super Set Application with KSZ8091 Ethernet PHY - Bare Metal |
| pic32ck_gc01_cult_freertos.X | PIC32CK2051GC01144 | PIC32CK GC01 Curiosity Ultra | TCP/IP WEB NET Super Set Application with KSZ8091 Ethernet PHY - FreeRTOS |
Hardware Setup
The target board for running the application is PIC32CK GC01 Curiosity Ultra.
This section provides essential hardware configuration of this target board to run TCP/IP applications.
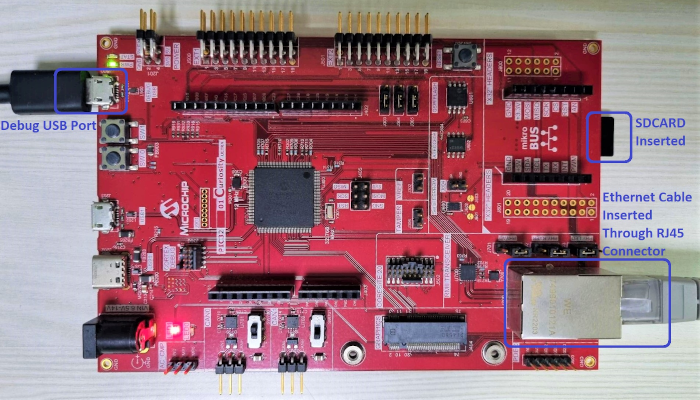
Board Setup
To set up the hardware, refer to the section Board Setup in PIC32CK GC01 Curiosity Ultra User Guide.
- Connect the micro USB cable from the computer to the DEBUG USB connector on the PIC32CK GC01 Curiosity Ultra Development Board.
- Insert the SD Card into the SD Card slot (which is on backside of the board) as shown above .
- Establish a connection between the router/switch with the PIC32CK GC01 Curiosity Ultra Development Board through the RJ45 connector.
Running the Application
- Open a terminal application on the host computer (like Hyper-terminal or Tera Term).
- Configure the terminal application for serial port connected to USB debug port of the board.
- Set baud rate as 115200 in the terminal application.
- Build and download the application project on the target board.
- Ensure SD card is formatted and loaded with the web pages provided within the /net_apps_pic32ck_sg_gc/apps/web_net_super_set_sdcard_fatfs/firmware/src/web_pages directory.
- Insert SD Card to the slot on target board.
- Verify the TCP/IP Stack initialization console messages.
Console Start up
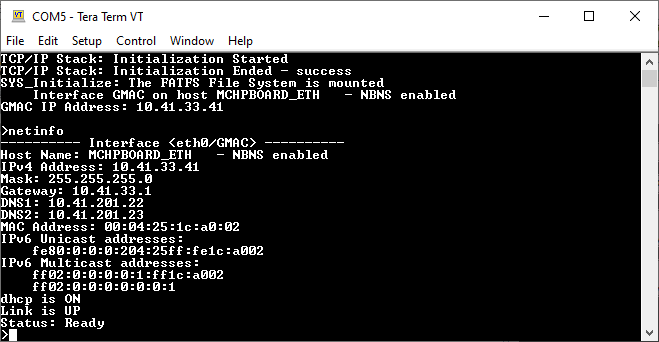
If DHCP client is enabled in the demonstration, wait for the DHCP server to assign an IP address for the development board.
This will be printed on the console. Otherwise, the default static IP address will be assigned to the board.
By entering the command netinfo, the response is obtained as shown above.
Demo Test
- To test the web server functionality, refer Web Net Server demo.
- The command interface is enabled for all the Application Layer modules. These modules can be configured and tested with commands from Console.
Important Notes when using PIC32CK SG01 Curiosity Ultra
If the user is willing to create/port a net application for PIC32CK SG01 Curiosity Ultra board,
then the following configurations/settings are required additionally for running the application and the TCP/IP Stack in Non-Secure region/configuration on a TrustZone device like PIC32CK SG01 Curiosity Ultra:
- All the components/items in the project graph will remain same as in the case of PIC32CK
GC01 Curiosity Ultra, other than RTC peripheral library.
Replace RTC peripheral library with TCC0 peripheral library, as RTC peripheral cannot be configured as Non-Secure, hence we’re choosing another peripheral as it’s replacement which is TCC0 and can be configured as Non-Secure.
- Mark/Select the peripherals used in the project as ‘Non-Secure’ in Arm TrustZone for
Armv8-M Plugin in MCC.
-
Launch Arm TrustZone for Armv8-M by going to the Project Graph tab in MPLAB X IDE and then select Plugins > Arm TrustZone for Armv8-M.
-
Click the Peripheral Configuration tab to configure Peripherals to run in Non-Secure mode.
- For this project, configure/select ETH, SERCOM5, TCC0 and SDMMC0(if used in the project) as Non-Secure Peripherals.
-
- Verify the Interrupt configuration for the peripherals used in the project is
‘Non-Secure’
- Launch NVIC Configuration by selecting Project Graph > Plugins > NVIC Configuration.
- Verify the configuration for the peripherals ETH, SERCOM5, TCC0 and SDMMC0(if used in the project) is ‘Non-Secure’.