
3.7 UART Driver
3.7.1 Introduction
The MPLAB® Code Configurator (MCC) Universal Asynchronous serial Receiver and Transmitter (UART) driver generates a portable API interface to assist a generic UART interface that supports the MCC Melody Component concepts: configuration and firmware portability.
The UART Driver will require a Peripheral LIBrary (PLIB) dependency, closely associated to a UART hardware peripheral. On PIC® MCUs the peripheral is named UART, USART or EUSART (Enhanced Universal Synchronous Asynchronous Receiver Transmitter) to emphasize the enhanced functionalities. The data sheet of each device shows the type of the UART peripheral.
The UART is very often used for terminal communications, e.g. via the Curiosity Nano's on-board debugger.
3.7.2 Required header files:
#include "mcc_generated_files/uart/uart[X].h"3.7.3 How to use the UART Driver
The UART driver generates a portable API interface. For an example of how to use the interface to write and read data, refer to this examples linked below. Click the links to view the code snippets associated with each
Instructions common for all code snippets: 3.7.4.3.1.1 UART Use Case Code Snippet Instructions.
- 3.7.4.3.1.2 UART Use Case 1: Printf with Variable Counter This example uses printf to print: "x Hello World!" to a terminal, where x is a counter.
- 3.7.4.3.1.3 UART Use Case 2: Write String Write any message, by calling UART_write_string(msg), passing the message to print on the terminal. Can be a light-weight alternative to printf.
- 3.7.4.3.1.4 UART Use Case 3: Control Commands - Using Interrupts This example shows how to implement a basic Command Line Interface (CLI). Here a LED is controlled using commands from a terminal. Send "ON" to turn the LED on, and "OFF" to turn it off. Interrupts are enabled and a callback is set to process commands.
- 3.7.4.3.1.5 UART Use Case 3.5: Control Commands - Polled Running same example as above, this time polling UART_ProcessCommand( ), instead of using interrupts. Only main.c changes.
- 3.7.4.3.1.6 UART Use Case 4: Mirror Back Typed Characters This example demonstrates how to send and receive data byte using UART read and write functions. A catch for a read error (if any) in the received byte is also implemented.
 |
 |
 |
 |
 |
- Recommended starting point: UART Driver, Timer/Counter A PLIB Driver and the Data Streamer Library.
- Videos also included for: RTC PLIB Driver, ADC PLIB Driver, AVR Event System.
- Recommended starting point: UART Driver, Timer0 PLIB Driver and the Data Streamer Library.
- Videos also included for: ADCC PLIB Driver.
3.7.4 UART Driver Documentation
3.7.4.1 Class Documentation
3.7.4.1.1 UART_INTERFACE Struct Reference
Detailed Description
uart_interface Generated Driver API Header File
@Company Microchip Technology Inc.
@File Name uart_interface.h
@Summary This is the generated driver interface header file for the uart_interface driver.
@Description This file provides common enumerations for uart_interface driver. Generation Information : Product Revision : CCL - 1.8.2 Device : PIC18F47Q43 Driver Version : 1.0.0 The generated drivers are tested against the following: Compiler : XC8 v2.2 MPLAB : StandaloneSection: Included Filesuart_interface
@Description Structure containing the function pointers of uart_interface driver.
#include <uart_interface.h>
Public Attributes
void(* Initialize )(void)
uint8_t(* Read )(void)
void(* Write )(uint8_t)
void(* RxCompleteCallbackRegister )(void(*CallbackHandler)(void))
void(* TxCompleteCallbackRegister )(void(*CallbackHandler)(void))
void(* ErrorCallbackRegister )(void(*CallbackHandler)(void))
void(* FramingErrorCallbackRegister )(void(*CallbackHandler)(void))
void(* OverrunErrorCallbackRegister )(void(*CallbackHandler)(void))
void(* ParityErrorCallbackRegister )(void(*CallbackHandler))
void(* ChecksumErrorCallbackRegister )(void(*CallbackHandler))
bool(* IsRxReady )(void)
bool(* IsTxReady )(void)
bool(* IsTxDone )(void)
Member Data Documentation
ChecksumErrorCallbackRegister
void(* UART_INTERFACE::ChecksumErrorCallbackRegister) (void(*CallbackHandler))
ErrorCallbackRegister
void(* UART_INTERFACE::ErrorCallbackRegister) (void(*CallbackHandler)(void))
FramingErrorCallbackRegister
void(* UART_INTERFACE::FramingErrorCallbackRegister) (void(*CallbackHandler)(void))
Initialize
void(* UART_INTERFACE::Initialize) (void)
IsRxReady
bool(* UART_INTERFACE::IsRxReady) (void)
IsTxDone
bool(* UART_INTERFACE::IsTxDone) (void)
IsTxReady
bool(* UART_INTERFACE::IsTxReady) (void)
OverrunErrorCallbackRegister
void(* UART_INTERFACE::OverrunErrorCallbackRegister) (void(*CallbackHandler)(void))
ParityErrorCallbackRegister
void(* UART_INTERFACE::ParityErrorCallbackRegister) (void(*CallbackHandler))
Read
uint8_t(* UART_INTERFACE::Read) (void)
RxCompleteCallbackRegister
void(* UART_INTERFACE::RxCompleteCallbackRegister) (void(*CallbackHandler)(void))
TxCompleteCallbackRegister
void(* UART_INTERFACE::TxCompleteCallbackRegister) (void(*CallbackHandler)(void))
Write
void(* UART_INTERFACE::Write) (uint8_t)
3.7.4.2 File Documentation
3.7.4.2.1 source/uart_interface.h File Reference
#include <stdbool.h>
#include <stdint.h>
#include <xc.h>
Data structures
struct UART_INTERFACE
3.7.4.3 Module Documentation
3.7.4.3.1 UART Use Cases
UART Use Case Code Snippet Instructions
-
Add UART to the project
-
Configure:
-
The UART as described in the example.
-
Best practice: Enable (weak)pullup on UART Rx pin
-
-
Generate the code
-
Add the code snippet(s) to the application code
-
Program the board
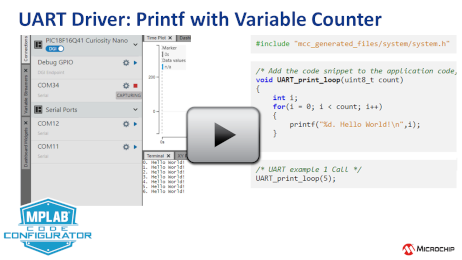
UART Use Case 1: Printf with Variable Counter
This example uses printf to print: "x Hello World!" to a terminal, where x is a counter.
-
Add UART
-
Dependency Selector:
-
UART PLIB Selector: Select the UART connected to Serial/CDC port.
-
-
Configuration Settings:
-
Redirect STDIO to UART (for printf support): Yes
-
-
Pins: (For all pins check board schematics)
-
Pin Grid View: Select pin for UART Transmit - Tx.
-
-
Inerrupt Manger: (for AVR)
-
Global Interrupt Enable: Yes.
-
After configuring the components as described above, click 'Generate' to generate the code. Then add the following code snippets to your application:
This use case prints the following to a terminal:
0. Hello World! 1. Hello World! 2. Hello World! 3. Hello World! 4. Hello World!#include "mcc_generated_files/system/system.h"
void UART_print_loop(uint8_t count)
{
    int i;
    for(i = 0; i < count; i++)
    {
        printf("%d. Hello World!\n",i);
    }
}
void main(void)
{
    SYSTEM_Initialize();
    UART_print_loop(5);

    while(1){}
}
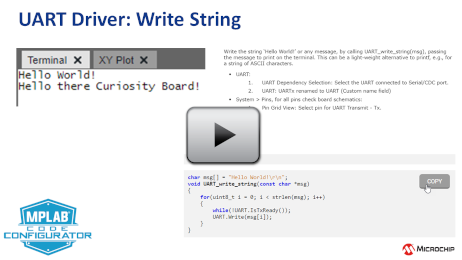
UART Use Case 2: Write String
Write the string ‘Hello World!’ or any message, by calling UART_write_string(msg), passing the message to print on the terminal. This can be a light-weight alternative to printf, e.g., for a string of ASCII characters.
-
Add UART
-
Dependency Selector:
-
UART PLIB Selector: Select the UART connected to Serial/CDC port.
-
-
Configuration Settings:
-
Custom Name: UARTx renamed to UART
-
-
Pins: (For all pins check board schematics)
-
Pin Grid View: Select pin for UART Transmit - Tx.
-
-
Inerrupt Manger: (for AVR)
-
Global Interrupt Enable: Yes.
-
After configuring the components as described above, click 'Generate' to generate the code. Then add the following code snippets to your application:
#include "mcc_generated_files/system/system.h"
#include <string.h>
char msg[] = "Hello World!\r\n";
void UART_write_string(const char *msg)
{
    for(uint8_t i = 0; i < strlen(msg); i++)
    {
        while(!UART.IsTxReady());
        UART.Write(msg[i]);
    }
}
void main(void)
{
    SYSTEM_Initialize();
    UART_write_string(msg);

    while(1){}
}
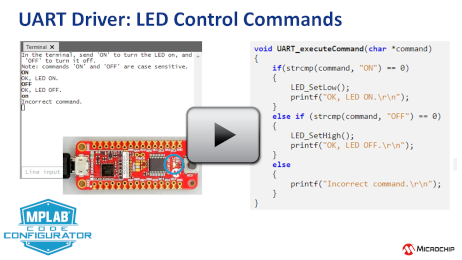
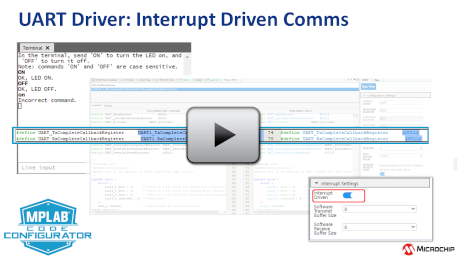
UART Use Case 3: Control Commands - Using Interrupts
This example shows how to implement a basic Command Line Interface (CLI), a popular way of sending control commands to the microcontroller over the UART. LED is controlled using commands from a terminal, e.g., on the MPLAB Data Visualizer. Interrupts are enabled and a callback is set to process commands.
-
Add UART
-
Dependency Selector:
-
UART PLIB Selector: Select the UART connected to Serial/CDC port.
-
-
Configuration Settings:
-
UART: UARTx renamed to UART (Custom name field)
-
Redirect STDIO to UART (for printf support): Yes
-
-
Interrupt Settings:
-
Interrupt Driven: Yes.
-
Software Transmit Buffer Size: 128
-
-
Pins: (For all pins check board schematics)
-
Pin Grid View: Select pin for UART Transmit - Tx.
-
Pin Grid View: Select LED pin as output.
-
Pins: Rename Custom Name to "LED".
-
-
Inerrupt Manger: (for AVR)
-
Global Interrupt Enable: Yes.
-
After configuring the components as described above, click 'Generate' to generate the code. Then add the following code snippets to your application:
-
Control LED using terminal commands. The commands are case sensitive.
-
Send "ON" to turn the LED.
-
Send "OFF" to turn it off.
-
#include "mcc_generated_files/system/system.h"
#include <string.h>

#define MAX_COMMAND_LEN 8
uint8_t command[MAX_COMMAND_LEN];
uint8_t index = 0;
uint8_t read_msg;
void UART_executeCommand(char *command)
{
    if(strcmp(command, "ON") == 0)
    {
        LED_SetLow();
        printf("OK, LED ON.\r\n");
    }
    else if (strcmp(command, "OFF") == 0)
    {
        LED_SetHigh();
        printf("OK, LED OFF.\r\n");
    }
    else
    {
        printf("Incorrect command.\r\n");
    }
}
void UART_ProcessCommand(void)
{

    if(UART.IsRxReady())
    {
        read_msg = UART.Read();
        if(read_msg != '\n' && read_msg != '\r')
        {
            command[index++] = read_msg;
            if((index) > MAX_COMMAND_LEN)
            {
                (index) = 0;
            }
        }
        if(read_msg == '\n')
        {
            command[index] = '\0';
            index = 0;
            UART_executeCommand(command);
        }
    }
}
int main(void)
{
    SYSTEM_Initialize();

    UART.RxCompleteCallbackRegister(&UART_ProcessCommand);

    printf("In the terminal, send 'ON' to turn the LED on, and 'OFF' to turn it off.\r\n");
    printf("Note: commands 'ON' and 'OFF' are case sensitive.\r\n");

    INTERRUPT_GlobalInterruptEnable();  /* Remove for AVR, enable in System>Interrupt Manager */

    while(1)
    { }
}
UART Use Case 3.5: Control Commands - Polled
Running same example as above, this time polling UART_ProcessCommand, instead of using interrupts. Only main.c changes.
-
Add UART
-
Dependency Selector:
-
UART PLIB Selector: Select the UART connected to Serial/CDC port.
-
-
Configuration Settings:
-
UART: UARTx renamed to UART (Custom name field)
-
Redirect STDIO to UART (for printf support): Yes
-
-
Interrupt Settings:
-
Interrupt Driven: No.
-
-
Pins: (For all pins check board schematics)
-
Pin Grid View: Select pin for UART Transmit - Tx.
-
Pin Grid View: Select LED pin as output.
-
Pins: Rename Custom Name to "LED".
-
int main(void)
{
    SYSTEM_Initialize();

    printf("In the terminal, send 'ON' to turn the LED on, and 'OFF' to turn it off.\r\n");
    printf("Note: commands 'ON' and 'OFF' are case sensitive.\r\n");

    while(1)
    {
        UART_ProcessCommand();
    }
}
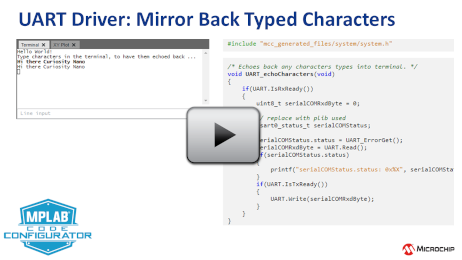
UART Use Case 4: Mirror Back Typed Characters
This example demonstrates how to send and receive data byte using UART read and write functions. A catch for a read error, if any, in the received byte is also implemented.
-
Add UART
-
Dependency Selector:
-
UART PLIB Selector: Select the UART connected to Serial/CDC port.
-
-
Configuration Settings:
-
UARTx renamed to UART (Custom name field)
-
Redirect STDIO to UART (for printf support): Yes
-
-
Pins: (For all pins check board schematics)
-
Pin Grid View: Select pin for UART Transmit - Tx.
-
Pin Grid View: Select pin for UART Receive - Rx.
-
Best practice: Enable (weak)pullup on UART Rx pin
-
After configuring the components as described above, click 'Generate' to generate the code. Then add the following code snippets to your application:
-
Code modifications: usartx_status_t -> replace with reference to PLIB used. Find this by searching for "status" in uartx.c (for PIC) or usartx.c (for AVR)
#include "mcc_generated_files/system/system.h"
int main(void)
{
    SYSTEM_Initialize();

    printf("Hello World!\r\n");
    printf("Type characters in the terminal, to have them echoed back ...\r\n");

    while(1)
    {
        UART_echoCharacters();
    }
}