
1.16.3 Debugging the Combined Bootloader and Application Code
Debugging the combined Bootloader and Application together is probably the most complex part of the bootloader. The reason for this is two-fold. First, each of these projects are independent projects and so you need to somehow merge the projects. While tools exist to merge these files, the merge tool does not comprehend the impact of the special way in which the memory maps are setup by the compiler.
Background
To understand the problem of just merging the projects, one needs to understand how the projects are generated. Normally the system linker will attempt to use all available flash in the most efficient way possible. That means it may not locate all of the code linearly and sequentially starting at the first address. So, left to its own, the linker may place some code in the low memory space and some code up in the upper most page where the configuration bits are set or in both the bootloader and application space. In addition, there is nothing to stop the linker from placing the code anywhere it wants if it's "legal". Normally, this is where some systems will use fancy linker scripts to move the code around and force the location of the bootloader code to stay within a specific area. Since we have attempted to limit the use of the linker scripts in the 16 bit compiler, we needed another way to limit where the linker could not place code.
The current method that the bootloader and application projects use to keep all of their code in their space is to mark the others space a reserved, noload and is done in the file mcc_generated_files/boot/memory_partition.S file in each project. This effectually puts a fence around the available memory space by marking all other space as reserved. While this works very well when debugging each project independently, if we try to merge the elf files from each environment, the reserved, noload memory spaces in each project conflict with the other project causing any attempt to merge the two to fail. This problem stops us from just merging the elf files together and debugging the combined project.
One solution to this is to choose which project you want to debug with all the debugger information, the bootloader code or the application code. Then we will build both projects as usual. After building, we will then start the project we want to debug and in that environment, "overlay" the hex file from the other one using MPLAB-X features when we run the MPLAB-X debugger. This will give us complete debugging features of the code base we want along with the entire binary of the other. Below are two sets of directions for debugging the "combined" code. The first case shown is if you need to debug an issue in the application section of the code and the second is if you need to debug the issue you believe is in the bootloader code. In both cases, the actual code on the part is the same. The only differences is which section has the debug environment enabled.
The key tool used below is the windows based hexmate command line tool. This program will take the hex file given to it and strip out or keep sections of addresses that are defined on the command line.
Case 1: Debug Application code with bootloader binary code.
|
Bootloader Code Base |
Application Code Base | |
|---|---|---|
|
Build normal debug code that the user plans to releasing |
Build normal debug code that the user plans to releasing | |
|
The tools will generate the hex file in boot.X\dist\default\production\boot.X.production.hex |
The tools will generate the hex file in app.X\dist\default\production\app.X.production.hex | |
|
run hexmate to remove all code except for the interrupt tables and bootloader code code base (Is this true here?) NOTE: HexMate works on Byte addresses so you need to take the end address of bootloader and double it to get the value to use here. "c:\Program Files (x86)\Microchip\xc8\v2.00\pic\bin\hexmate" -Oboot.hex r0-2fff,boot.X\dist\default\production\boot.X.production.hex | ||
|
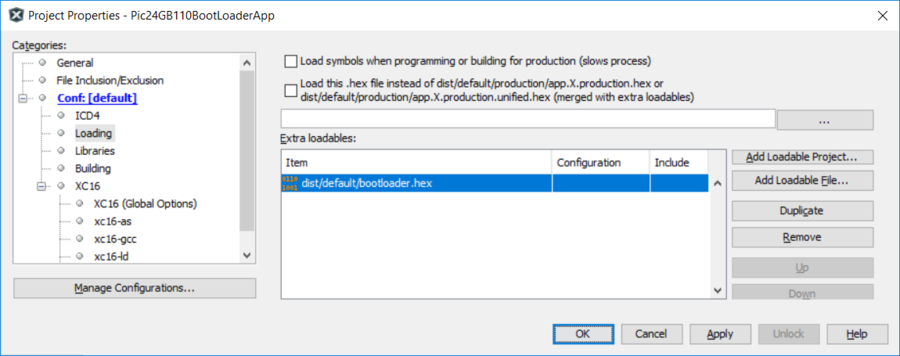
Append the bootloader hex file created by hexmate into the application environment using the "Project Properties "Loading->Add Loadable File as shown below. This will "overlay" the bootloader binary code onto the application code. It's important to note the two programs are do not overlap code areas where they could be different. The interrupt tables and config words will be identical though so if they overlap, there will be no harm done. Also since the code created by the bootloader is at a different area (by design) that the application code, there should be no harm here either. | ||
 | ||
|
Download and debug your application code as you would normally. However, this time the code will execute the bootloader code and you will only be able to set break points within the application code. So you will not be able to set breakpoints in the "bootloader" code unless you do it at the assembly level. At this point, the download and run is executed, the first thing to run is the bootloader binary. Since there is no debug information for this module, you will not be able to easily debug what is occurring in the bootloader section. However, once the code vectors out of the bootloader and goes into the application code, the user will be able to debug the application normally. This also means that if you want to debug an interrupt ISR, you will need to set breakpoints in the ISR code located in the application code. You will not be able to set a break point in the IVT or AIVT unless you do it at the assembly level. |
|
Bootloader Code Base |
Application Code Base | |
|---|---|---|
|
Build normal debug code that the user plans to releasing |
Build normal debug code that the user plans to releasing | |
|
The tools will generate the hex file in boot.X\dist\default\production\boot.X.production.hex |
The tools will generate the hex file in app.X\dist\default\production\app.X.production.hex | |
|
run hexmate to remove all code except application code base "c:\Program Files (x86)\Microchip\xc8\v2.00\pic\bin\hexmate" -Oapp.hex r3000-60000,app.X\dist\default\production\app.X.production.hex | ||
|
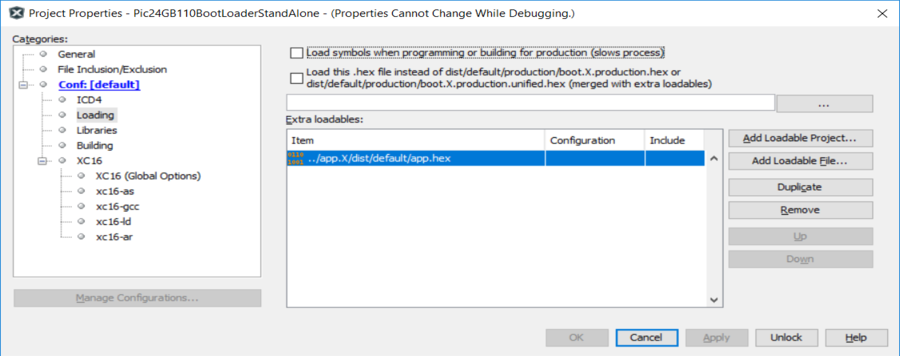
Append the application hex file created by hexmate into the bootloader environment using the "Project Properties " Loading as shown below. This will "overlay" the application binary code onto the bootloader code. It's important to note the two programs are do not overlap code areas where they could be different. The interrupt tables and config words will be identical though so if they overlap, there will be no harm done. Also, since the code created by the bootloader is at a different area (by design) that the application code, there should be no harm here either | ||
 | ||
|
Download and debug your bootloader code as you would normally. However, this time the code will execute the bootloader code and you will only be able to set break points within the bootloader code. You will not be able to set breakpoints in the "application" code unless you do it at the assembly level. At this point, the download and run is executed, the first thing to run is the bootloader binary. You will be able to debug this code since there information for this module. However, if you branch out of this code to the application code, you will not be able to easily debug what is occurring in the application section. This also means that if you want to debug an interrupt ISR, you will need to set breakpoints in the ISR IVT or AIVT tables in the binary code. |