
9.4.1 Step-by-step guide to enable semihosting in your application
- For MPLAB XC32 projects:
- Type
-lrdimon-muslinto the Project Properties, text box. - If it has not already been
specified, enter a heap size in Project Properties, . For more information, see Allocating Heap Memory and MPLAB® XC32 C/C++ Compiler User's Guide
for PIC32C/SAM MCUs.
Figure 9-2. xc32-ld Options 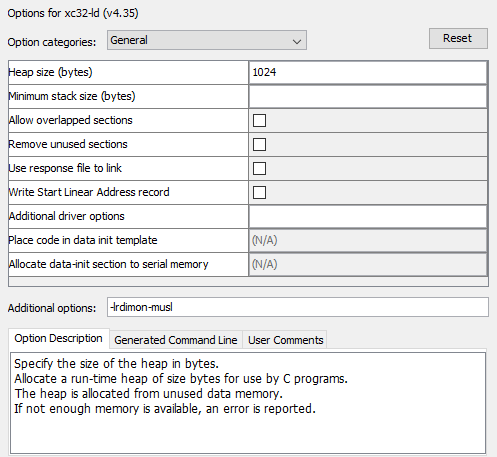
For Arm GCC projects:
- Type
-lrdimoninto the Project Properties, text box. - If you get a link error for the symbol
end, add the following definition to your application linker script. It should have the same value as the existing_endsymbol:end = DEFINED(end) ? end : . ; _end = .;
- Type
- Call
Initialise_monitor_handlesin your code before you make any semihosting calls. For example:extern void initialise_monitor_handles(void); int main (void){ initialise_monitor_handles(); printf(“hello world!”); } - Add autoload.py
script to your project by right clicking the project and selecting . Open the autoload.py file (located in ) and copy the following code to the autoload.py
file:
def on_halted(pc):
    bp = memPgm.Read16(pc)
    if bp != 48811: #0xbeab
        return False
    semihost()
    deb.SetNamedReg("PC", pc+2) #move pc over swbp
    return True

def semihost():
    r = deb.GetNamedReg("R0")
    if r == 12:
        r = deb.SetNamedReg("R0",1) #file length 1 for :tt
        return

    if r == 5:
        block = deb.GetNamedReg("R1")
        buf = memPgm.Read32(block+4)
        len = memPgm.Read16(block+8)
        message = bytearray(len)
        memPgm.Read(buf ,message,0,len)
        msg.printToTab(message.decode(), "Printf output")

    r = deb.SetNamedReg("R0",0)
    return
Note: autoload.py enables scripting with Jython inside the IDE. It is a powerful way to automate and get control (e.g., for debugging, memory access or advanced breakpoints.) - Reload scripts by right clicking on the project and selecting .
- (Optional) For improved throughput
use memory buffer by adding the following before the first printf
call:
// Optional memory buffer for printf for enhanced performance
charbuff[1024];
setvbuf(stdout,buff,_IOFBF,1024);
You have now configured your project to direct printf data to the tab. Add printf freely in your application code and #include
<stdio.h>.
printf Output to MPLAB X IDE Output Window
#include <stdio.h> #include <xc.h> extern void initialise_monitor_handles(void); void main(void) { initialise_monitor_handles(); char buff[1024]; setvbuf(stdout,buff,_IOFBF,1024); volatile int i = 0; while(1) { i= i + 1; printf("Count %i\n", i); } }