1.1 Configuration Bits
Microchip devices have configuration registers with bits that enable and/or set up device features.
Which Configuration Bits to Set
In particular, be aware of the following settings:
- Oscillator selection - This must
match your hardware’s oscillator circuitry. If this is not correct, the device clock
may not run. Typically, development boards use high-speed crystal oscillators. From
the example code:
#pragma config FEXTOSC = ECH - Watchdog timer- It is recommended that you disable this timer until it is required.
This prevents unexpected Resets. From the example code:
#pragma config WDTE = OFF - Code protection - Turn off code protection until it is required. This ensures that
device memory is fully accessible. From the example code:
#pragma config CP = OFF - Extended Instruction Set - Turn off the extended instruction set. This instruction
set is not used by the C compiler:
#pragma config XINST =
                OFF
Different configuration bits may need to be set up to use another 8-bit device (rather than the PIC18F47Q10 MCU used in this example). See your device data sheet for the name and function of corresponding configuration bits. Use the part number to search https://www.microchip.com for the appropriate data sheet.
For more information about configuration bits that are available for each device, see pic_chipinfo.html and pic18_chipinfo.html files. Once you open one of these in your browser, you can then select your target device for more info. These are both located in the docs directory where MPLAB XC8 was installed:
MPLAB XC8 Installation Directory/docs/
How to Set Configuration Bits
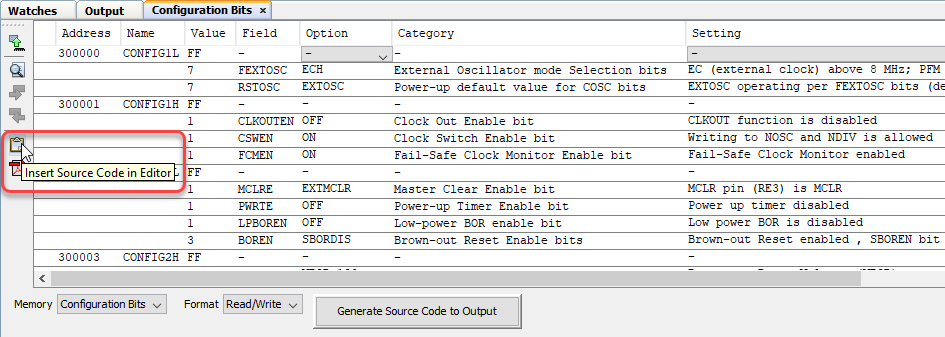
In MPLAB X IDE, you can use the Configuration Bits window to view and set these bits. Select Window>Target Memory Views>Configuration Bits to open this window.

See MPLAB X IDE documentation for more information on this window.
