
6.6.1 RFD Project Creation
- Create a new MCC Harmony Project. For more details, refer to Creating a New MCC Harmony Project from Related Links.
- The MAC component is available on Device
Resources>Libraries>Harmony>Wireless>Drivers>IEEE 802.15.4. Add
by using ‘+’ symbol. The component will be displayed on project resources section.
Figure 6-100. Device Resources 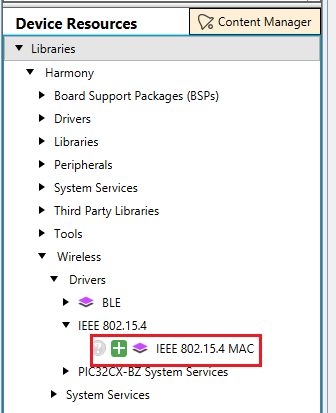
- Click “Yes” for all Pop-ups to add all the dependent modules, device type selection choose
as RFD and, if security required choose MAC Security Config as Enabled
Figure 6-101. MAC Configuration 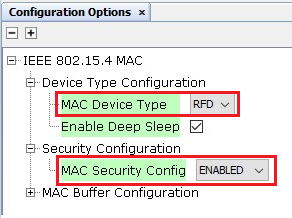
- Right Click on TIME module for selecting the timer source, Select TC0
Figure 6-102. Time Component 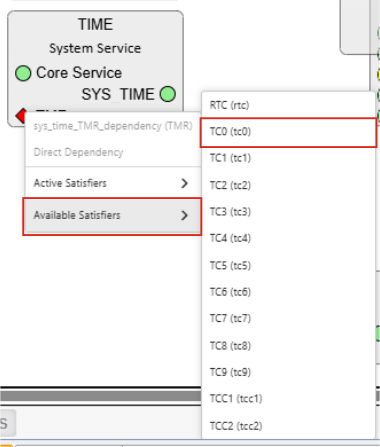
- Click on Time Component>Go to Configuration Options>Change the Number of
Clients as 10
Figure 6-103. TIME Configuration 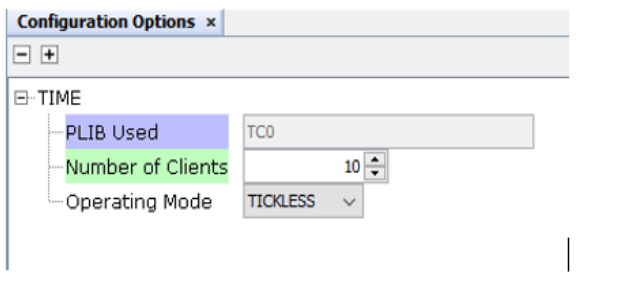
- The component is available on Device Resources>Libraries>Harmony>Board
Support Packages>WBZ451 Curiosity BSP . Add by using ‘+’ symbol. The
component will be displayed on Project resources section.
Figure 6-104. Board Support Packages 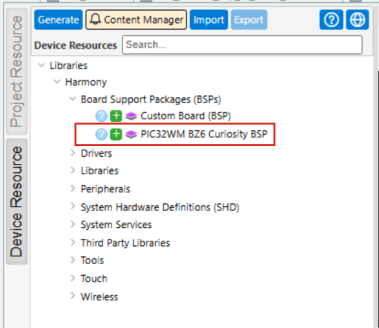
- The Bluetooth LE Provisioning component is available in Device
Resources>Libraries>Harmony>System Services>BLE Provisioning. Add
the component by using ‘+’ symbol.
Figure 6-105. BLE Provisioning 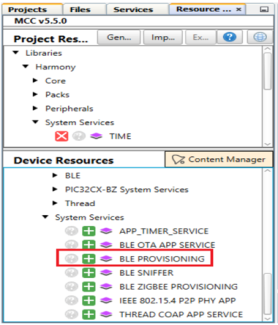
- Click “Yes” for all Pop-ups to add all the dependent modules.Note: The Bluetooth LE stack is configured to disable the RTC by default. To prevent the RTC from being disabled, we are activating the Deep Sleep feature subsequent to the integration of the BLE provisioning component.
Figure 6-106. Auto-deactivation Request 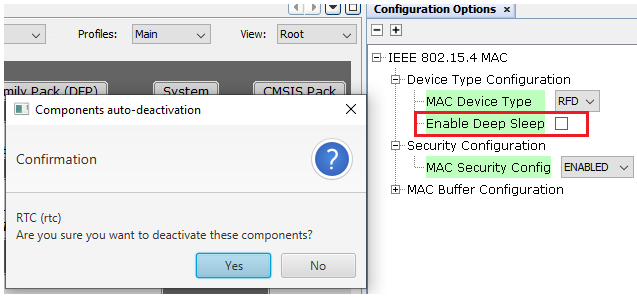
- Select BLE Stack and change the Device Name and Local Name as MicrochipRFD.
Figure 6-107. BLE Stack Configuration 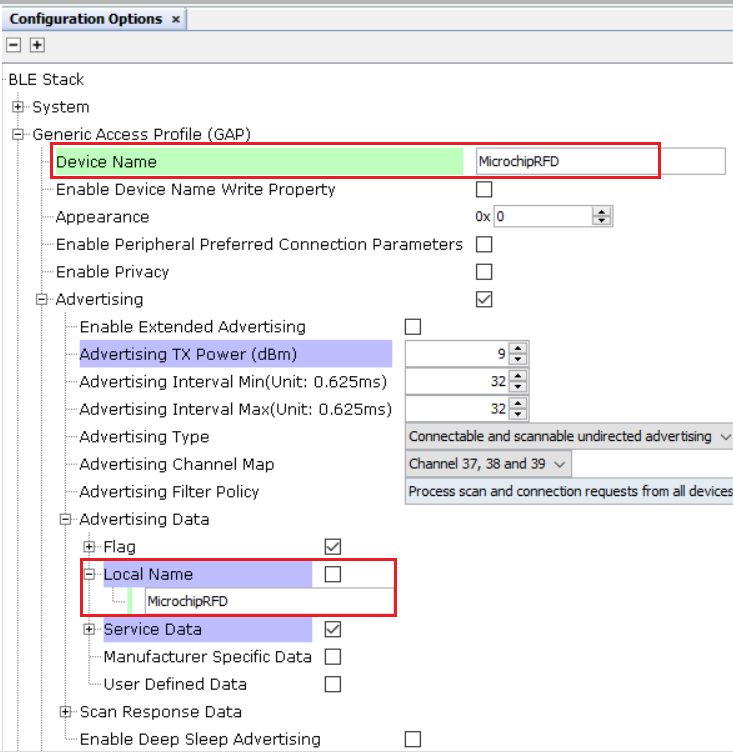
- For Free-RTOS component, enable the Use Timers option and do the following
modifications
- Set the Timer task priority as 1
- Set the Timer queue length as 10
- Set the Timer task stack depth as 256
- Disable Use Application Daemon Task Startup Hook
Figure 6-108. Free-RTOS Component Configuration 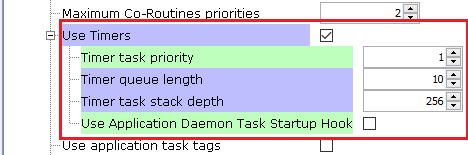
- Add the CONSOLE component to project graph available from Device Resources>System
Services>CONSOLE.
Figure 6-109. CONSOLE Component 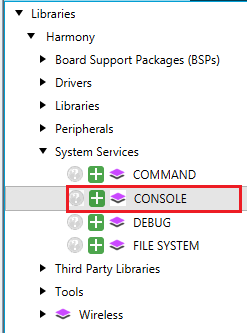
- Select the CONSOLE component from the project graph and add SERCOM0 as illustrated in
the following figure.
Figure 6-110. CONSOLE Component 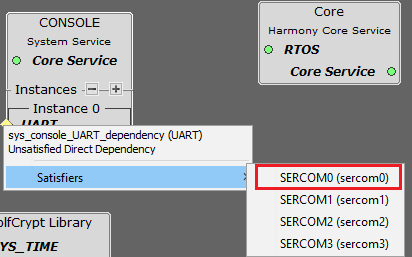
- Configure the SERCOM0 component as illustrated in the following figure.
Figure 6-111. SERCOM0 Component 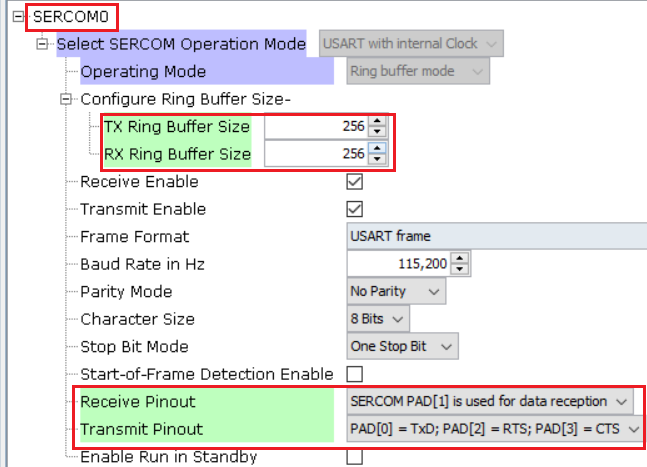
- Select System and Set the SERCOM0 Direct Pin Enable as DIRECT as illustrated in the
following figure.
Figure 6-112. System 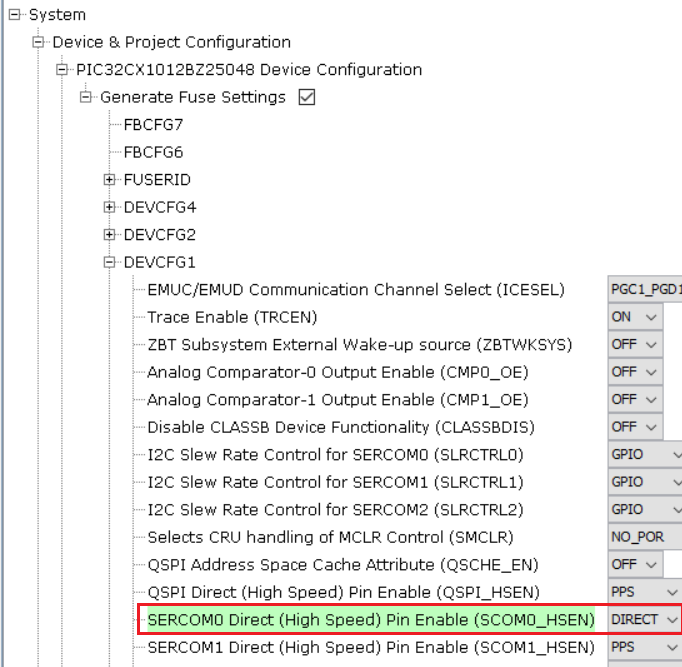
- Select the CONSOLE component from the project graph and add SERCOM0 as illustrated in
the following figure.
- For Clock configuration, go to Plugins>double click on Clock
Configuration
Figure 6-113. Clock Configuration 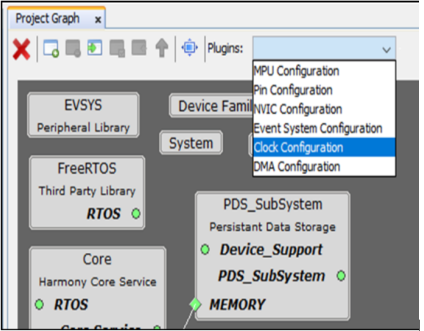
- Configure the clocks as illustrated in the following figure.
Figure 6-114. Clock Configuration 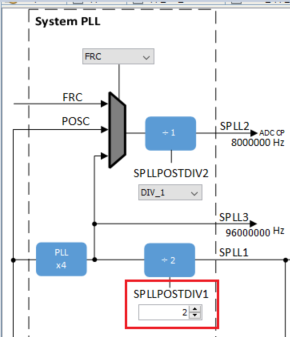
Figure 6-115. Clock Configuration 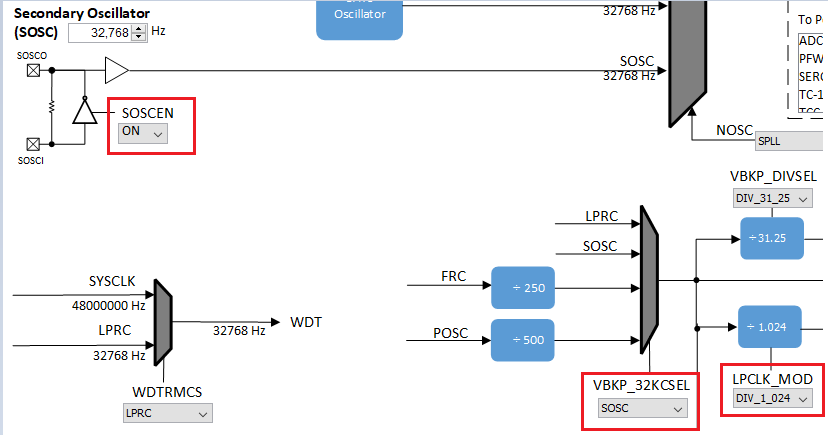
- Ensure that the project graph resembles the one illustrated in the following figure.
Figure 6-116. Project Graph 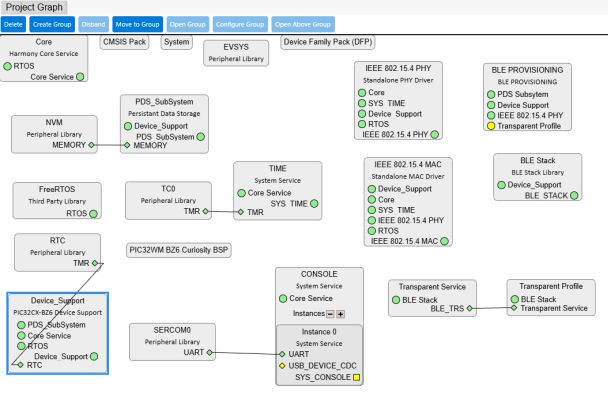
Generating a Code
For more details on code generation, refer to MPLAB Code Configurator (MCC) Code Generation from Related Links.
Adding Files To The Project
- After the successful generation of the project , add the following files and folders.
Copy the following folder into the project location from the Project Repository
(
<Harmony Content Path>\wireless_apps_pic32_bz6\apps\multiprotocol\ble_mac_prov_rfd\firmware\src).Figure 6-117. Adding Files To The Project 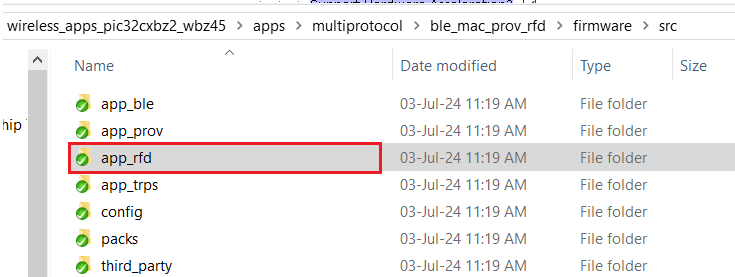
- Add the source and header files to the project as illustrated below
Figure 6-118. Adding Files To The Project 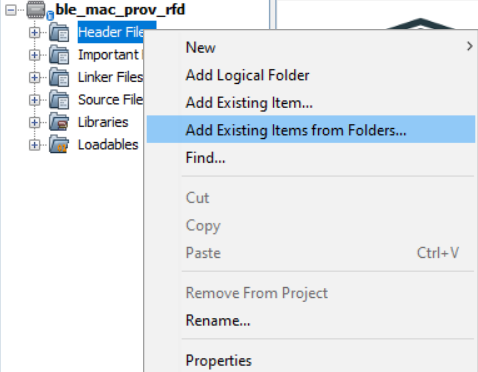
- Add the source file to the project as illustrated below
Figure 6-119. Adding Files To The Project 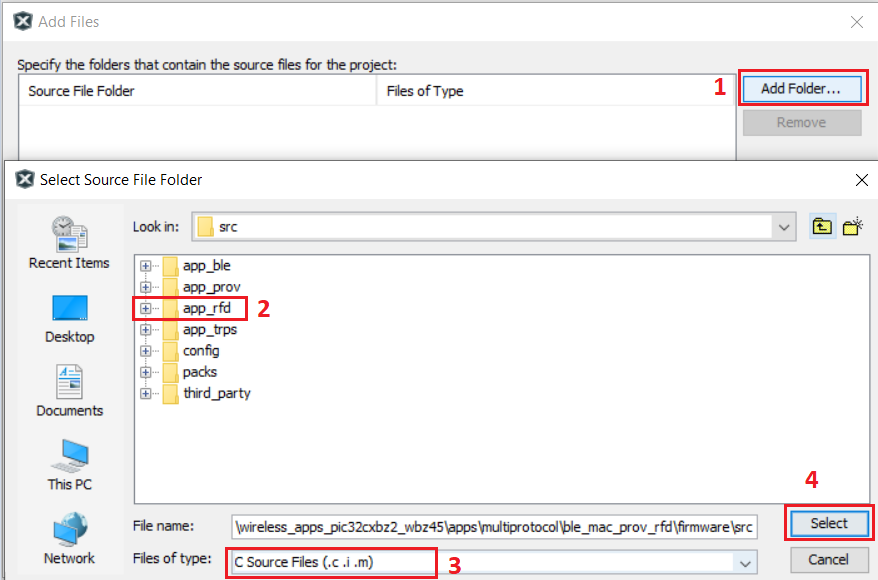
- Similarly add the header files to the project as illustrated below
Figure 6-120. Adding Files To The Project 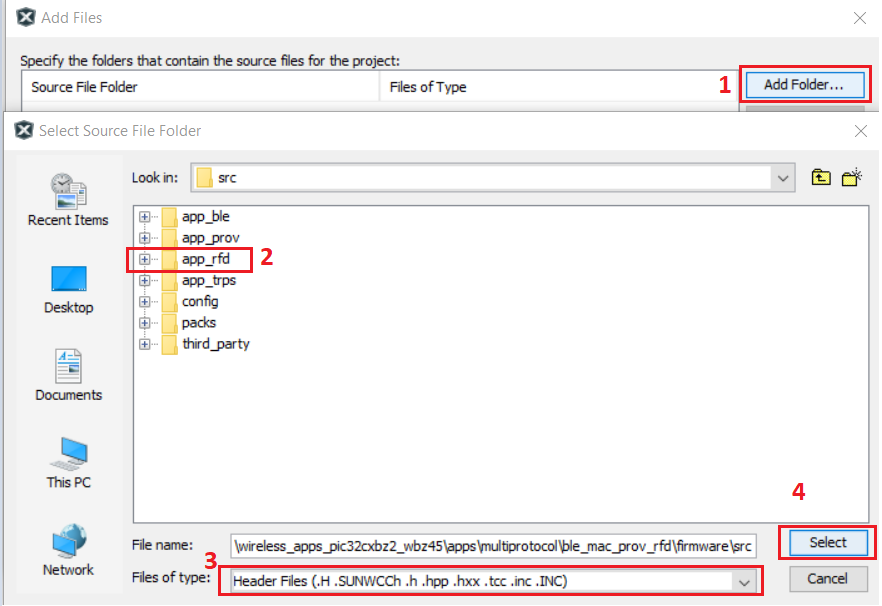
Figure 6-121. Adding Files To The Project 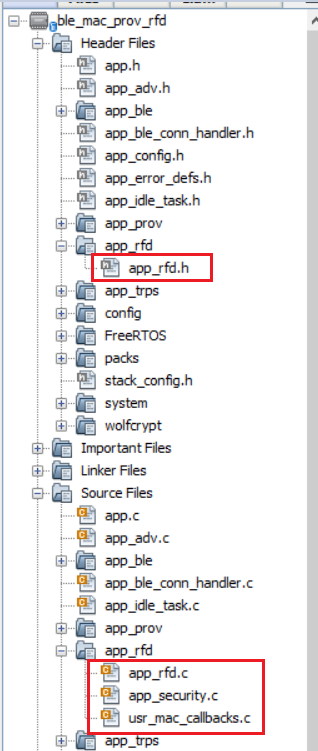
- Add the source file to the project as illustrated below
- To add this folder to include directory,
select the Project folder>ble_mac_prov_rfd>Set
Configuration>Customize
Figure 6-122. Adding File to Include Directory 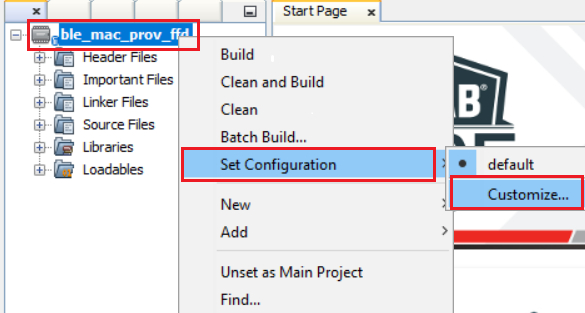
- Select xc32-gcc>preprocessing
and messages>Include directories>Browse>firmware>sensors>Open
Figure 6-123. Adding File to Include Directory 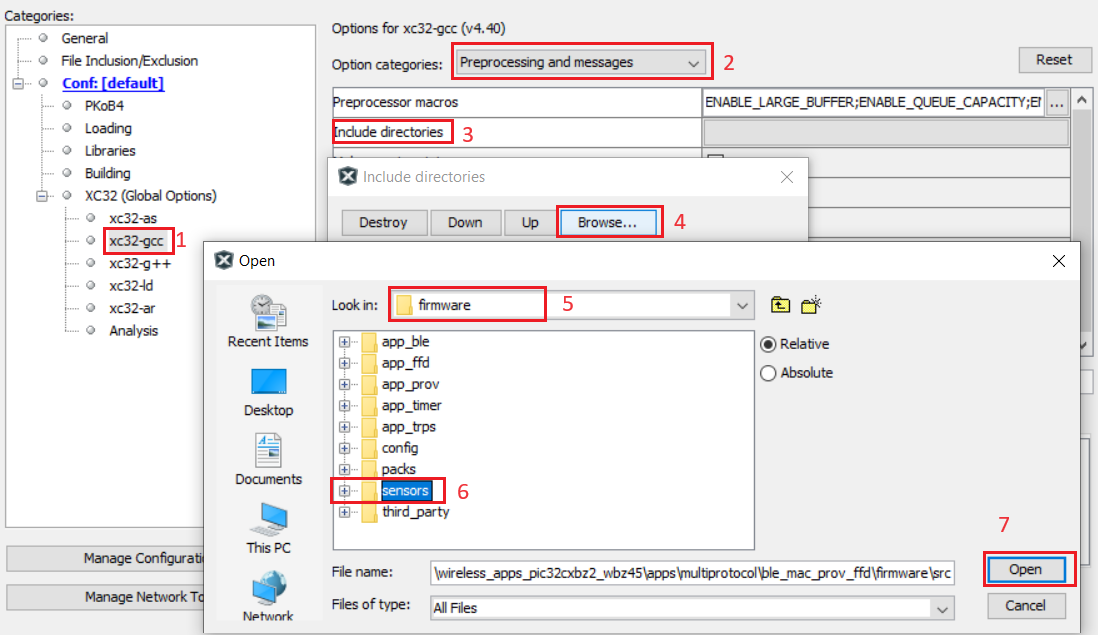
- Copy the following files “
app_adv.candapp_adv.h” into the project location from the Project Repository (<Harmony Content Path>\wireless_apps_pic32_bz6\apps\multiprotocol\ble_mac_prov_rfd\firmware\src). These files enable the Bluetooth LE advertisement service.Figure 6-124. Adding Files To The Project 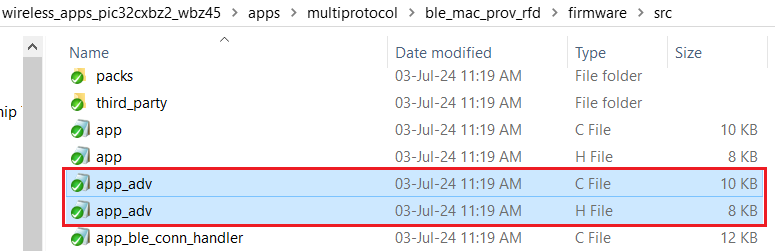
- Follow step 2 above to add the source and header files, respectively.
Code Modifications For RFD project
- Code changes in
app_ble_handler.cfileFigure 6-125. app_ble_handler.c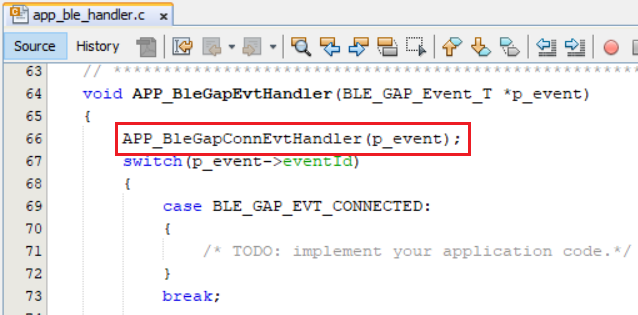
- Code changes in
app_trps_handler.cfileFigure 6-126. app_trps_handler.c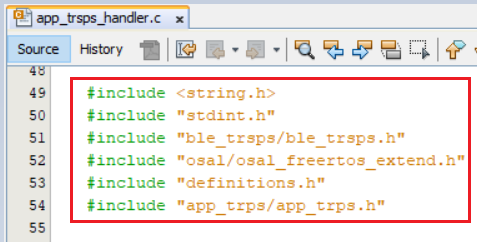
Figure 6-127. app_trps_handler.c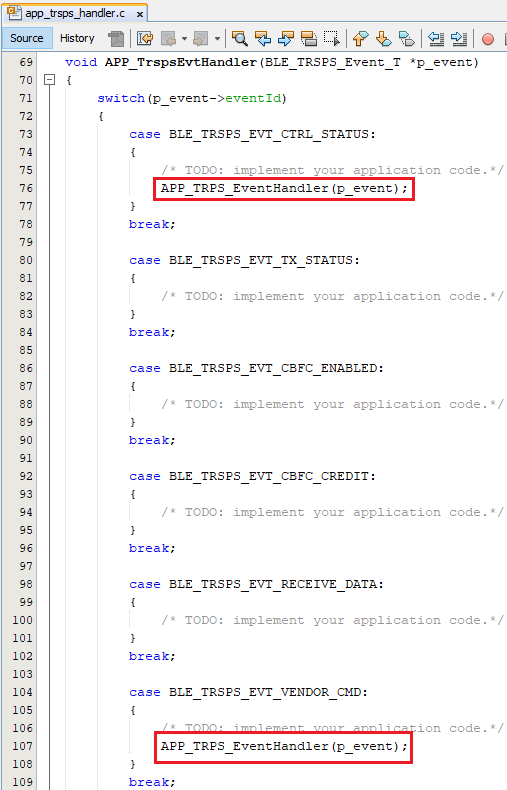
- Code changes in
app_ble_conn_handler.cfileFigure 6-128. app_ble_conn_handler.c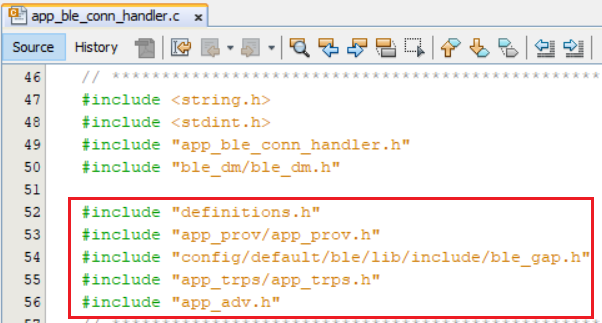
Figure 6-129. app_ble_conn_handler.c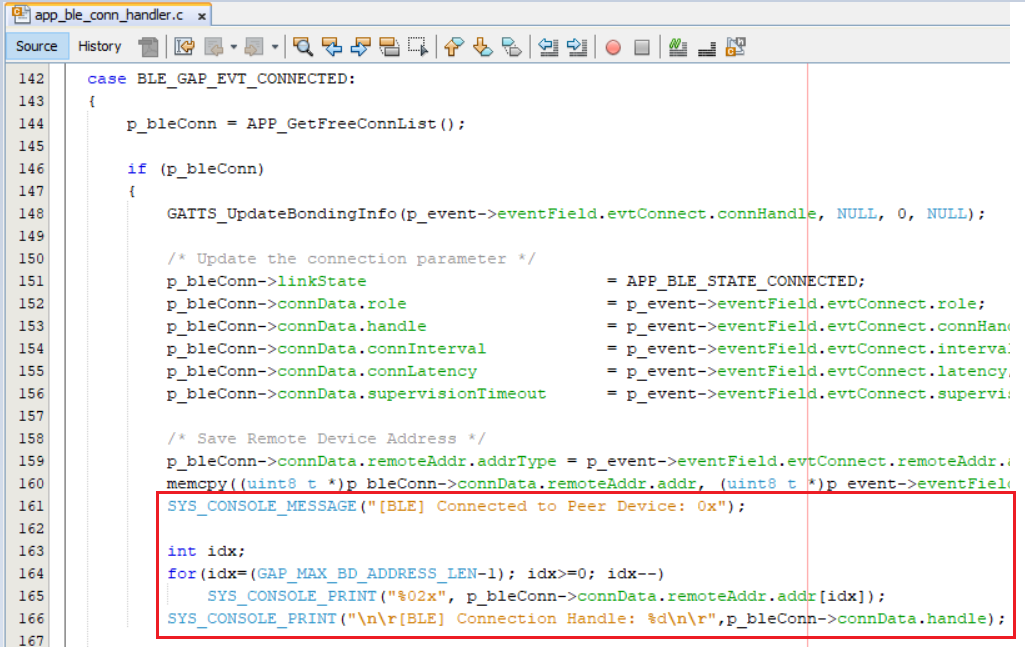
Figure 6-130. app_ble_conn_handler.c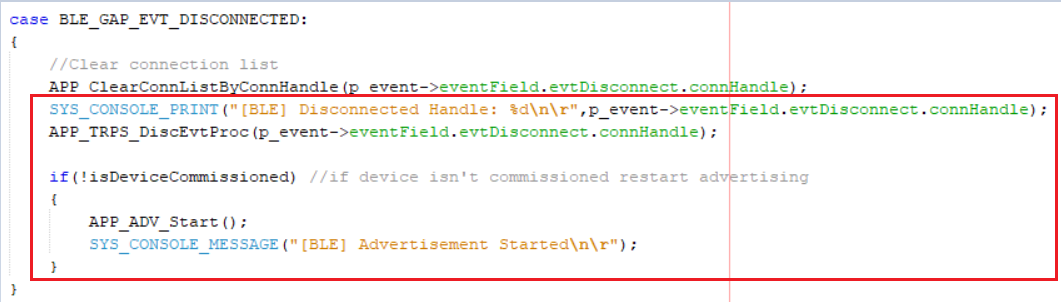
- Code changes in
app.cfileFigure 6-131. app.c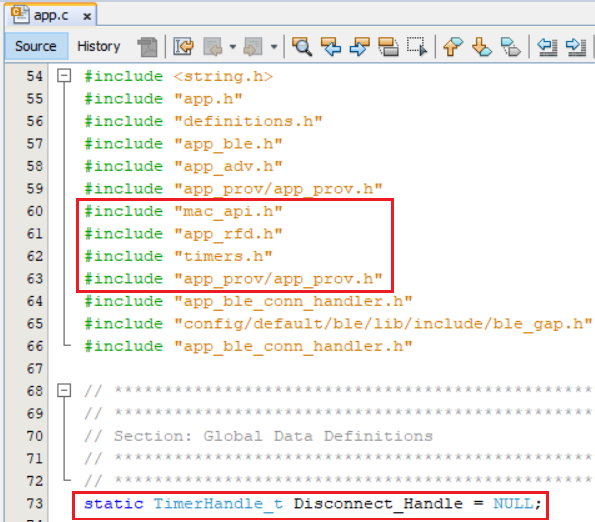
Figure 6-132. app.c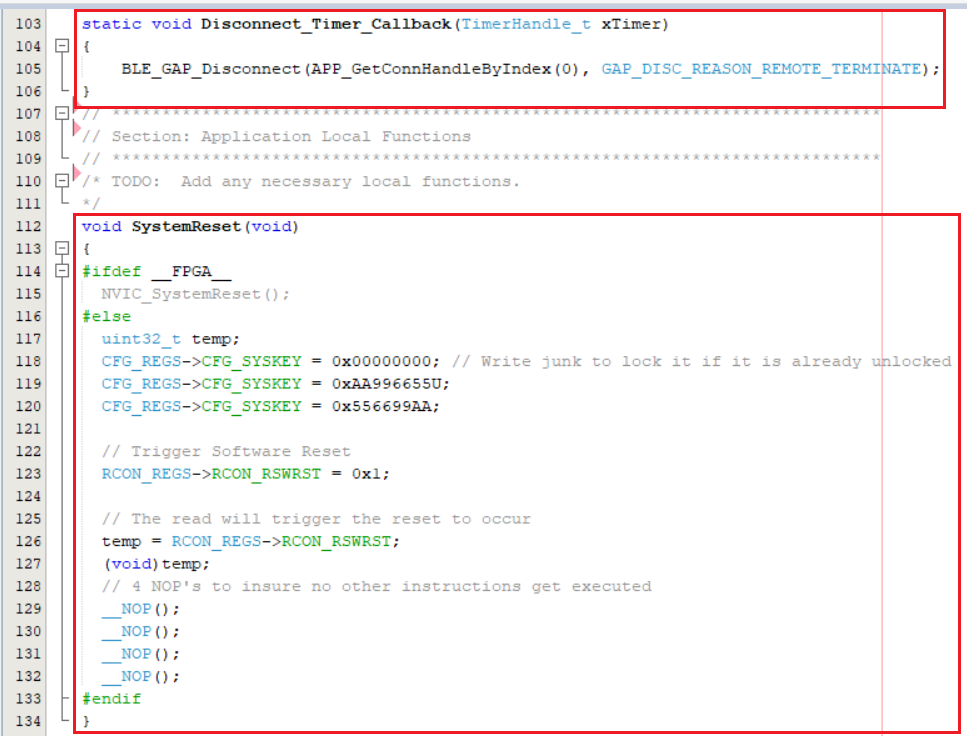
Figure 6-133. app.c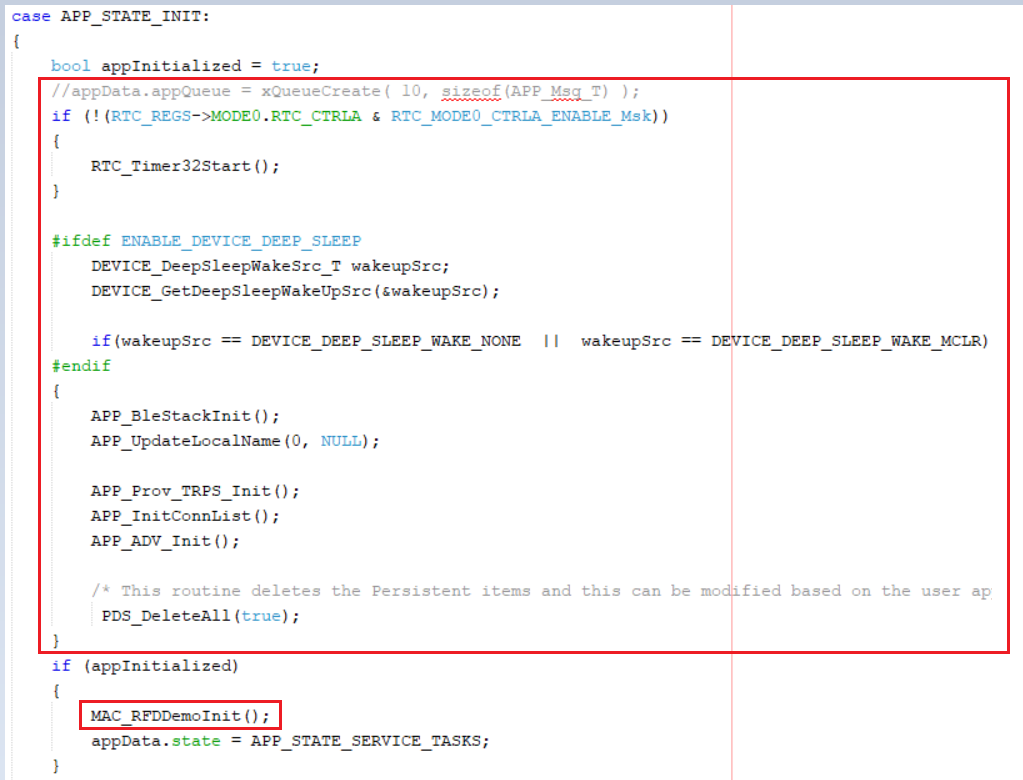
Figure 6-134. app.c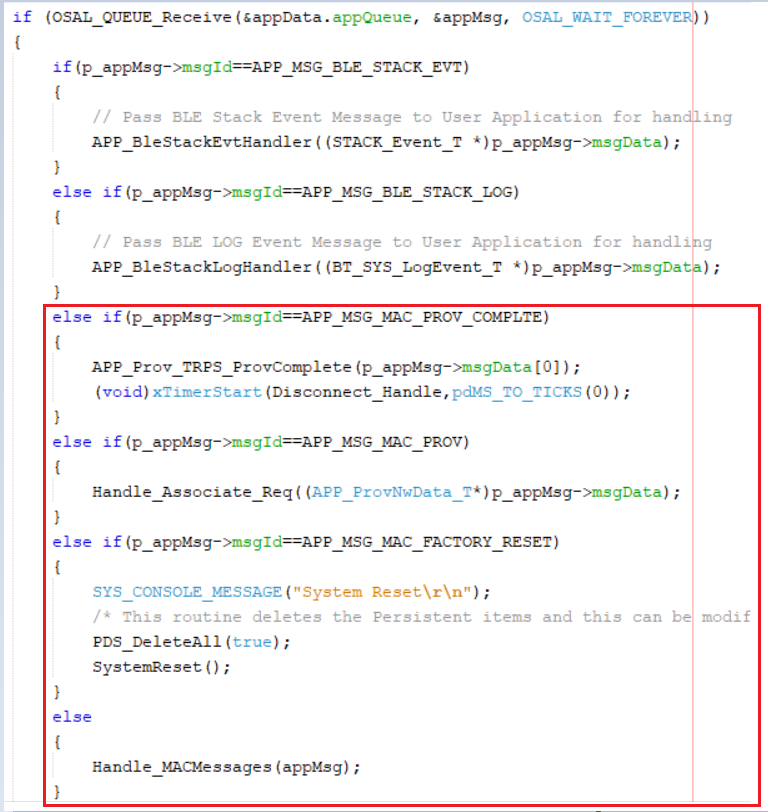
- Code changes in
app.hfile.Figure 6-135. app.h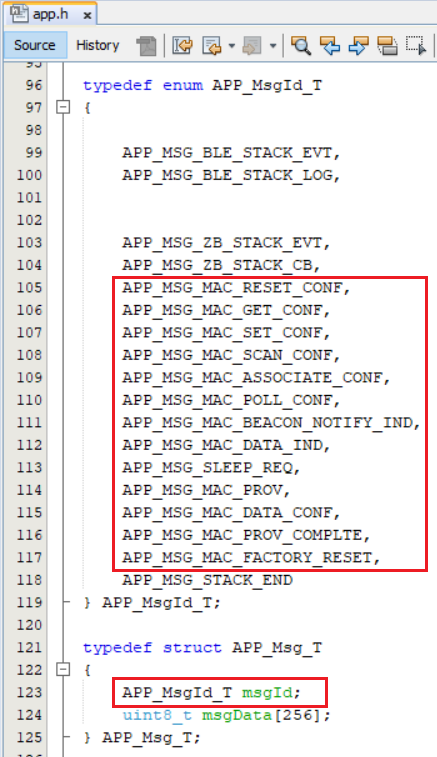
Figure 6-136. app.h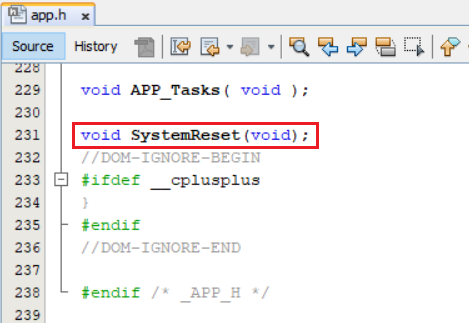
- Code changes in
app_idle_task.cfileFigure 6-137. app_idle_task.c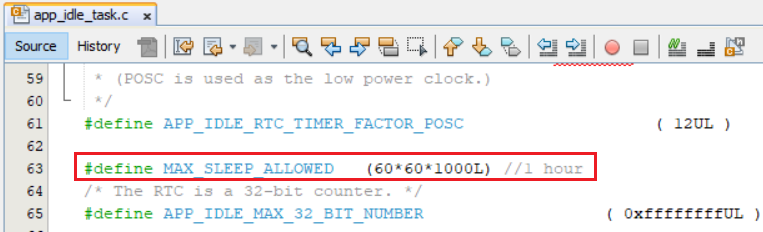
Figure 6-138. app_idle_task.c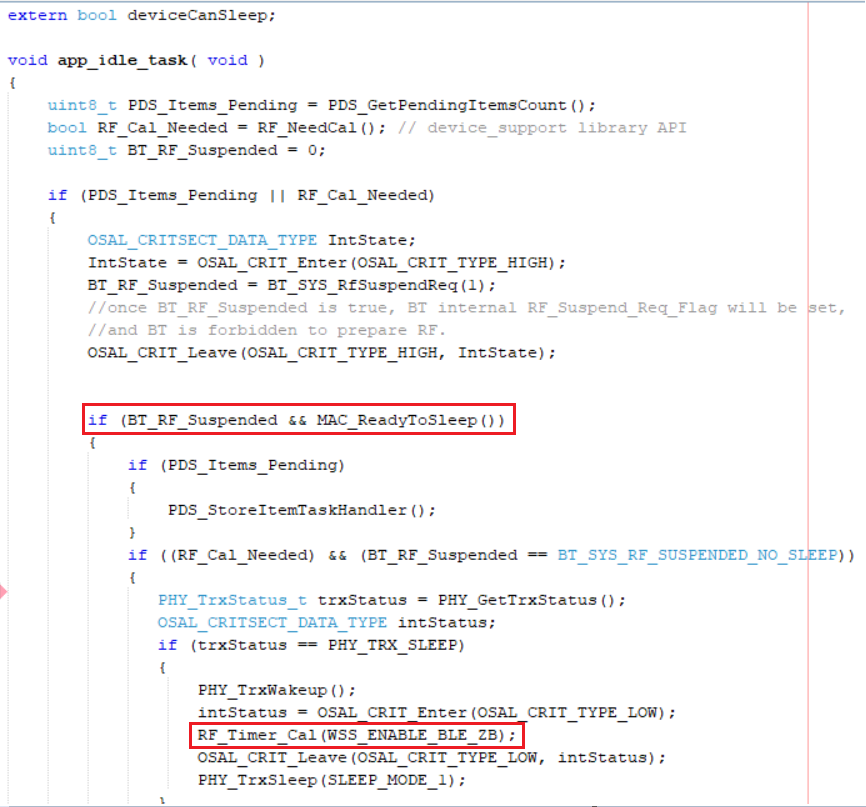
Figure 6-139. app_idle_task.c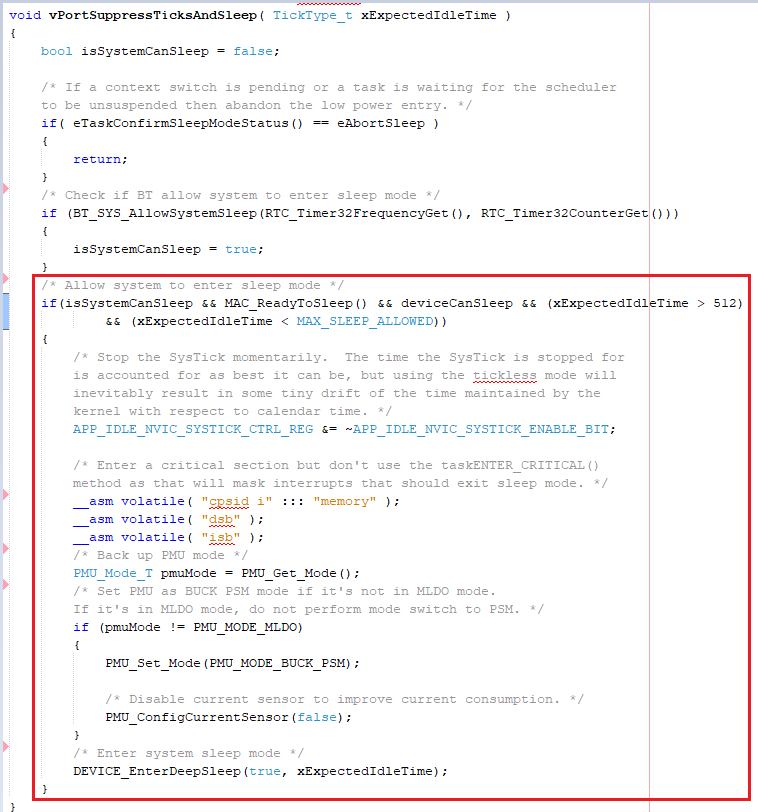
- Code changes in
freertos_hooks.cfileFigure 6-140. freertos_hooks.c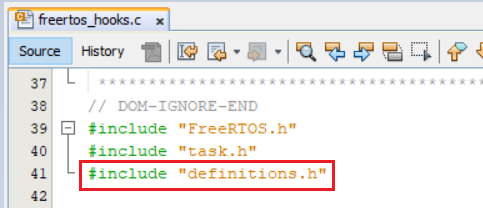
Figure 6-141. freertos_hooks.c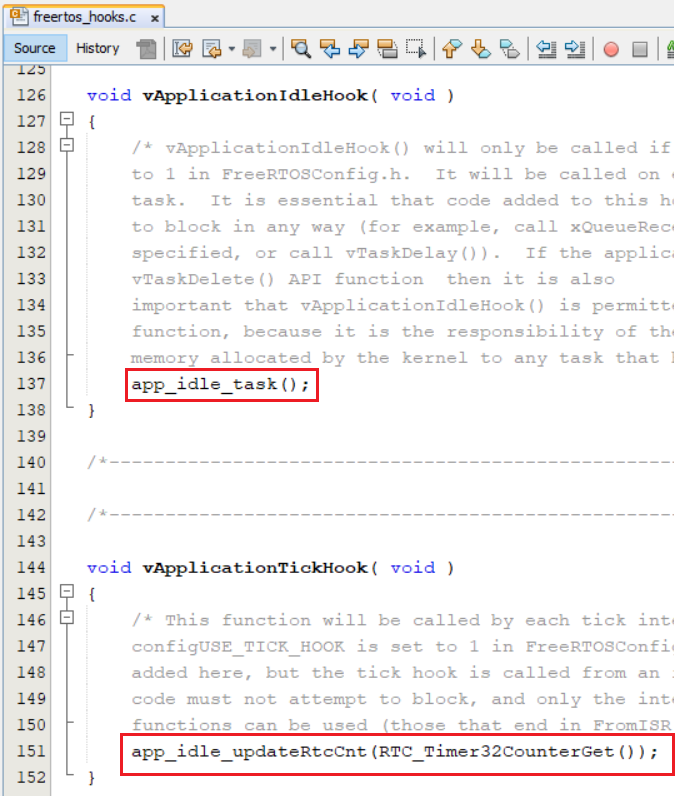
- Code changes in
initialization.cfileFigure 6-142. initialization.c