
4.1 Board Validation Check
The EV51H13A Evaluation Base Board kit requires a compatible daughter card kit with a TS1800 device installed. The TS1800 device must be programmed with predefined OTP settings and a valid firmware SPI image. Once the daughter card is installed, a basic validation procedure can be performed to confirm proper board operation.
To power up the board, connect a USB Type-C® cable between the test PC and the USB Type-C® connector (J29) on the board.
- USB Hub Test
- Open Device Manager by
pressing Windows+R, typing
devmgmt.msc, and clicking OK.Figure 4-1. Device Manager Window - Verify that the USB hub enumerates correctly.
- Confirm that the devices
shown in the following figure are present.
Figure 4-2. Highlighted Devices
- Open Device Manager by
pressing Windows+R, typing
- Tera Term Communication
Test
- Open the Tera Term program.
- Select File → New Connection.
- Under the Serial
connection options, select the PICkit™ 4 On Board
Virtual COM Port and click OK.
Figure 4-3. Tera Term New Connection 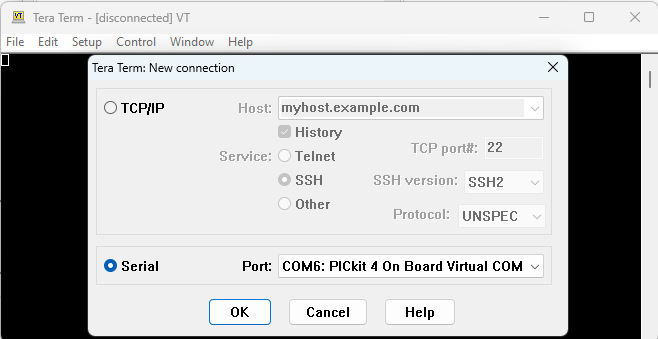
- Navigate to Setup → Serial
Port and verify that the serial port configuration matches the
settings shown in the following figure.
Figure 4-4. Tera Term Serial Port Setup 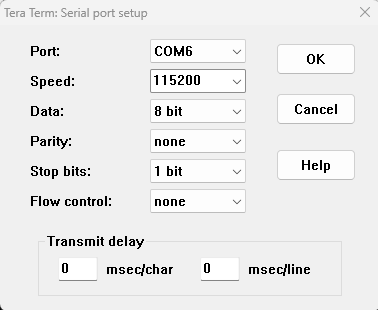
- Ensure that the daughter card containing the TS1800 ASIC is securely installed on the Evaluation Base Board.
- Press the SW2 push
button and confirm that the expected output appears in the Tera Term console
window.
Figure 4-5. Tera Term Console Window 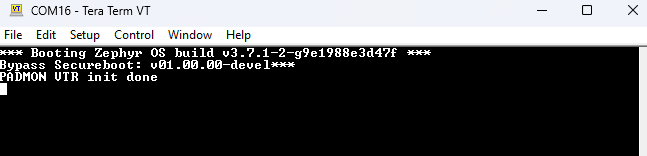 Note: The displayed message may differ from the image shown above.
Successful completion of these validation checks confirms proper board operation and verifies compatibility between the devices, the board, and the Trust Platform Design Suite (TPDS) tools.