3.6.2.1 Single PER Test
The primary intent for Single PER Test is to perform Packet Error Rate measurement. One of the nodes should be connected to the Performance Analyzer application using the UART Level Shifter Cable. The node connected to the UART is referred as transmitter and another node, which needs not be connected to the UART, is referred to as receiver. Apart from PER measurement, it can be used in the following areas:
-
Sensitivity testing:
Using the PER test, sensitivity can be tested by configuring one of the nodes as a transmitter and another as a receiver. The number of packets to be transferred is configured on the transmitter and all the packets received by the receiver are acknowledged. The receiver keeps count of the packets received. At the end of the test the transmitter asks the receiver for the test results. The test results are displayed on the Performance Analyzer window at the end of the test.
-
Diversity feature testing:
In a multipath environment, several versions of the same signal with different phases, delays, and attenuations will be added together at the receiver location, so there is always the possibility that at some locations, the signals could cancel each other out almost entirely. One way to overcome the multipath issue is to use the receiver antenna diversity technique. In this method, two antennas are used instead of one in the receiver. This way, if one antenna is in a multipath null (also known as deep-fading region), the other antenna has a good chance of being outside the deep-fading region. The receiver can switch between these two antennas to escape from a multipath null. Enable Diversity in the radio by using the Transceiver settings control. The antenna diversity feature can be tested by doing the PER measurement on conductive medium.
-
TX Power handling:
The PER measurement mode gives an option to configure the TX out power in the form of absolute power in dBm.
How Transceiver performance is affected at various Power levels can be studied using this.
Running Single PER Test
-
Pre-requisite:
Kits should be pre-flashed with the latest available revision of the Performance Test Application.
- Connect one of the kits to Performance Analyzer.
- Power ON both the kits.
- Choose the COM
port to which the kit is connected and click Connect.

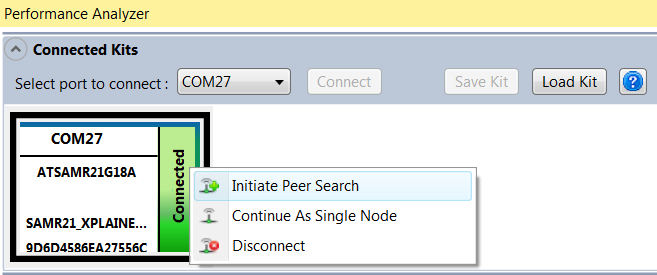
- After setting the appropriate COM settings in the Pop-up, click OK. The kit appears on the Performance Analyzer UI with the status "Connected".
- Right click on
the kit and choose "Initiate Peer Search" from the Context menu. On successful
pairing , the status of the kit will be updated as "Paired".

- Default
properties of the kit gets displayed in the Kit/Transceiver Properties UI
control. The configuration properties can be edited and applied to the kit.Note: A short description of the chosen Property will be displayed at the bottom. For detailed description/kit specific details, refer to the datasheets available online at www.atmel.com .
- If the entered
value is outside the valid range, the Performance Analyzer's validation
mechanism will highlight the erroneous value of the property. Also, the Write
button will be disabled till the error is corrected.Note: A helpful balloon tip message will guide you to the correct range of values.
- Once the edits are completed, click on the "Write" button to update the Performance Test application running on the kit.
- With all the configuration done, Packet Error Rate Test is ready to be run. Go to Packet Error Rate Test tab and click on the "Play" button to start the PER Test.
- Once the PER
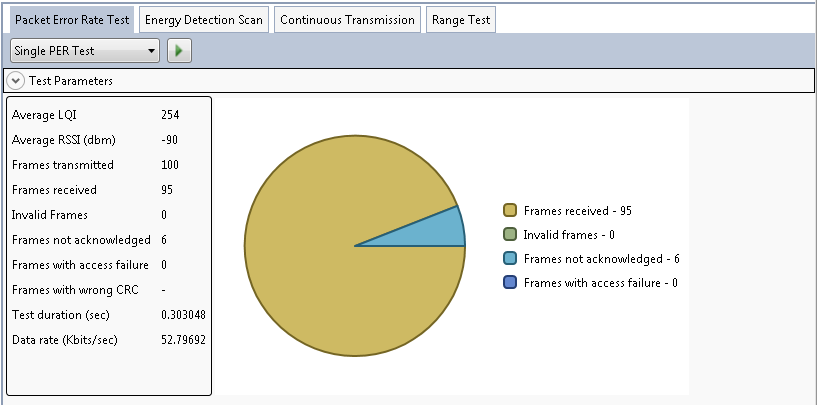
Test is completed, the test results will be displayed in the tab window.
 Interpreting PER Test results:
Table 3-3. Result Information Property Description Average LQI -
Gives the average Link Quality Indication during the test
-
The minimum (
0x00) and maximum (0xFF) should be associated with the lowest and highest quality compliant signals, respectively
Average RSSI -
Gives the average Received Signal Strength Indication during the test
-
RSSI is a 5-bit value indicating the received power in the selected channel in 3dB increments
Frames Transmitted Number of frames transmitted from the transmitting node
Frames Received Number of frames received at the receiving node
Frames failed Number of frames that failed the transmission
Frames not acknowledged -
Number of frames acknowledged received from the receiving node
-
N/A if
ACKrequest is set to false in the transceiver properties before the test
Frames with access failure Number of frames that could not be transmitted due to no available channel
Frames with wrong CRC -
Number of frames that does not pass CRC
-
N/A if CRC checks are disabled
Test duration Time for the test to complete Data rate Data rate for the transmitted packages -
- The 'Test
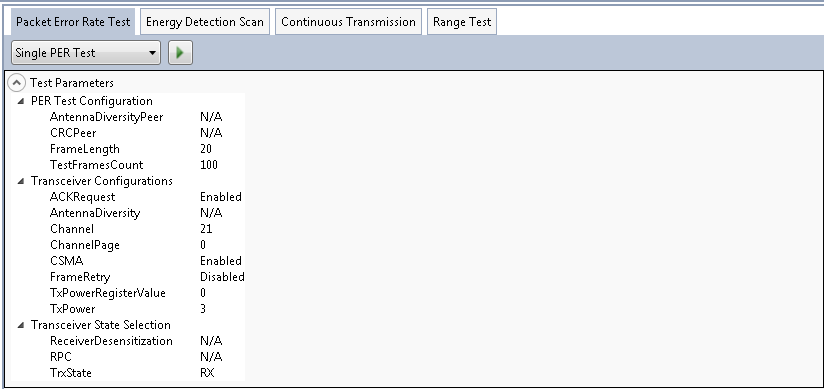
Parameters' drop-down expander shows the settings used for the test.

- If you wish to run another test, click on the "Play" button again. Or, if you wish to re-configure the Performance Test application, do so and "Write" the changed values to the kit before proceeding to run another PER test.
