
5.3 Running the H.264 Demo using GUI
(Ask a Question)To run the H.264 demo using GUI, perform the following steps:
- Insert the dual-camera sensor module in J10 on the PolarFire SoC video kit. Ensure to remove the camera lens cap.
- Do not connect any Ethernet cable from the host to the video kit.
- On the windows host, open command prompt in
Admin mode and type
ipconfig.Figure 5-2. Executing the ipconfigCommand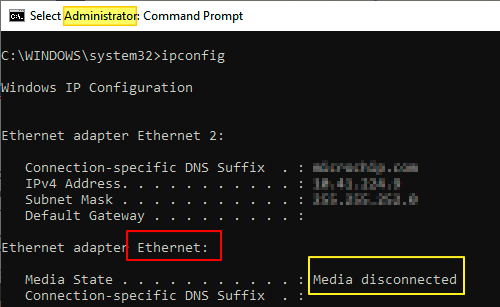
- Make a note of the Ethernet adapter name displayed against the Media disconnected interface. It is Ethernet in this case.
- Set the host IP address to 192.168.2.X,
where X is any integer from 2 to 255 and the Subnet mask to 255.255.255.0 using the
following command. This is a one-time process and need not to be done every time the video
kit is
connected.
netsh interface ip set address "Ethernet" static 192.168.2.100 255.255.255.0Figure 5-3. Setting the Host IP Address 
- Connect an Ethernet cable from video kit eth0 port to the PC Ethernet port. There are two Ethernet ports on the video kit. The Ethernet port eth0 is next to the camera mount.
- Power ON the board and wait for the system boot sequence to complete. The LED highlighted (LED 3) in the following figure glows green once the Linux boot up sequence is completed.
- Restart the board if LED 3 does not
glow.
Figure 5-4. PolarFire SoC Video Kit—LED Indication 
- Log in to Linux using the user name
root(password is not required). - To configure the board for static IP, follow the steps mentioned in Steps to configure static IP addresses.
- Reboot the video kit and log in again into
Linux using the user name
root. - Type
ifconfig, on the serial terminal connected to Interface 1 (Linux COM Port). - It must report some IP, which indicates
that the Ethernet port is working, see the following figure.
Figure 5-5. Fetching the Ethernet Port Status 
- Check if the connection is successful by
pinging the video kit, see the following figure.
Figure 5-6. Pinging the Video Kit 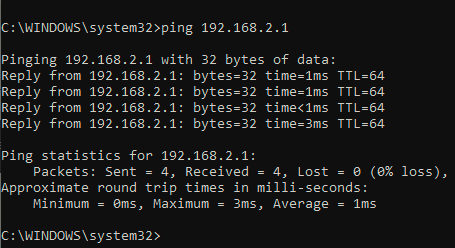
- From the host PC, open the web browser.
Enter the IP address of the PolarFire SoC video kit, depending on the Gigabit Ethernet MAC
(GEM) you are connected to (J6: 192.168.2.1 or J7: 192.168.2.2), in the address bar and
press Enter. The H.264 demonstration GUI loads in the browser, see
the following figure.
Figure 5-7. H.264 GUI 
- Click the Start Video to initiate
the video streaming. GStreamer or VLC player can be used to play the video stream. GStreamer
has minimal latency as compared to VLC player. Following list contains the procedure to open
the video using GStreamer and VLC player:
- To play the video using GStreamer in Windows command prompt or Linux terminal, use the
following command:
gst-launch-1.0 udpsrc port=10000 ! application/x-rtp, payload=96 ! rtph264depay ! h264parse ! avdec_h264 ! autovideosink - The H264 GUI creates a Session
Description Protocol (SDP) file. VLC player uses this file to accept streaming packets
from the Ethernet cable. Do the following procedure to open the video using SDP file:
- To download the SDP file, click Download SDP file.
- To play the video stream, open the
SDP file with the VLC player in Windows®/Linux® operating systems. In Linux, you can also execute
vlccommand in the terminal, with the SDP file as argument (for example,vlc video.sdp) to play the video stream.
- To play the video using GStreamer in Windows command prompt or Linux terminal, use the
following command:
- Observe a live stream video captured from
one of the cameras in the PolarFire SoC video kit. This is a scaled and H.264 compressed
video of 1280x720 resolution. To change the resolution, select the resolution and click
Update as shown in the following figure.
Figure 5-8. Select Resolution 
- Observe the live stream video in the VLC
player, as shown in the following figure. Adjust the VLC configurations to reduce the lag in
streaming. For more information about VLC configurations, see Appendix A: VLC Configurations.
Figure 5-9. Live Stream Video 
This concludes the demo.
To get back from static to DHCP (dynamic), use the following command in the Windows command-line prompt:
netsh interface ip set address name="Ethernet" dhcp