
1.21 TCP/IP WEB NET Server SDCARD FATFS
The Web Net Server SD Card configuration demonstrates creating an HTTP web server on a Microchip evaluation board. The FAT FS File System is used for storing the web pages on an external SD Card.
This demonstration uses the HTTPNET server module that supports encrypted communication with NET_PRES layer and third-party TLS service provider (like wolfSSL).
TCP/IP WEB NET Server SDCARD FATFS MCC Configuration
The following Project Graph diagram shows the Harmony components included in the WEB NET Server SDCARD FATFS demonstration application.
MCC is launched by selecting Tools > Embedded > MPLAB® Code Configurator from the MPLAB X IDE and after opening the project, TCP/IP demo project is ready to be configured and regenerated.
TCP/IP Root Layer Project Graph
The root layer project shows that SERCOM2 peripheral is selected to do read and write operation for TCP/IP commands.
This is the basic configuration with SYS_CONSOLE, SYS_DEBUG and SYS_COMMAND modules. These modules are required for TCP/IP command execution.
SDHC (SD/MMC Host Controller) PLIB provides low level APIs to configure and transfer data using the SD host controller. SD multimedia memory card ( SDMMC ) driver provides abstraction to communicate with SD/eMMC card through the SDHC peripheral library interface. The TCP/IP application use FAT file system with SDMMC driver to read/write to an SD card.
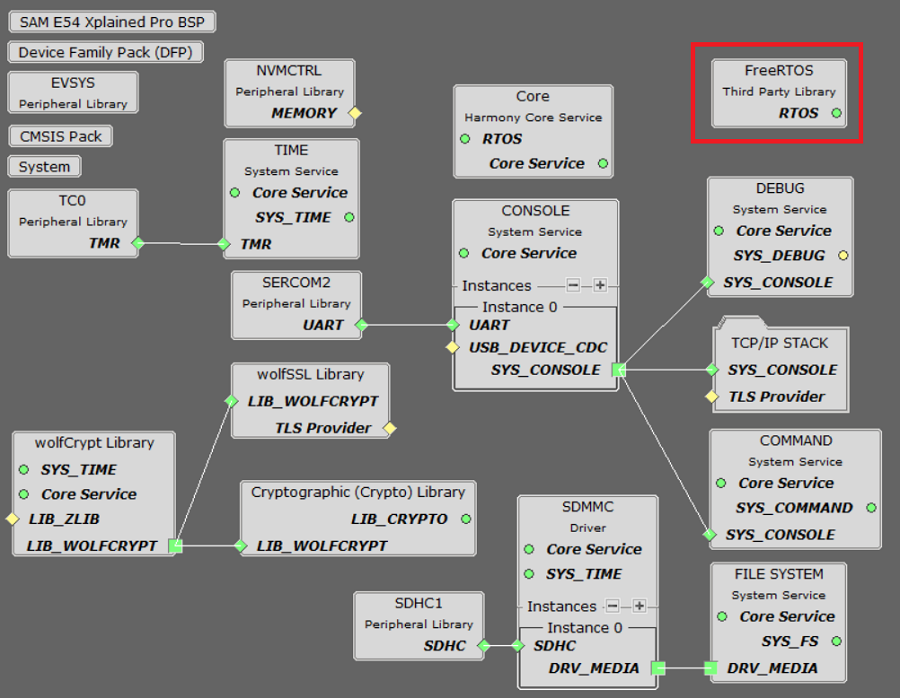
WolfSSL component is selected for secure connection which supports TLS and WolfSSL-Crypto component is selected for MD5 and SHA authentication.
TCP sockets calculate the ISN using the wolfSSL crypto library.
NOTE - The above screenshot contains FreeRTOS component and that is required for RTOS application. For bare-metal(non-RTOS) FreeRTOS component shouldn't be selected.
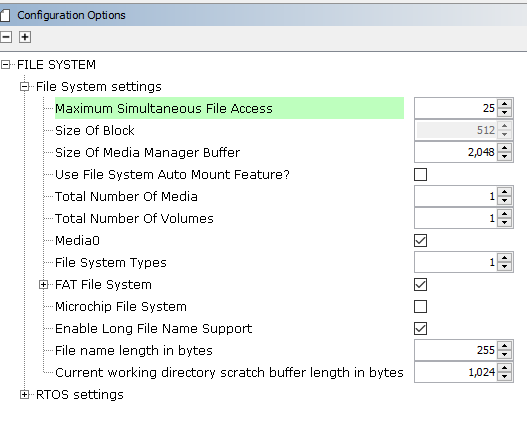
The FAT file system is selected for this application to read and write from the SDHC( sdcard ) module. This is the below snapshot for the FAT FS configuration.
TCP/IP Configuration
- SAM E54 Xplained Pro

- SAM E54 Xplained Pro
TCP/IP Required Application
TCP/IP demo use these application module components for this demo.
Announce module to discover the Microchip devices within a local network.
DHCP Client module to discover the IPv4 address from the nearest DHCP Server.
DNS Client provides DNS resolution capabilities to the stack.
HTTPNET Server module is selected to run the web_server for the port number 443.
NBNS NetBIOS Name Service protocol associates host names with IP addresses. This assign of human-name host names to access boards on the same subnet.
SMTP CLIENT let applications send e-mails to any recipient worldwide.
SNTP Simple Network Time Protocol updates its internal time periodically using a pool of public global time servers.
TCP/IP Data Link Layer
Internal ethernet driver(gmac) is enabled with the external KSZ8091 PHY driver library. The MIIM Driver supports asynchronous read/write and scan operations for accessing the external PHY registers and notification when MIIM operations have completed.
TCP/IP WEB NET Server SDCARD FATFS Hardware Configuration
This is the following section describes the hardware configuration used for this application demonstration.
- This section describes the required default hardware configuration use USB device as on board debugger and programmer for this application demonstration.
No hardware related configuration or jumper setting changes are necessary
Refer to the SAM E54 Xplained Pro User Guide
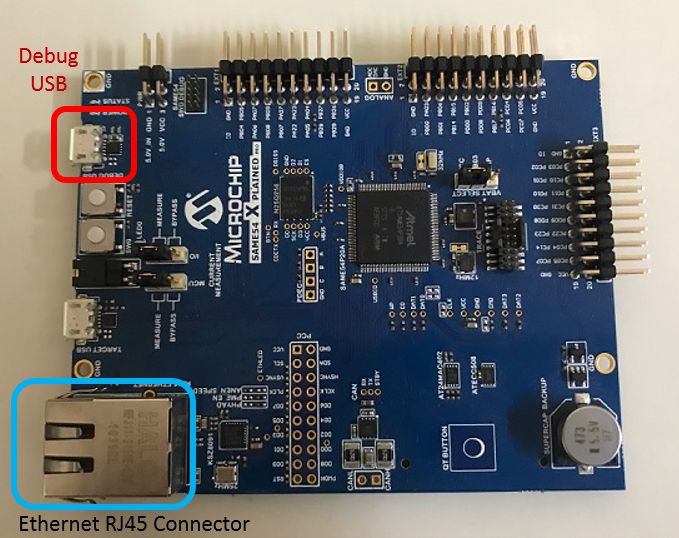
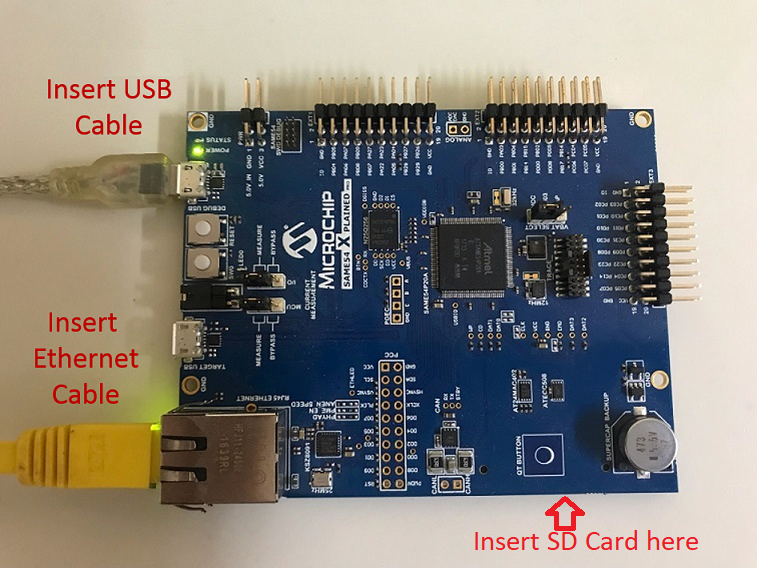
Connect the micro USB cable from the computer to the DEBUG USB connector on the SAM E54 Xplained Pro.
Insert the SD Card into the SD Card slot (which is on backside of the board) as shown above.
Establish a connection between the router/switch with the SAM E54 Xplained Pro through the RJ45 connector
TCP/IP WEB NET Server SDCARD FATFS Running Application
This Web Net Server application uses the SD card as a memory media and reads the web pages stored according to the configured mount path. Web Server reads the external SD card content using FAT FS API.
This table list the name and location of the MPLAB X IDE project folder for the demonstration.
| Project Name | Target Device | Target Development Board | Description |
|---|---|---|---|
| sam_e54_xpro.X | ATSAME54P20A | SAM E54 Xplained Pro | Demonstrates the WEB NET Server SDCARD FATFS on development board with ATSAME54P20A device and KSZ8091 PHY daughter board. This implementation is based on bare-metal(non-RTOS). |
| sam_e54_xpro_freertos.X | ATSAME54P20A | SAM E54 Xplained Pro | Demonstrates the WEB NET Server SDCARD FATFS on development board with ATSAME54P20A device and KSZ8091 PHY daughter board. This implementation is based on FreeRTOS. |
- Ensure a microSD/SD card is formatted and loaded with the web pages provided within the < install-dir > /net_apps_sam_e5x/apps/web_net_server_sdcard_fatfs/firmware/src/web_pages directory.
Running Demonstration Steps
Build and download the demonstration project on the target board.
If the board has a SERCOM2 configuration:
A virtual COM port will be detected on the computer, when the USB cable is connected to USB-UART connector.
Open a standard terminal application on the computer (like Hyper-terminal or Tera Term) and configure the virtual COM port.
Set the serial baud rate to 115200 baud in the terminal application.
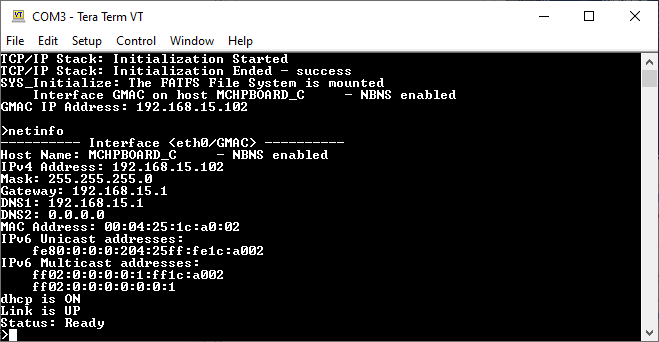
See that the initialization prints on the serial port terminal.
When the DHCP client is enabled in the demonstration, wait for the DHCP server to assign an IP address for the development board. This will be printed on the serial port terminal.
Alternatively: Use the Announce service or ping to get the IP address of the board.
Run tcpip_discoverer.jar to discover the IPv4 and IPv6 address for the board.
Execution :
After the successful board bring up, the console output becomes
HTTP Server Output -
An HTTP server is hosted by the demonstration application. Open a web browser and direct it to the board running the HTTP server by typing the URL in the address bar (for example, https://mchpboard_c or https://< ip-address as shown in the console > ), and then pressing Enter.
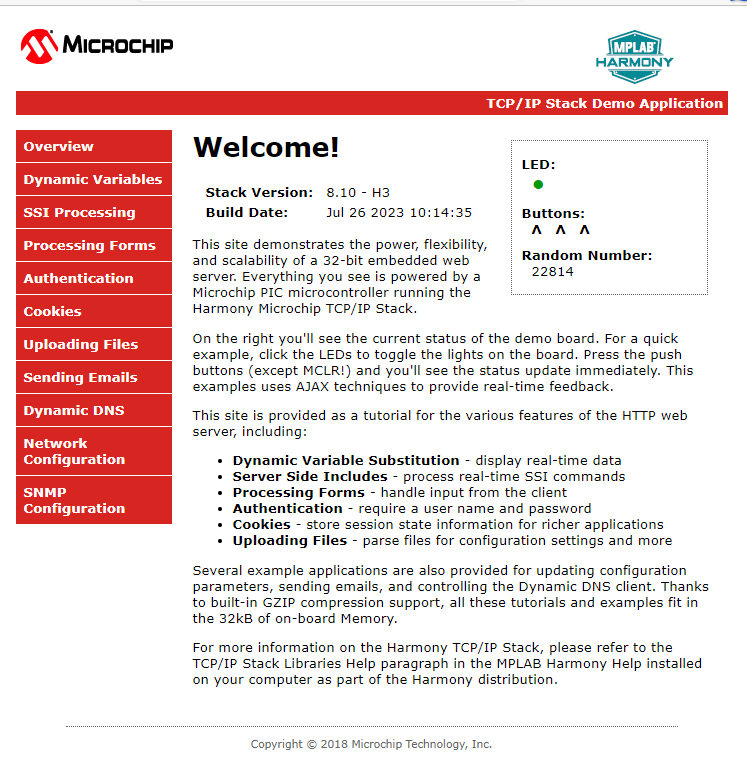
The demonstration application features following:
Dynamic Variables and Real-time Hardware Control - On the Overview page the LEDs can be clicked to toggle the LEDs on the Microchip hardware development board. The SWITCHes on the Microchip hardware development board can be pressed to toggle the Buttons on the web page. The dynamic variables can be updated in real-time on the HTTP server.
Form Processing - Input can be handled from the client by using the GET and POST methods (this functionality controls the on-board LEDs and is operational only on the Explorer 16 Development Board)
Authentication - Shows an example of the commonly used restricted access feature
Cookies - Shows an example of storing small text strings on the client side
Server Side Includes - An example of how SSI can be used to support dynamic content
File Uploads - Shows an example of a file upload using the POST method. The HTTP server can_accept_a user-defined MPFS/MPFS2 image file for web pages.
Send E-mail - Shows simple SMTP POST methods
Dynamic DNS - Exercises Dynamic DNS capabilities
Network Configuration - The MAC address, host name, and IP address of the evaluation kit can be viewed in the Network Configuration page and some configurations can be updated
MPFS Upload - A new set of web pages can be uploaded to the web server using this feature, which is accessed through http://mchpboard_c/mpfsupload
Notes:
- For the LED and SWITCH functionality portion of the demonstration, configure the GPIOs connected to LEDs and Switches on Microchip hardware development board, through the Pin Configuration manager in MPLAB® Code Configurator (MCC).