
5.3.2 Setting Up PTG Mode with MPLAB IPE
Using MPLAB IPE, follow these steps to download the project files into the microSDHC card in the MPLAB PICkit 5 and enter Programmer-To-Go mode.
- Insert a formatted
FAT32-compatible microSDHC card into the PICkit 5.

- Ensure that you have the appropriate connections to the device for
Programmer-To-Go:
- PICkit 5 is connected to the computer via the USB cable.
- PICkit 5 is connected via the appropriate programming interface connector to the target board.
- The target board is powered from either the PICkit 5 or a power supply, depending on your Project Properties selection.
- From the MPLAB IPE menu, select , and type in the password to log in. The
Operate tab should be
visible/selected; if not click on the Operate
button. Then, as shown in the following Figure, (1) enter your
Device name and click Apply, (2) select your debug Tool and
click Connect, and (3) select either your Hex or SQTP file by
Browsing.
Figure 5-5. MPLAB® IPE Operate Setup 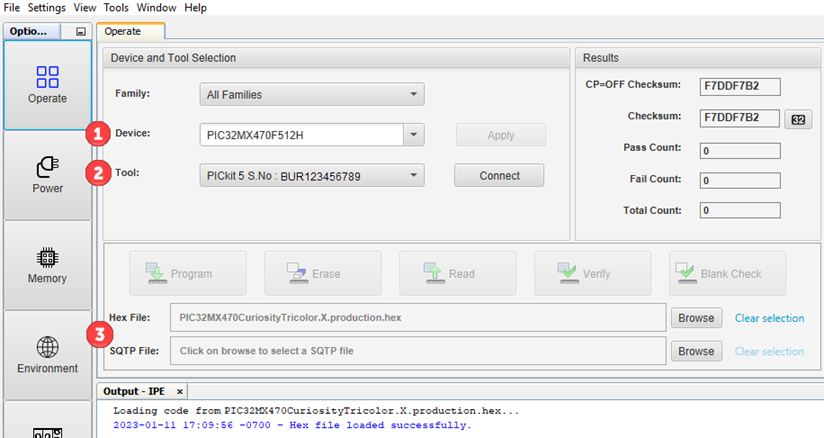
- Next, as shown in the
following Figure, (1) click Settings and then (2) locate the
Programmer-To-Go box.
Figure 5-6. MPLAB® IPE Programmer-To-Go Options 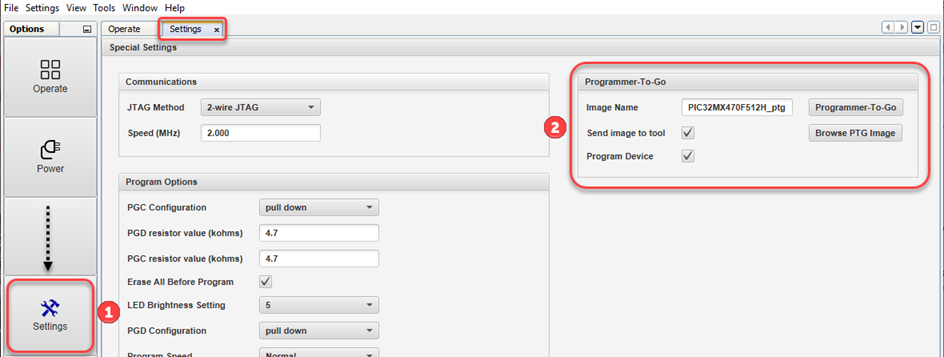
- In the Image Name field, the default is “<your project name>_ptg,” though you can edit the name if you wish. This will be the folder name on the microSDHC card that contains the appropriate files for Programmer-To-Go.
- The Send image to tool check box is selected by default. With the check box selected, the PTG image is created and then sent to the microSDHC card in the connected MPLAB PICkit 5.
- The Program Device
check box is selected by default. With the check box selected,, the
device connected to the MPLAB PICkit 5 is programmed.Note: If both the Send image to tool and Program Device check boxes are unchecked, see Setting Up PTG Mode Without a Memory Card.
- Click the
Programmer-To-Go button. During this process, the device is programmed, then the Programmer-To-Go directory is populated with the appropriate files for the Programmer-To-Go operation into the microSDHC card. The Output window displays a status message “Programming/Verify complete” when the process finishes successfully.Note: The PTG settings on the microSDHC card are the same as in the project (for example, memory, power, etc.).
The PICkit 5 is now in Programmer-To-Go mode. The LED should blink green to indicate the tool has been configured successfully for Programmer-To-Go.
- Disconnect the PICkit 5 and you’re ready to use Programmer-To-Go.