
3.6.3.3.1 Sensor Fusion AWS IoT Application on PIC32CM LS00 Curiosity Nano + Touch Evaluation Kit
Description
- Seamless data collection from multiple sensors
- Reliable data transmission to the AWS IoT Cloud service via the MQTT Broker
- Scalable architecture for future sensor additions
Modules/Technology Used
-
Peripheral Modules
- SERCOM0 (USART)
- SERCOM2 (I2C)
- SERCOM3 (USART)
- SYSTICK
- Power Manager (PM)
- EVSYS
- NVMCTRL
- PORT
- RTC
- PTC
-
Drivers
- I2C Driver
-
System Service
- Core
- Console
- Debug
- Time
- Core
-
Library
- Touch
-
Wireless System Service
- RNWF WINCS Wi-Fi Service
- RNWF WINCS Net Service
- RNWF WINCS MQTT Service

Hardware Used:
Software/Tools Used:
Refer Project Manifest present in harmony-manifest-success.yml under the project folder firmware/src/config/default
- Refer the Release Notes to know the MPLAB® X IDE and MCC Plugin version. Alternatively, Click Here.
Because Microchip regularly update tools, occasionally issue(s) could be discovered while using the newer versions of the tools. If the project doesn’t seem to work and version incompatibility is suspected, It is recommended to double-check and use the same versions that the project was tested with.
To download original version of MPLAB® Harmony v3 packages, refer to document
How to Use the MPLAB® Harmony v3 Project Manifest Feature(DS90003305)
Hardware Setup
Mount the Mikroe Shuttle Base Board on the mikroeBUS in the Curiosity Nano Explorer Board

- Connect all the Mikroe Click boards and
RNWF Add on Boards on the Mikroe Shuttle Extensions

- Attach all the Mikroe Shuttle Extensions
with the Mikroe Shuttle Base Board using 16-pin flat cables

- Connect the PIC32CM LS00 Curiosity Nano +
Touch Evaluation Kit to the Host PC as a USB Device through a Type-A male to micro-B USB
cable connected to Micro-B USB (Debug USB) port

Programming hex file
The pre-built hex file can be programmed by following the below steps.
- Open MPLAB X IDE
- Close all existing projects in IDE, if any project is opened.
- Go to File -> Import -> Hex/ELF File
- In the Import Image File window,
- Create Prebuilt Project,
- Click the Browse button to select the prebuilt hex file.
- Select Device as PIC32CM5164LS00048.
- Ensure the proper tool is selected under Hardware Tool and click on Next button.
- Select Project Name and Folder,
- Select appropriate project name and folder and click on Finish button
- Create Prebuilt Project,
- In MPLAB X IDE, click on Make and Program Device button to program the device.
- Follow the steps in Running the Demo section below.
Programming/Debugging Application Project
- Open the project group (pic32cm_ls00_cnano_aws_iot/firmware/aws_iot_pic32cm_ls00_cnanogroup) in MPLAB® X IDE
- Right click on aws_iot_pic32cm_ls00_cnanogroup file and go to Open Required projects > Open All Projects.
- Then right click on the non-secure project and click Set as Main Project.
- Ensure "PIC32CM LS00 Curiosity Nano" is selected as hardware tool to program/debug the application
- Build the code and program the device by clicking on the "make and program" button in MPLAB® X IDE tool bar
- Debugging the project can be done by clicking on the “Debug Main Project” button in MPLAB® X IDE tool bar
- Follow the steps in Running the Demo section below.
Running the Demo:
- Open a standard terminal application on the computer (like Putty or Tera Term) and configure the virtual COM port
- Set the serial baud rate to 115200 baud in the terminal application.
- To Reset the device, run this command:
ipecmd.exe -P32CM5164LS00048 -TPNEDBG -OK from the following location:
C:/Program Files/Microchip/MPLABX/v6.20/mplab_platform/mplab_ipe
 Attention: PIC32CM LS00 Curiosity Nano + Touch Evaluation Kit does not include a reset button. Therefore, the device can be reset by executing the reset command in the CMD prompt.
 - Wait for the initialization prints in the
serial port terminal
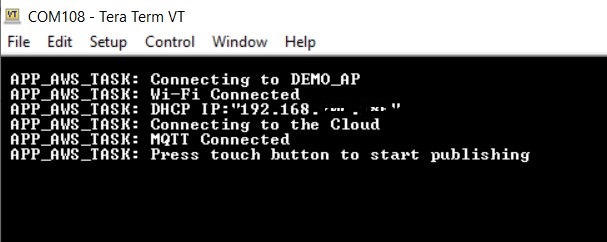
- Press the touch button on the PIC32CM
LS00 Curiosity Nano + Touch Evaluation Kit to start the message pubishing in the AWS IoT Cloud

- After the button press, the serial
console shows the published sensor data

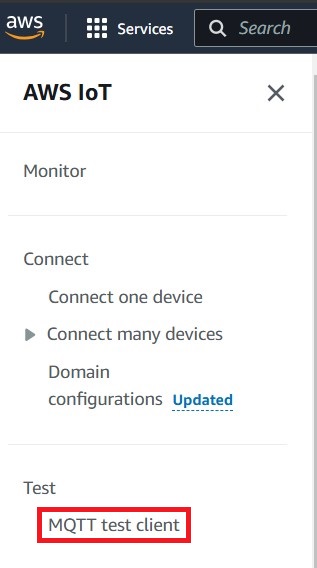
- Open the AWS IoT Cloud in the browser and
select the MQTT test client
- Enter the publish topic
/aws_iot_pic32c/ in the topic Subscribe section and click Subscribe button

- All sensor data are updated with the time
stamps in the AWS Cloud and also serial console

-
The Wi-Fi SSID and Password is configured through MCC under RNWF WINCS Wi-Fi Service configuration or the user can modify the credentials manually in the configurations.h file of the pic32cm_ls00_cnano_aws_iot project as below
- MCC Configuration:

- Manual Configuration:

- MCC Configuration:
- RGB LED indicates MQTT connected or not:
- The RED LED is turned ON when the
board is not connected to MQTT

- The GREEN LED is turned ON when the
board is connected to MQTT

- The RED LED is turned ON when the
board is not connected to MQTT
AWS Account Setup:
To run the AWS Cloud IoT core solution, an AWS account is required. The following are the steps to configure an AWS account.
Amazon Web Services (AWS) provides computing services for a fee. Some are offered for free on a trial or small-scale basis. By signing up for your AWS account, you are establishing an account to access a wide range of computing services.
Think of your AWS account as your root account for AWS services. It is very powerful and gives you complete access. Be sure to protect your username and password. You control access to your AWS account by creating individual users and groups using the Identity and Access Management (IAM) Console. You also assign policies (permissions) to the group from the IAM Console.
Create your own AWS account
- Create AWS account
- Go to Amazon AWS and follow instructions to create your own AWS account
- Additional details can be found at Create and activate a new AWSaccount
- Secure root account with MFA
(multi-factor authentication)
- This is an important step to better secure your root account against attackers. Anyone logging in not only needs to know the password, but also a constantly changing code generated by an MFA device.
- AWS recommends several MFA device options at the link Multi-Factor Authentication (MFA) for IAM
- The quickest solution is a virtual
MFA device running on a phone. These apps provide the ability to scan the QR code
AWS will generate to set up the MFA device.
- Return to Amazon AWS and click the Sign in to the Console.
- If it asks for an IAM username and password, select the Sign-in using root account credentials link.
- Enter the email and password for your AWS account.
- Under Find Services search for IAM and select it to bring up the Identity and Access Management options.
- Click on Activate MFA (Multi-factor Authentication) on your root account
- Creating an admin IAM user AWS best practices recommend not using your root account for standard administrative tasks, but to create a special admin user for those tasks.
- Follow the instructions at Create an administrative user for creating an admin user.
- Enable MFA (multi-factor authentication) for the admin user. See Require multi-factor authentication (MFA)
Creating Device Certificate to AWS IoT Cloud Service
- Login to your AWS account.
- Go to AWS IoT Core services.
- Under Manage > All devices > Things, click Create Things.
- Select Create a Single Thing.
- Enter the thing name of user choice and click Next (e.g., pic32c_aws_iot).
- Click on Auto-generate a new certificate and select Create Thing.
- Create a new policy name of user choice (e.g., pic32c_aws_iot_policy).
- Select Allow under Policy Effect.
- Under Policy action option, select * to select all the actions.
- Under Policy resources option, select * to select all the resources and click Create.
- Go to the Create single thing previous tap in the browser and add the newly added policy.
- Click Create
- Download the Private, Public keys, Root and Device Certificates.
- Activate the device certificate by clicking Activate Certificate option
- Select the pic32c_aws_iot thing and copy the ARN for IoT Connect, Publish, Subscribe and Receive policies.
- Under Security > Policies, select pic32c_aws_iot_policy.
- Copy the Policy ARN which is used for the MQTT Broker Configuration in the Harmony v3 Configurator.
Uploading Device Certificate to RNWF Add on Board
- Use the Certificate And Key Utility to upload the
Private Key and Device Certificate for AWS IOT Cloud ServiceNote: Refer to the Windows Send To Utility for Windows Machine
Comments
Reference Training Module: Arm TrustZone Getting Started Application on PIC32CM LS60 (Arm Cortex-M23) MCUs
- This application demo builds and works
out of box by following the instructions above in Running the Demo section. If the
user needs to enhance/customize this application demo, should use the MPLAB Harmony v3
Software framework. Refer links below to setup and build the applications using MPLAB
Harmony.
- How to Setup MPLAB Harmony v3 Software Development Framework (DS90003232).
- How to Build an Application by Adding a New PLIB, Driver, or Middleware to an Existing MPLAB Harmony v3 Project (DS90003253).
- Video - How to Set up the Tools Required to Get Started with MPLAB® Harmony v3 and MCC
- Create a new MPLAB Harmony v3 project using MCC
- Update and Configure an Existing MHC-based MPLAB Harmony v3 Project to MCC-based Project