
3.1.3.4 Smart Wireless Thermostat Wi-Fi Gateway Application on WFI32 IoT Development Board
Description
This application acts as bridge between the central node and the AWS cloud. It periodically receives the BLE end nodes temperature data from the central over UART and publishes the same over MQTT to the AWS IoT cloud for constant monitoring.
Modules/Technology Used
-
Peripheral Modules
- UART2
-
System Configuration
- ATECC608
- BA414E
- COMMAND
- CONSOLE
- Core
- CORE TIMER
- Cryptographic (Crypto) Library
- DEBUG
- Device Family Pack(DFP)
- FreeRTOS™
- I2C2
- NETCONFIG
- NVM
- Paho MQTT Library
- PIC32MZW1
- TIME
- Trust&Go
- UART1
- wolfCrypt Library
- wolfSSL Library
- TCPIP CORE
- TCP/IP STACK
- Application Layer
- Basic Configuration
- Driver Layer
- Network Layer
- Presentation Layer
- Transport Layer
-
Wireless
- System Services
- MQTT Service
- Net Service
- WiFi Provisioning Service
- WiFi Service
- System Services
-
Harmony Core Service


Hardware Used
Software/Tools Used
The projects have been verified to work with the following versions of software tools:
- For Wi-Fi Gatway PIC32MZ_W1, refer to the Project Manifest
- MPLAB® X IDE v6.20
- MPLAB® XC32 C/C++ Compiler v4.45
- Tera term or any serial application
- Python v3.5 or higher
Due to Microchip regularly updates tools, occasionally issue(s) could be discovered while using the newer versions of the tools. If the project does not seem to work and version incompatibility is suspected. It is recommended to double-check and use the same versions that the project was tested with. To download original version of MPLAB Harmony v3 packages, refer to the document How to Use the MPLAB Harmony v3 Project Manifest Feature (DS90003305).
Prerequisites
-
The WFI32E01PC module on the WFI32 IoT development board has an in-built Trust and Go (TNG) device. It is essential to upload the device certificate of the TNG device to the AWS IoT cloud for authenticated client TLS connection with the cloud platform.
-
Follow the procedure mentioned in Generate Device certificate
readme_deviceCertificate.mdfor extracting the certificate from the device. -
Upon generation, the device certificate should be uploaded to the cloud. Refer to the Uploading Device Certificate to AWS IoT cloud service for more details about the procedure.
-
The
configuration.hfile inwfi32_iot.Xproject should be modified for connecting successfully to the AWS cloud.-
Ensure that the WIFI SSID and WIFI Password is modified in this file by changing the
SYS_WIFI_STA_SSIDandSYS_WIFI_STA_PWDmacros with the user Wi-Fi credentials. The default credentials are as follows.
-
Ensure that the aws endpoint and aws thing name are properly set using
SYS_MQTT_INDEX0_BROKER_NAMEandSYS_MQTT_INDEX0_CLIENT_IDmacros respectively. This depends on user-specific AWS account credentials.
-
AWS Account Setup
-
To run this application, an AWS account is required. This section describes the steps necessary to obtain and configure an AWS account for the demo.
Amazon Web Services (AWS) provides computing services for a fee, with some offered for free on a trial or small-scale basis. Signing up for an AWS account establishes access to a wide range of computing services. An AWS account serves as the root account for accessing AWS services. It is very powerful and grants complete access. It is important to protect the username and password associated with the account. Control over access to the AWS account is achieved by creating individual users and groups using the Identity and Access Management (IAM) Console. From the IAM Console, policies (permissions) can be assigned to the groups.
Create an AWS Account
-
Create AWS account.
-
Go to Amazon AWS and follow instructions to create an AWS account.
-
Additional details can be found at Create and activate a new AWS account.
-
-
Secure root account with MFA (multi-factor authentication).
-
This is an important step to better secure the root account against attackers. Anyone logging in not only needs to know the password. However, a constantly changing code generated by an MFA device.
-
AWS recommends several MFA device options at the link Multi-Factor Authentication (MFA) for IAM.
-
The quickest solution is a virtual MFA device running on a phone. These apps provide the ability to scan the QR code AWS will generate to set up the MFA device.
-
Return to Amazon AWS and click the Sign in to the Console.
-
If it asks for an IAM username and password, select the Sign-in using root account credentials link.
-
Enter the email and password associated with the AWS account.
-
Under Find Services search for IAM and select it to bring up the Identity and Access Management options.
-
Click on Activate MFA (Multi-factor Authentication) for the root account.
-
-
-
Creating an admin IAM user AWS best practices recommend not using the root account for standard administrative tasks, but to create a special admin user for those tasks. Refer to the lock-away-credentials.
-
Follow the instructions at Create an administrative user for creating an admin user.
-
Enable MFA (multi-factor authentication) for the admin user. Refer to the Require multi-factor authentication (MFA).
Uploading Device Certificate to AWS IoT Cloud Service
-
Login to the AWS account
-
Go to AWS IoT Core services
-
Under Manage>All devices>Things, click Create Things
-
Select Create a Single Thing
-
Enter the thing name of any choice and click Next (e.g., Wireless_Thermostat)
-
Click on Skip creating a certificate currently and select CreateThing
-
Under Security>Certificates, click on Add Certificate>Register Certificates
-
Select CA is not registered with AWS IoT
-
Browse from PC and upload the device certificate (.crt) extracted from the device
-
Click Activate all and click on Register Certificate
-
Under Security>Policies, select Create a policy
-
Enter a policy name of any choice (e.g., Wireless_Thermostat_policy)
-
Copy the following resource ARN policies for IoT Connect, Publish, Subscribe, and Receive policies:
- Connect ARN: *
- Publish ARN: *
- Receive ARN: *
- Subscribe ARN: *
Note: This policy is set only for testing. It is not recommended to allow access for all IoT resources. Modify policy according to AWS Documentation. -
Select Allow under Effect and click Create
-
Go to Security>Certificates and select the certificate created
-
Under Policies tab, select Attach Policy and select the policy created
-
Under Things tab, select Attach to Things and select the thing name created for the certificate to get attached to the thing
-
Get the device endpoint from Settings
Note: The AWS endpoint will be of the format axxxxxxxxxxxx-ats.iot.region.amazonaws.com.
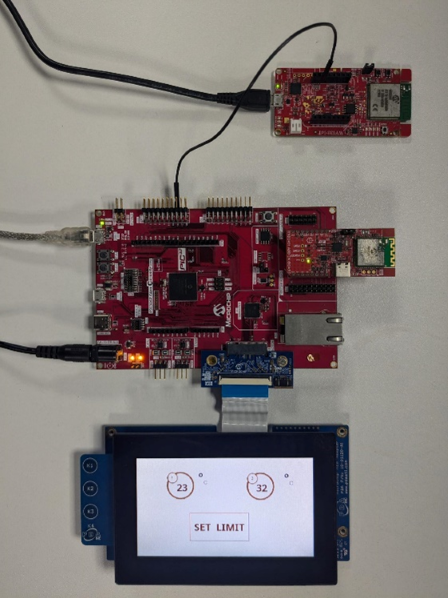
Hardware Setup
-
Connect the WFI32 IoT development board to the host PC as a USB device through a Type-A male to Micro-B USB cable connected to PKOB4 Micro-B USB (Debug USB) (J200)
-
Connect RX (RB9) pin on the mikroBUS header of the WFI32 IoT development board to the central node pin PC08 for UART communication
Programming Prebuilt Hex File
-
Perform Prerequisites steps mentioned above, if not done already
-
Open MPLAB X IDE
-
Close all existing projects in IDE, if any project is opened
- Go to File>Import>Hex/ELF file
- In the Import Image File
window,
- Create Prebuilt
Project,
- Click the Browse button to select the prebuilt hex file
- Select Device as PIC32MZ1025W104132
- Ensure the proper tool is selected under Hardware Tool and click the Next button
- Select Project Name
and Folder,
- Select appropriate project name and folder and click the Finish button
- Create Prebuilt
Project,
-
In MPLAB X IDE, click the Make and Program Device button to program the device
-
Follow the steps in Running the Demo section
Programming/Debugging Application Project
-
Open the project
wfi32_iot.Xin MPLAB X IDE frompic32cz_ca90_wireless_thermostat/firmware/wfi32_iot_wt_gateway -
Ensure
WFI32 IoT boardis selected as hardware tool to program/debug the application -
Build the code and program the device by clicking on the Make and Program button in MPLAB X IDE tool bar
-
Follow the steps in Running the Demo section
Running the Demo
-
Power up the board.
-
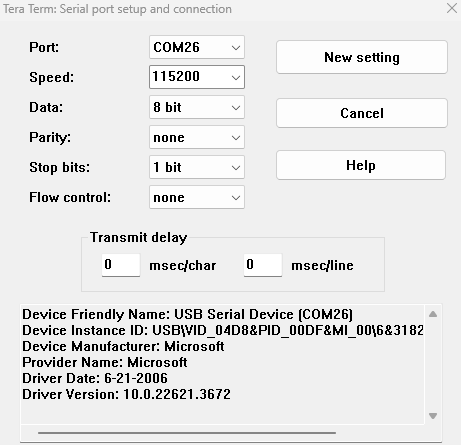
Open the Terminal application (e.g., Tera term) on the computer.
-
Change the baud rate to 115200 from Setup>Serial menu.
-
Press Reset to run the application from the beginning.
-
The console displays TCP/IP stack initialization messages and the Gateway IP address gets assigned and displayed on successful connection with Wi-Fi AP. Wait for some time for the MQTT connection establishment as it may take some time.

-
Once the MQTT connection is established the device updates the temperature received from the central node in AWS cloud periodically.

-
To view the messages published, log into the AWS account and navigate to AWS IoT core service>MQTT Test client and subscribe to
/pubTopic/, then the following messages will be displayed.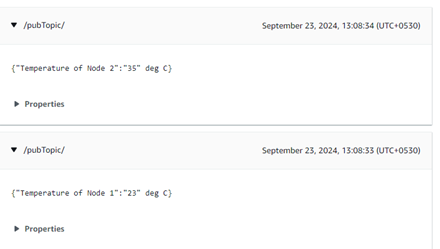
Comments
- Getting Started Application on WFI32 IoT Development Board
- Reference Document: PIC32MZ W1 Software User Guide (DS50003034)
- WFI32 IoT - MPLAB peripheral Harmony drivers and application examples
- WFI32 IoT - MPLAB net Harmony drivers and application examples
- This application demo builds
and works out of box by following the instructions above in Running the Demo
section. If the user needs to enhance/customize this application demo,
should use the MPLAB Harmony v3 Software framework. Refer to the following
links to setup and build the applications using MPLAB Harmony.
- How to Setup MPLAB Harmony v3 Software Development Framework (DS90003232)
- How to Build an Application by Adding a New PLIB, Driver, or Middleware to an Existing MPLAB Harmony v3 Project (DS90003253)
- Video - How to Set up the Tools Required to Get Started with MPLAB® Harmony v3 and MCC
- Create a new MPLAB Harmony v3 project using MCC
- Update and Configure an Existing MHC-based MPLAB Harmony v3 Project to MCC-based Project