
3.3.4 BLE Based Weather Station and Motion Sensor Application on SAM D21 Curiosity Nano and Nano Base for Click Boards
Description
The application demonstrates a solution based on Microchip products for environmental or weather industry products. The application demonstrates posting of weather and motion sensor data collected from the various sensors to android mobile application via BLE (Bluetooth Low Energy). The PTH (Pressure, Temperature and Humidity) collected from BME680 sensor of the Mikro elektronika 13DOF click board and motion sensor data collected from BMI088 and BMM150 sensors of Mikro elektronika 13DOF Click are posted to the android application via BM71 Bluetooth module.
The host microcontroller (SAM D21) is interfaced to the 13DOF click over the I2C interface and BM71 XPRO over UART.
Modules/Technology Used
- Peripheral Modules
- Timer
- SERCOM
- Driver Modules
- BM71 Driver
- STDIO Library
Hardware Used
Software/Tools Used
This project has been verified to work with the following versions of software tools:
Refer Project Manifest present in harmony-manifest-success.yml under the project folder firmware/src/config/samd21_cnano.
- Refer the Release Notes to know the MPLAB X IDE and MCC Plugin version.
- Download and Install Microchip Bluetooth Data Android App in the android mobile
Because Microchip regularly updates tools, occasionally issue(s) could be discovered while using the newer versions of the tools. If the project does not seem to work and version incompatibility is suspected. It is recommended to double-check and use the same versions that the project was tested with. To download original version of MPLAB Harmony v3 packages, refer to document How to Use the MPLAB Harmony v3 Project Manifest Feature (DS90003305).
Adding Private Characteristics to BM71
- In BM71-XPRO: Change jumper J2 to select USB.
- In BM71-XPRO: Configure DIP switch SW2 with below configurations.
- All DIP switch ON.
- Power the BM71-XPRO from a Host PC through a Type-A male to Micro-B USB cable connected to Micro-B port (J1).
- Perform reset by pressing switch SW1
on BM71-XPRO and check blue LD1 is ON.

- Download the manual configuration tool from BM70/71 Firmware & Software Tools v1.11.
- Extract and locate configuration tool
from below location:
- Your_downloaded_folder
\Firmware & Software Tools
              v1.11\ConfigurationTool\IS187x_102_BLEDK3v1.11_UI1.00
- Your_downloaded_folder
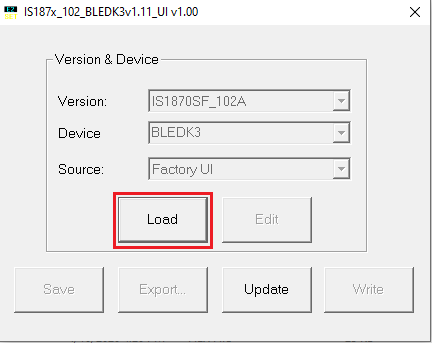
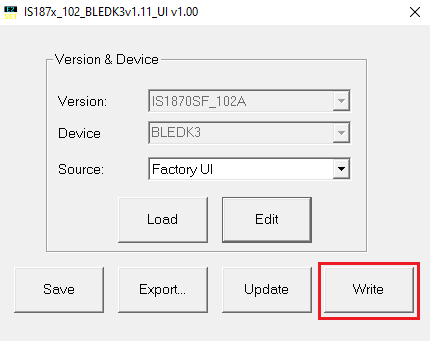
- Double click on
IS187x_102_BLEDK3v1.11_UI1.00.exe. - Click on Load button and
select Load Text File.
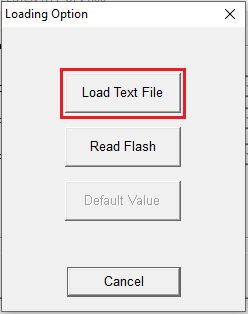
- Select
bm71_environmental_private_service.txt from bm71_configuration folder
present in firmware folder.

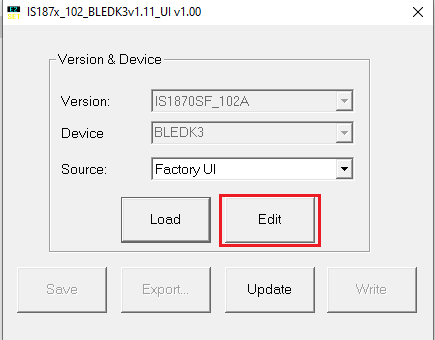
- Click on EDIT option.
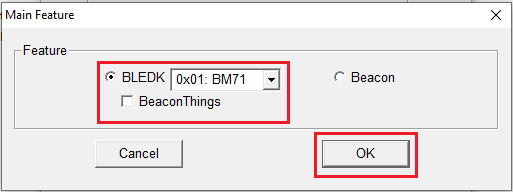
- Select 0x01: BM71 in BLEDK and
click OK.
- Click on Finish.

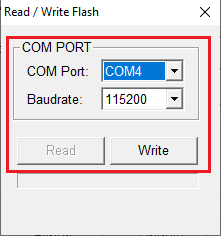
- Click on Write.
- Select respective COM Port and
set baud rate to 115200 then click on Write.
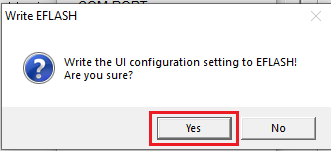
- Click on Yes to successfully
update the private characteristics on to BM71 module.
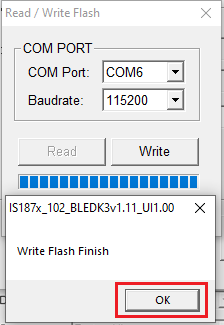
- After successful update, click
OK and remove the power from BM71-XPRO and change jumper J2 to select
EXT.
- Turn OFF DIP 1 switch.
Setup
- Mount SAM D21 Curiosity Nano Evaluation Kit on "CNANO56_HOST_CONN"(U3) connector of Curiosity Nano Base board.
- Mount the 13DOF Click on the mikro bus 1 connector of Curiosity Nano Base board.
- Connect the BM71-XPRO on to EXT 1 connector of Curiosity Nano Base board.
- Power the SAM D21 Curiosity Nano
Evaluation Kit from a Host PC through a Type-A male to Micro-B USB cable connected to
Micro-B port (J105).

Programming Hex File
The pre-built hex file can be programmed by following the below steps.
Steps to program the hex file:
Before proceeding with this step complete "Adding private characteristics to BM71" step.
- Open MPLAB X IDE.
- Close all existing projects in IDE, if any project is opened.
- Go to File -> Import -> Hex/ELF File.
- In the Import Image File window,
- Create Prebuilt Project,
- Click the Browse button to select the prebuilt hex file.
- Select Device as ATSAMD21G17D.
- Ensure the proper tool is selected under Hardware Tool and click on Next button.
- Select Project Name and Folder,
- Select appropriate project name and folder and click on Finish button
- Create Prebuilt Project,
- In MPLAB X IDE, click on Make and Program Device button to program the device.
- Follow the steps in Running the Demo section below.
Programming/Debugging Application Project
Before proceeding with this step complete "Adding private characteristics to BM71" step.
- Open the project (ble_weather_station\firmware\sam_d21_cnano.X) in MPLAB X IDE
- Ensure SAM D21 Curiosity Nano is selected as hardware tool to program/debug the application
- Build the code and program the device by clicking on the Make and Program button in MPLAB X IDE tool bar
- Follow the steps in Running the Demo section below
Running the Demo
Before proceeding install Microchip Bluetooth Data android app in an Android Smartphone.
- Enable Bluetooth and location from Smatphone settings.
- Perform reset by unplugging and re-plugging the power cable of SAM D21 Curiosity Nano.
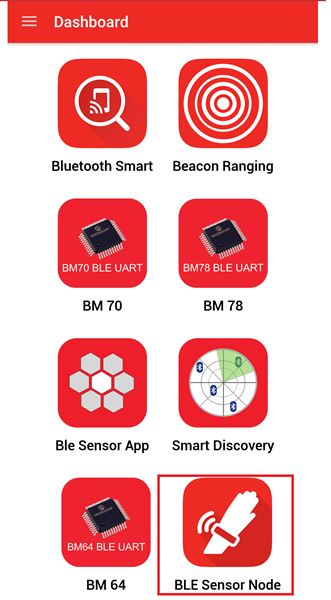
- After power up, open Microchip
Bluetooth Data (MBD) android app from the smartphone and tap on BLE Sensor
Node icon on the dashboard. If prompted, allow the application to turn on
Bluetooth.
- Scan for Bluetooth devices by tapping
START SCAN option. The BM71 device should appear as MCHP in the list of Bluetooth
devices.

- Stop the scan and connect using the
MCHP BLE device. This will establish a connection between the MBD BLE
application and the BM71 BLE device.


- Once connected, the application shows
the proximity screen and displays the Status of the Bluetooth link and using RSSI, the
approximate range between the Android device and the SAM D21 Curiosity Nano Evaluation
Kit.

- Navigate to the Environment Sensor
screen by swiping left on the proximity screen as shown in above figure.

- Tap on the Graph button next to the
Temperature, Humidity and Pressure to see the PTH values plotted on graphs.


- Navigate to the Accelerometer Sensor
screen by swiping twice on to left from Environment screen.

- Click on start button to see the
Accelerometer values plotted on graph.

- Navigate to the Gyroscope Sensor screen
by swiping left on the Accelerometer screen.

- Click on start button to see the
Gyroscope values plotted on graph.

- Navigate to the 3D Plot screen by
swiping left on the Gyroscope screen.

- Keep finger on 13DOF click board to see PTH values changing and move the 13DOF click board to see accelerometer and gyroscope values changing.
Comments
- Other features on the application, such as the Step Count and Light are not supported by this demo. Navigating to these screens may lead to an undefined behavior.
- Code related for custom private services are added manually, harmony v3 framework does not generate code related to it.
- Reference Training Module: Getting Started with Harmony v3 Peripheral Libraries on SAM D21 MCUs
- This application demo builds and
works out of box by following the instructions above in Running the Demo
section. If the user needs to enhance/customize this application demo, should use the
MPLAB Harmony v3 Software framework. Refer links below to setup and build the
applications using MPLAB Harmony.
- How to Setup MPLAB Harmony v3 Software Development Framework (DS90003232).
- How to Build an Application by Adding a New PLIB, Driver, or Middleware to an Existing MPLAB Harmony v3 Project (DS90003253).
- MPLAB Harmony v3 is configurable through MPLAB Code Configurator (MCC). Refer to the below links for specific instructions to use MPLAB Harmony v3 with MCC.