6.1.2 Configure User Application to Use Bootloader
To integrate Bootloader with a user application, follow these steps in the user
application project. These steps are applicable to any user application that requires
Bootloader functionality:
Add the Bootloader Services
component to the user application project and generate the necessary code.
Include the bootloader as a “Loadable
File/Project” to create a unified image.
Program the unified image onto the
device.
Add Bootloader Services Component and Generate Code
Launch MPLAB® X IDE.
Go to File>Open Project.
Navigate to user
application project folder (ending with .X), select
it, and click Open.
Click the MCC icon to
launch the MPLAB® Code Configurator.
The MCC window will open, displaying the Project Graph tab.
After launching MCC, in the
Device Resource window, perform the following steps:
Expand
Harmony>Wireless>Driver.
Click the green (+)
symbol next to the “Bootloader Services” component. This action adds
the “Bootloader Services” to the Project Graph.
Click Yes to
accept and auto-activate any required dependencies. The MCC
automatically adds and connects any additional components needed for
the Bootloader to function.
The “Bootloader Services” component generates the supporting linker
file and MPLABX script needed for adding a metadata header into the
application image.
The Project Properties tab include the “SignFirmware”
settings.
For DFU via UART, firmware signature and verification are optional.
For OTAU, the user must enable firmware signature and verification
by checking Use Firmware Signature Verification API in
Bootloader.
The following project graph figure is just an example. The user may have
different graph depending on their application.
Figure 6-17. User Application Adding Bootloader Services
Click Generate to generate the user application code.
The newly generated code includes some code related to the
bootloader service. Additionally, the project’s linker script file
is automatically modified to incorporate bootloader
functionality.
Figure 6-18. Generate User
Application Code
After code generation, the “SignFirmware” settings appear in Project
Properties.
Note: If not visible, restart MPLAB X
IDE.
The following are the recommended authentication methods to the user:
From the “Auth Method:” drop-down list, the user can choose
ECDSA256-SHA256 or SHA256.
ECDSA256-SHA256 – Firmware signature validation and data
integrity check.
SHA256 – Firmware data integrity check only.
If the user chooses None as the authentication method, then
no firmware security/integrity check (not recommended).
Important: If an issue occurs during
image saving into slot1, the new image might be incomplete, and
the firmware could become non-functional at the next restart.
Therefore, choosing None option is not secure for
firmware upgrades.
Note: The “Sequence Number:” must not be
0x00000000 or 0xffffffff, as these are invalid
values.
Add Bootloader as Lodable File/Project to Create Unified Image
Once the new code is generated and configured, add the Bootloader as a loadable
project or loadable hex file in the updated project. This allows MPLAB X IDE to
merge both the user application and the bootloader, creating a unified firmware by
generating a unified image file.
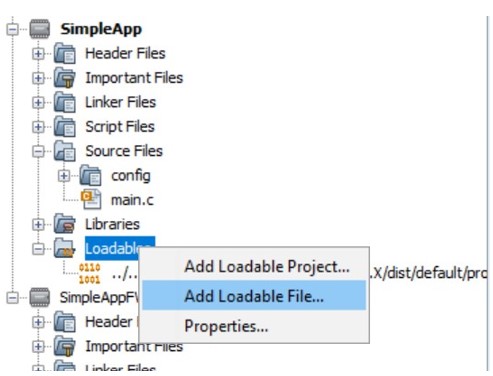
To add Bootloader as loadable file, perform the following steps:
In the project tree,
right-click Loadables>Add Loadable File.Figure 6-21. User Application
Add Loadable File
Browse and select the
bootloader file.
In this scenario,
select Bootloader.X.production.hex file.Figure 6-22. Add
Loadable File
To add bootloader as loadable
project, perform the following steps:
After adding, click Clean
and Build Main Project on the MPLAB X IDE tool bar to rebuild and
create a unified image.
Click the Clean
and Build Main Project icon.
The build process
merges the user application and bootloader.
Figure 6-25. Build to Create
Unified Image
After building, the generated files are available under
firmware\ble_sensor.X\dist\default\production path.
signed.unified.hex – This is a combined image that
includes both the user application and the bootloader. By
programming this unified image, the user application gains
bootloader capabilities.
signed.bin – This is the target binary image file
that the bootloader uses for DFU.
If there are any modifications to the user application firmware, the user
can build and generate the binary file. Then, use the bootloader to upgrade
the device to the new image.
Note: Ensure that the
binary file is correctly generated before proceeding.
Program Unified Image
As mentioned above, the user needs to program the device with a unified image to
enable the user application to have bootloader capability. To do this, on the MPLAB® X IDE Tools bar, click the Make and Program Device
Main Project icon to program the device. The unified image will be
programmed into the device.Figure 6-26. Program Unified
ImageNow, the device with the user application will have bootloader functionality.
The user can run DFU by using the bootloader. For more details, see Device
Firmware Upgrade Over Serial from Related Links.


 Note: The “Sequence Number:” must not be 0x00000000 or 0xffffffff, as these are invalid values.