
1.1.2 Generate a Touch Project With MCC Melody
Objective
The following procedure shows how to create a Touch project with the MPLAB® Code Configurator (MCC) Melody platform where touch sensors and their parameters can be graphically added and tuned. The resulting project supports the MPLAB® XC8 compiler in MPLAB®X IDE, and uses the ATTINY3217 Xplained Pro board along with the T10 Mutual Capacitance Xplained Pro Extension Kit.
Materials
Hardware Tools
Software Tools
MPLAB® X IDE with MCC installed.
Procedure
Step 1: Open MPLAB® X IDE
Go to File>New Project in MPLAB® X IDE.

Step 2: Choose Project
In the New Project window, select Application Project and click Next.

Type TINY3217 in the Device field and select ATtiny3217.

In the Tool field, select the Attiny3217 Xplained Pro tool from the drop down and click Next.

Step 4: Compiler Selection
In the Select Compiler section, select the XC8 compiler and click Next.

Step 5: Project Settings
Enter the project name, location and folder for the project and click Finish.

Step 6: MCC With Melody
Select MCC from the toolbar.

The MCC Content Manager tab opens up. Click Next.

Step 7: Melody With Touch Package
Select the Touch Library option from the Content Libraries tab and click Finish.

Add Touch from Touch Configurator in the Device Resources tab.

Touch is added to the Project graph as shown below.

Include RTC from Device Resources.

RTC and Touch appear in the Builder tab as follows:

Toggle on the Overflow Interrupt Enable button in the RTC tab.

Select Mutual-Cap from the drop down.

Click the “Button” icon and add four buttons.

The following dialog box opens indicating that the Sensor pins are auto-assigned on creation. Click Ok.

Click the “Slider” icon, select 4 in the Segments field and click Add.

Now four buttons and four channel slider sensors are added.

A generalized pin assignment for a majority of the Xplained PROs and MCUs has been provided in a downloadable file titled Curiosity Nano Touch Adapter Pin Configuration. To download it, scroll down to the Documentation section in this link, as indicated by the image below.

If the MCU or the XPRO board are not available, then the user can assign the pins based on the indications in their respective data sheet/user guide. The figure below shows a snapshot of the SAML10 and T10 XPRO pinout.

Based on the documentation file, select the X and Y lines as follows:
| Sensor | Channel ID | X Line | Y Line |
| Button 0 | 0 | 5 | 4 |
| Button 1 | 1 | 4 | 4 |
| Button 2 | 2 | 1 | 4 |
| Button 3 | 3 | 0 | 4 |
| Slider 0 | 4 | 5 | 3 |
| 5 | 4 | 3 | |
| 6 | 1 | 3 | |
| 7 | 0 | 3 |
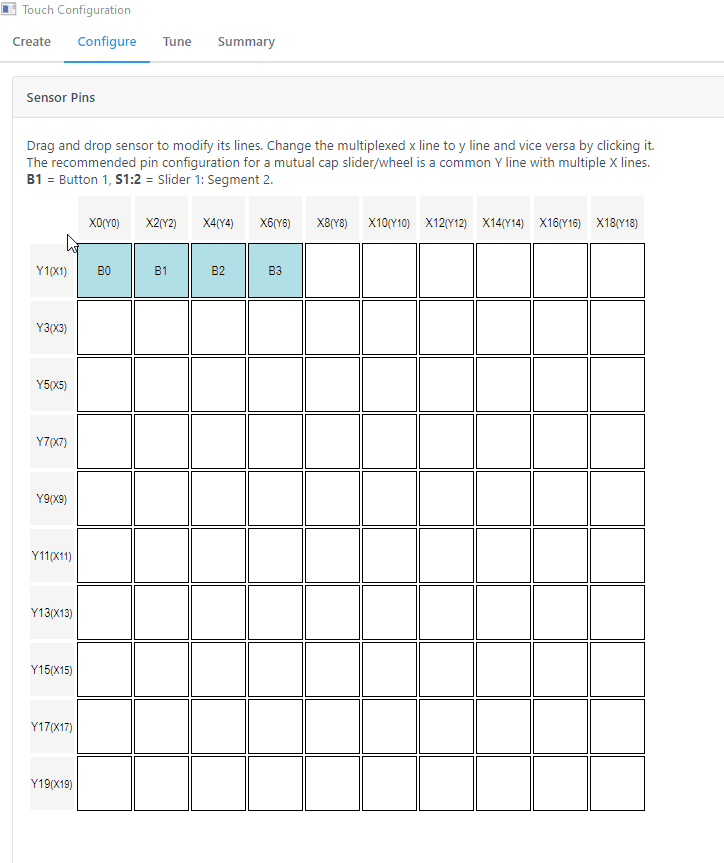
The pin assignment can be done in Configure>Sensor Pins. The pins were selected by referencing the above table.

Parameters
Step 13: Sensor Parameters
For tuning the touch parameters, go to Config>Sensor Parameters and tune according to the application.
The Sensor Parameters tab allows to configure touch sensor parameters such as:
- Digital Filter Gain
- Digital Filter Oversampling
- Analog Gain
- Series Resistor
- Addition Charge Share Delay
- PTC Clock
- Sensor Detect Threshold
- Sensor Hysteresis
- Sensor AKS

Here, the CPU operating frequency can be set in the GCLK block in MHz, as highlighted above.
Step 14: Common Parameters
For tuning the touch parameters, go to Config>Common Parameters and tune according to the application.
The Common Parameters tab allows to configure touch sensor parameters such as:
- Acquisition
- Scan Rate
- PTC Interrupt Priority
- Acquisition Frequency
- Sensor
- Detect Integration
- Away from Touch Recal Integration count
- Away from Touch Recal Threshold
- Touch Drift Rate
- Away from Touch Drift Rate
- Drift Hold Time
- Re-Burst mode
- Max ON Duration

Step 15: Frequency Hop
Frequency Hop can be enabled by navigating to Config>Frequency Hop/AFA and then sliding the Enable Frequency Hop button. A maximum of seven frequency steps can be selected and individually configured using the drop down. Hop Frequencies are fixed at compile time in Frequency Hop.

The auto-tune feature can be enabled by toggling on the Enable Frequency Auto Tuning button. A detailed description on how to configure the Frequency Hop and Frequency Hop Autotune is provided in the How to Enable Frequency Hop Auto Tune section.

Step 16: Touch Tuning
Enable the datastreamer by toggling on the Enable Touch tuning Data connection button. A detailed description on how to configure the datastreamer is provided in the Guide to View Touch Tune Data Using MPLAB® Data Visualizer section.

Click the Summary tab to review the project configuration and find versions of Library modules. Check whether all the necessary parameters are enabled and present.

The pin assignment can be checked as configured above in the Pin Grid View tab.

Step 18: Configuring Hints and Warnings
The Notifications tab contains hints and warnings given for the project to build without any errors.

To clear these messages, go to Touch Configurator> Important Notes.

A new pop up with the respective notifications is displayed. Once all the items in the notifications are checked, the warnings and hints are cleared.

In the Resource management tab, select Interrupt Manager and enable the toggle the Global Interrupt Enable button, as indicated in the Notifications [MCC] tab.


Click Generate in the Project Resources tab.

The “Generation complete” message is displayed in the Output tab.

Step 19: Include touch_process() to the
main while(1) loop. Now the project is ready for testing on the
kit.
