
8.2 Starting an X2Cscope Session
This section describes how to create an X2Cscope session and connect to your target device.
Creating an X2Cscope Session
Click the X2Cscope Session button in the main Data Visualizer toolbar to create a new X2Cscope session. This opens the X2Cscope panel where you can load symbols, configure the connection, and add variables.

The X2Cscope Panel
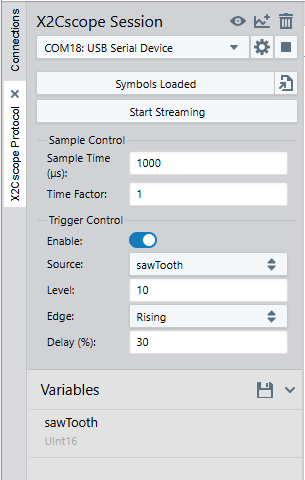
The X2Cscope panel contains:
- Connection source selector: For configuring the data source (COM port).
- Load Debug Symbols button: For loading the project ELF File.
- Start/Stop Streaming button: For controlling scope capture.
- Scope timing configuration: Sample time and sample time factor settings.
- Trigger configuration: Variable, type, level, and delay settings.
Connecting to the Target
Selecting the Serial Port
Navigate to the X2Cscope Protocol panel.
Select the COM port connected to your target's UART:
- Click the connection source selector.
- Choose the appropriate serial port.
Connection Settings
Configure the baud rate to match your target’s UART configuration:
- Baud rate: 115200 (default)
- Data bits: 8
- Stop bits: 1
- Parity: None
For detailed configuration options, see X2Cscope Configuration Options.