6.2.2 Import an Existing MPLAB IDE v8 Project
Select one of the following methods to import an MPLAB IDE v8 project into an MPLAB X IDE project.
- Select
- On the Start Page, click on the Learn & Discover or My MPLAB X IDE tab, Projects section, Import Legacy link.
When importing, note the following considerations:
MPLAB IDE v8 workspace settings not transferred
Settings that were saved in a workspace in MPLAB IDE v8 (such as tool settings) will not be transferred to the new MPLAB X IDE project. Refer to the MPLAB IDE v8 help for what is stored in a workspace (MPLAB IDE Reference>Operational Reference>Saved Information).
Project settings, such as compiler, linker, and assembler options, will be transferred to the new MPLAB X IDE project.
MPLAB IDE v8 project possible file changes
An MPLAB IDE v8 project using the “MPLAB C Compiler for PIC24 MCUs and dsPIC DSCs” (aka MPLAB C30) and a COFF debug file format may have changes.
- The MPLAB X IDE project will be converted to the ELF/DWARF debug file format unless the project uses COFF libraries, in which case the project format will continue to be COFF.
- MPLAB IDE v8
is case insensitive to file extensions such as
.cand.C. However, MPLAB X IDE is case sensitive and associates.cto C code files and.Cto C++ code files. Therefore, if you import an MPLAB IDE v8 project with C code specified as.C, MPLAB X IDE will rename the.Cfiles to.cto avoid incorrect compiler behavior.
MPLAB IDE v8 project possible build changes
An MPLAB IDE v8 project imported into MPLAB X IDE may not build the same as the original project.
- Do not use
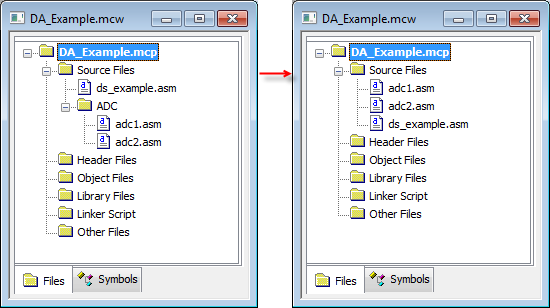
__FILE__,assert(),__TIME__, or__DATE__in your project code or the build (and checksum) will be different. - An MPLAB IDE v8 project that uses logical subfolders will not have the same checksum when imported into MPLAB X IDE. To build with the same checksum, move the files in the logical subfolders into the main logical folder (i.e., Source Files, Header Files, etc.) and then import into MPLAB X IDE.
To remove a logical subfolder under Source Files:
- Drag to files under Source Files.
- Select the folder and hit the Delete key.
- Alternately, you can right click on the folder and select Remove from Project to remove the folder from the project. But it exists on the PC, it will not be deleted.

