15.1.5 Programmer Settings and Operations
(Ask a Question)This section describes the FlashPro Express settings and operation.
15.1.5.1 Introduction
(Ask a Question)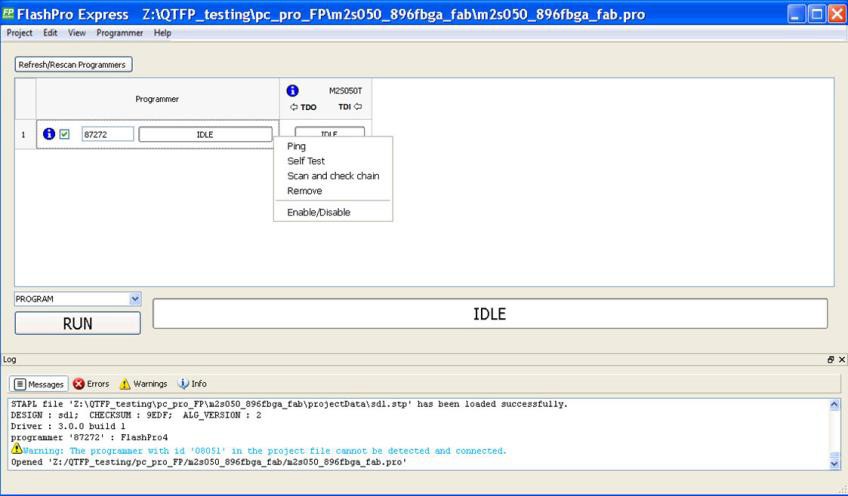
15.1.5.2 Programmer Settings
(Ask a Question)To view the Programmer Settings dialog box, in the Libero SoC Design Flow window, expand Configure Hardware, double click Configure Programmer or right click Configure Programmer and choose Programmer Settings.
For the JTAG interface, you can set specific voltage and force TCK frequency values for your programmer in this dialog box. For the SPI Target interface, you can force SCK frequency values for your programmer. SPI Target mode is supported by FlashPro5 for SmartFusion 2 and IGLOO 2 devices, and by FlashPro6 for SmartFusion 2, IGLOO 2, and PolarFire devices. SPI Target mode is not supported for RTG4 devices. JTAG is the default interface.
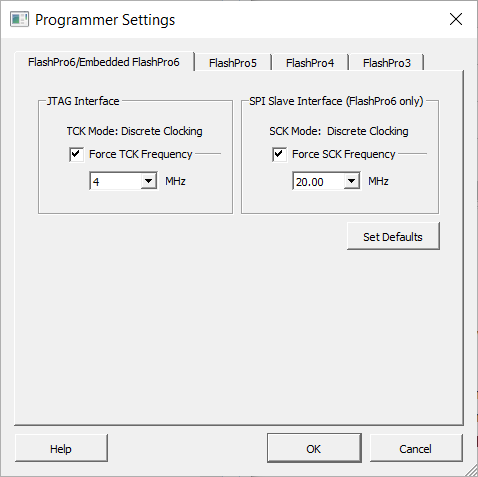
The Programmer Settings dialog box includes options for FlashPro6/5/4/3/3X. Limitations of the TCK frequency for the selected programmer are:
- FlashPro6: 1, 2, 3, 4, 5, 6, 7, 8, 9, 10, 11, 12, 13, 14, 15, 16, 17, 18, 19, 20 MHz
- FlashPro5: 1, 2, 3, 4, 5, 6, 10, 15, 30 MHz
- FlashPro4: 1, 2, 3, 4, 5, 6 MHz
- FlashPro3/3X: 1, 2, 3, 4, 6 MHz TCK frequency limits by target device (refer to the target device data sheet)
During execution, the frequency set by the FREQUENCY statement in the PDB/STAPL file overrides the TCK frequency settings you select in the Programmer Settings dialog box, unless you also select the Force TCK Frequency check box.
Limitation of the SCK frequency for the selected programmer are: 1.00, 2.00, 2.50, 3.33, 4.00, 5.00, 6.67, 8.00, 10.00, 13.33, and 20.00 MHz
15.1.5.2.1 FlashPro5/4/3/3X Programmer Settings
(Ask a Question)For FlashPro5/4/3/3X, if you choose the Force TCK Frequency, select the appropriate MHz frequency. For FlashPro4/3X settings, you can switch the TCK mode between a Free Running Clock and a Discrete Clocking. Use Discrete Clocking when there is a JTAG non-compliant device in a chain with Microchip devices. After selecting, click OK.

After the pop-up is closed by the user, a warning icon with a message tooltip appears next to the Discrete Clocking radio button. The icon and the tooltip appear when the programmer settings dialog is re-opened.
Default Settings
(Ask a Question)- The Force TCK Frequency option is unchecked to instruct the FlashPro5/4/3/3X to use the TCK frequency specified by the Frequency statement in the PDB/STAPL file(s).
- The FlashPro5/4/3/3X default TCK mode setting is Free running clock.
15.1.5.2.2 TCK Setting for Force TCK Frequency
(Ask a Question)If Force TCK Frequency is checked in the Programmer Setting, the selected TCK value is set for the programmer and the Frequency statement in the PDB/STAPL file is ignored.
15.1.5.2.3 Default TCK Frequency
(Ask a Question)If the IPD/STAPL file or Chain does not exist, the default TCK frequency is set to 4 MHz.
If more than one Microchip flash device is targeted in the chain, the FlashPro Express software passes through all the files and searches for the "freq" keyword and the "MAX_FREQ" Note field. The FlashPro Express software uses the lesser value of all the TCK frequency settings and the "MAX_FREQ" Note field values.
15.1.5.3 Ping Programmers
(Ask a Question)Right-click a programmer and choose Ping.
15.1.5.4 Performing a Self-Test
(Ask a Question)Before performing a self-test, connect the programmer to the self-test board that came with your programmer. Then right-click the programmer you want to self-test and choose Self Test.
15.1.5.5 Scanning and Checking a Chain
(Ask a Question)The scan chain operation scans and analyzes the JTAG chain connected to programmers you selected and checks that a scanned chain matches the chain configured in FlashPro Express.
To scan a chain, right-click the programmer you want to scan and choose Scan and check chain.
15.1.5.6 Enabling and Disabling Programmers
(Ask a Question)After loading a job project, you can enable, disable, or remove a programmer, as well as ping, self-test, run scan, and check chain on any of the connected programmers. These actions are available in the right-click menu for each programmer in the programmer column.
Check the check box next to a programmer in the Programmer column to enable the programmer or uncheck the check box to disable the programmer.
15.1.5.7 Renaming a Programmer
(Ask a Question)Enter a new programmer name in the Programmer window to rename the programmer. By default, the programmer name is the same as the programmer ID.
15.1.5.8 Removing a Programmer
(Ask a Question)To remove a programmer, right-click the programmer and choose Remove.
15.1.5.9 Selecting and Running an Action
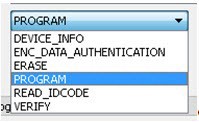
(Ask a Question)FlashPro Express supports the following programming actions:
- DEVICE_INFO - This identifies the number of
times the device has been programmed.Attention: If the erase operation is interrupted for any reason, the cycle count value is lost. However, the device can still be programmed.
- ENC_DATA_AUTHENTICATION - This is visible when each device in the chain contains encrypted bit stream files. Selecting this action checks each bit stream file for authentication.
- ERASE
- PROGRAM
- READ_IDCODE
- VERIFY