
12.1 About the Timing Constraints Editor
(Ask a Question)This chapter provides an overview of the Timing Constraints Editor.
12.1.1 Constraints Editor Window
(Ask a Question)- Constraint Browser
- Constraint List
- Constraint Adder
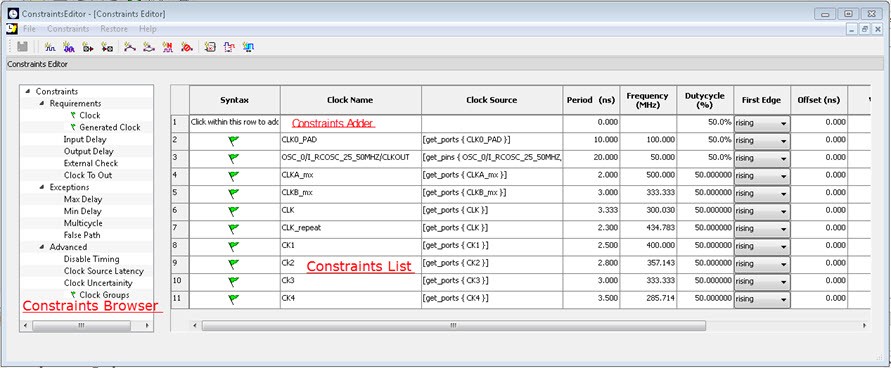
12.1.1.1 Constraints Browser
(Ask a Question)The Constraint Browser categorizes constraints based on the following types of constraints:
- Requirements are constraints to meet the design’s timing requirements and specifications. Examples are clock constraints and generated clock constraints.
- Exceptions are constraints on certain timing paths for special considerations. Examples are false path constraints and multicycle path constraints.
- Advanced are special timing constraints such as clock latency and clock groups.
12.1.1.2 Constraints List
(Ask a Question)The Constraints List is a spreadsheet of constraints with detailed values and parameters of the constraint displayed in individual cells. You can click the individual spreadsheet cells to change the values of the constraint parameters.
12.1.1.3 Constraints Adder
(Ask a Question)- To add a constraint of the same type to the Constraint List, right-click a row and select Add Constraint. This method displays the specific add constraint dialog.
- Click in a cell, and then double-click and start typing. This method is for the experienced users who know the design well and do not need to rely on the dialog box for guidance.
You can perform the following tasks in the Constraints View:
- From the Constraint Browser, select a constraint type, and then create or edit the constraint.
- Add a new constraint and check the syntax.
- Right-click a constraint in the Constraints List to edit or delete.
- Use the first row to create a constraint, and then add it to the Constraints List.
12.1.1.4 Constraint Editor Icons
(Ask a Question)You can click the icons across the top of the Constraint Editor to add constraints. Tool tips are available to identify the constraints. The following table lists the the icons.
| Icon | Name (Tool tip) |
|---|---|
| Add Clock Constraint | |
| Add Generated Clock Constraint | |
| Add Input Delay Constraint | |
 | Add Output Delay Constraint |
 | Add Maximum Delay Constraint |
| Add Minimum Delay Constraint | |
 | Add Multicycle Path Constraint |
 | Add False Path Constraint |
 | Add Disable Timing Constraint |
 | Add Clock Source Latency |
 |
Add Clock to Clock Uncertainty |
12.1.2 Adding Constraints
(Ask a Question)The Constraints Editor provides four ways to add constraints using the Add Constraints dialog box.
- Option 1: Click the Add Constraint
icon.

- Option 2: In the Constraints Browser, click the type of constraints you want to add.
Figure 12-2. Adding Constraints Using Constraints Browser 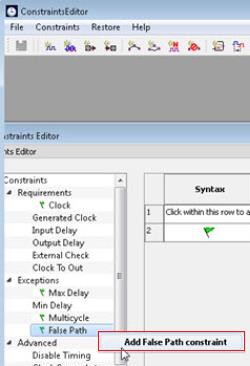
- Option 3:
From the Constraints menu, click a constraint.
Figure 12-3. Adding Constraints Using Constraints Menu 
- Option 4:
In the Constraints Browser, click the type of constraints you want to add. Right-click the first row and in the context menu that appears, click the constraint.
Figure 12-4. Adding Constraints Using Constraint Adder 