
4.5 LSRAM Initialization from SPI Flash
(Ask a Question)This section describes how to load the user application hex image file into the LSRAM from SPI flash using System Controller.
To configure Design Initialization Data and Memories, perform the following steps:
- Generate the Libero_Project using the TCL script. See Appendix 4: Running the TCL Script section.
- Double click Configure Design Initialization Data and Memories from the Design Flow window, see the following figure.
Figure 4-14. Configure Design Initialization Data and Memories 
- Click the Fabric RAMs tab
and select the LSRAM instance that needs to be initialized and click
Edit, as shown in the following figure. In this design,
LSRAM instance must be initialized with the user application.
Figure 4-15. Fabric RAMs 
- Double click the LSRAM instance to add the initialization client and storage location. In the Edit Fabric RAM Initialization Client dialog, select the Content from file option, locate the
miv-rv32-ccm-services.hexfile from thempf_an4591_df/HW/src/softconsolefolder, and select Storage Type as SPI-Flash, and then click OK, as shown in the following figure.Figure 4-16. Edit Fabric RAM Initialization Client 
- Click the Design Initialization tab, and ensure SPI-Flash - Binding Encrypted with Default Key is selected for SPI-Flash Binding type as shown in the following figure. SPI clock divider value must be set to 6. Refer to the note given below for more information. In this reference design, the initialization client is stored in the SPI flash in an encrypted format with authentication. When this option is selected, the design initialization client file (<root>_uic.bin) is encrypted with the default encryption key. When the Default key is selected, the user does not need to specify any other details. If required, enable user security protection using UEK1/UEK2 for the SPI-Flash client..
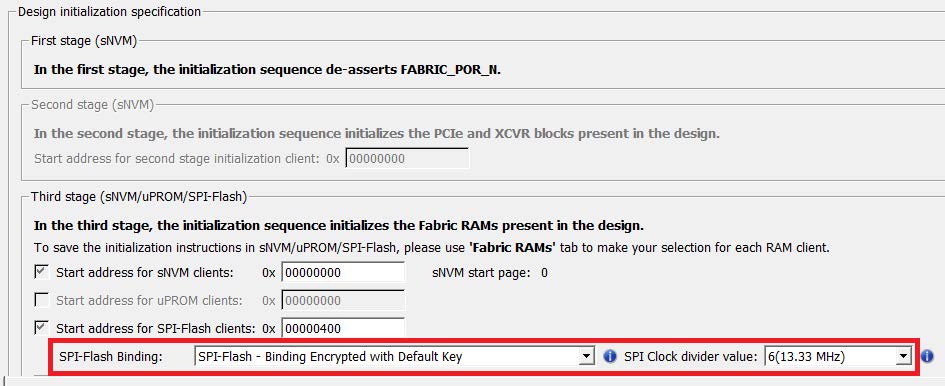 Important: The SPI clock divider value specifies the required SPI SCK frequency to read the initialization data from SPI Flash. The SPI Clock divider value must be selected based on the external SPI Flash operating frequency range.
Table 4-3. SPI Clock Divider Value SPI Clock Divider Value SCK Frequency 1 80 MHz 2 40 MHz 4 20 MHz 6 13.3 MHz - Click Generate Initialization clients under the Design Initialization tab to generate the External SPI-Flash (Non-authenticated) client.
- When the initialization clients are generated, the Generate Initialization clients status window is displayed, see the following figure.
Figure 4-17. Generate Design Initialization Data 
- Select the SPI Flash tab to verify that the SPI flash client is generated, see the following figure.
Figure 4-18. SPI Flash Client Verification 
Configuration of Design Initialization Data and Memories is successfully completed.
Important: In the scenario where a PolarFire device is first programmed with a design with an sNVM client and then reprogrammed with a (different) design without an sNVM client, upon completion of programming with the second design, the sNVM client will not be erased. In such a case, if there are locked sNVM pages, writing to those pages using a system service call fails. For that enable, Sanitize all sNVM pages in ERASE action in Generate Bistream Configure Options.