6.3.4 Dual Core Projects - dsPIC33CH Devices
A dual core device has a Main core and Secondary core that can operate independently and can be programmed and debugged separately during application development. Both processor (Main and Secondary) subsystems have their own interrupt controllers, clock generators, ICD, port logic, I/O MUXes and PPS. The device is equivalent to having two complete devices on a single die.
For more details on dsPIC33CH dual core devices and how to debug dual core code, see:
AN2721 Getting Started with Dual Core
These dual core devices have several modes of operation which correspond to different ways of creating and using projects (see the sections below).
Main Only Programming and Debugging
A dual core device is by default in Main Only mode; the Main Secondary Interface (MSI) has the MSI1 Main Control Register (MSI1CON) Secondary Enable bit (SLVEN) set to ‘0’.
A project for this device mode is no different from a project for any Microchip device. For details, see Create a New Project.
Secondary Only Programming
For the Secondary project to work independently, the ports for the Secondary need to be assigned. Therefore a Main project is necessary that programs the Main with the configuration bit settings (like which PORTS are assigned to Secondary). For details, see Set Configuration Values in the Configuration Bits Window.

Two projects are required for Secondary Only Programming mode:
- Create a Main “stub” project per Create a New Project and be sure to enable the Secondary (SLVEN = ‘1’). Set the configuration bits as described previously.
- Create a Secondary project per Create a New Project but use the “S1” version of the device, e.g., dsPIC33CH512MP205S1.
Main must be programmed first and then Secondary.
Secondary Only Debugging
To debug the Secondary project in the previous section, enable background debug
(S1DEBUG) in the configuration settings:
// FS1ICD
#pragma config S1ICS = PGD2 // ICD Communication Channel Select bits
                            // (Communicate on PGEC2 and PGED2)
#pragma config S1DEBUG = ON // Background Debug (Enabled)
 :
Main and Secondary Programming and Debugging
In this mode, the Main project will be linked to the Secondary project. That is, the Secondary code resides in Main and Main must transfer the code to Secondary.
- Create Main and Secondary projects as in Secondary Only Programming.
- In the
Projects window, the Main project will have a folder
named Secondaries. Right click on the folder and click
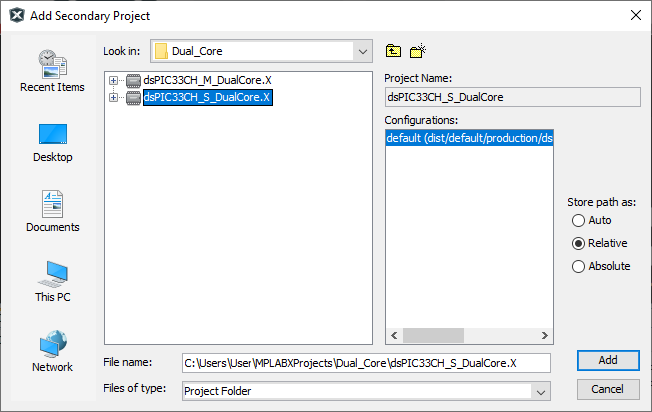
Add Secondary Project. Then select the Secondary
project in the dialog and click Add.
Figure 6-21. Add Secondary Project 
- Right click on the Main project
and select Properties to open the Project
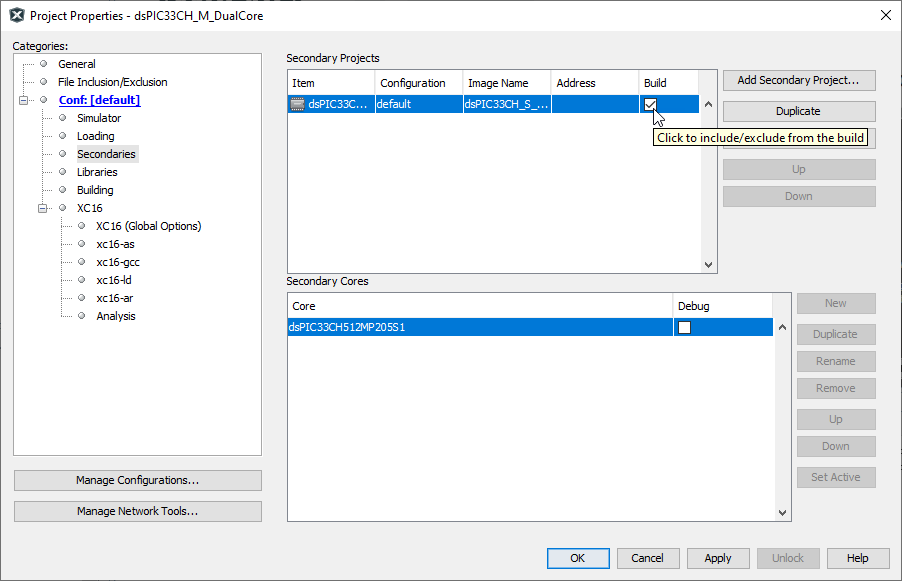
Properties window. Click on the
Secondaries category and make sure to check the
Build checkbox. Click
Apply.
Figure 6-22. Main with Secondary Project 
- In the Main code
add:
#include "Secondary.h" //The function to transfer the code from Secondary to Main and start the Secondary is below. _program_Secondary(1,0,Slav); _start_Secondary(); - By building and programming Main, both Main and Secondary projects will be built and both Main and Secondary cores will be programmed.
