
5.2 Managing Licenses
(Ask a Question)This chapter describes Libero SoC licensing.
5.2.1 Microchip License Utility
(Ask a Question)The Microchip License Utility allows you to check and update your license settings for the Libero SoC software. It displays your current license settings and the license host-id for the current host, and allows you to add a new license file to your settings.
Starting the Microchip License Utility
Requesting a License
To request a license, navigate to the Microchip Licensing page, and then click one of the Purchase License options or click Register a Free License. You are redirected to the microchipDIRECT website to generate a license.
The following table describes the available licenses.
| License | Description |
|---|---|
| 1 year Platinum | Purchased license that supports all devices. |
| 1 year Gold | Purchased license that supports a smaller set of devices than Platinum. |
| 1 year Silver | Free license that supports a smaller set of devices than Gold. |
| 30-day Evaluation | Free license that supports all devices, but disables programming. |
When you receive your license file, follow the instructions that come with it and save the license to your local disk. In the Microchip License Utility window, click Add License File, browse to the license file, and then select it. If you use a floating license, click Add License Server, and enter the port number and name of the license server host.
Although the list of features for which you are licensed shows all versions, your license
must have a version equal to or greater than your design tools release version for the
libero.exe and designer.exe tools to run.
The list at the lower right shows the order in which the license files are read. The first file read appears at the top of the list.

Printing the Licenses Report
Click Write Report File to print the Microchip Tools Licenses Report
or to save it as a .txt file.
Related Information
For more information about licensing, including links to troubleshooting and FAQ documents, see the Microchip Libero SoC License Information Web Page.
5.2.2 Selecting a Default License from a License List
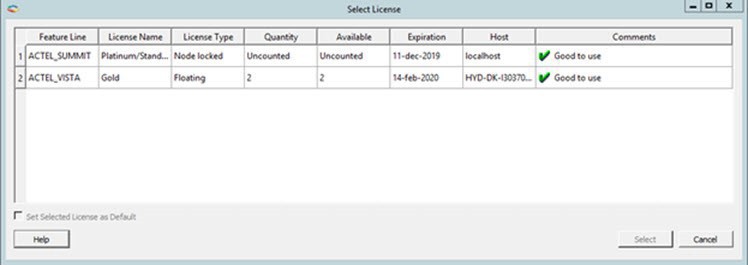
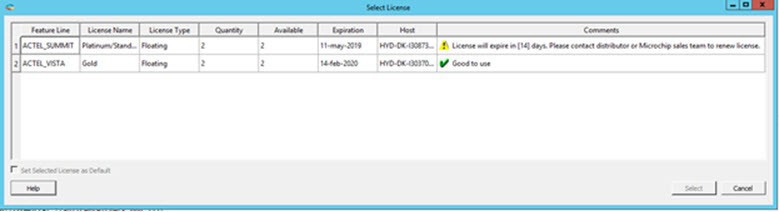
(Ask a Question)If you have more than one license available and have not selected a default license, the Select License dialog box appears when you start the Microchip License Utility. Select the feature license you want to use from the list of available licenses shown.
- The Quantity and Available columns show the total number of licenses and number of available licenses, respectively.
- The License Type column shows whether an available license is a Node Locked license, Floating license, or Server-based license. Floating and Server-based Licenses can be used by multiple users, depending on the number of seats available.
Selecting a License to Use
- In the Select License dialog box, click Select to activate Libero using the selected license. This button is disabled by default and is enabled after you select a license.
- Check the Set Selected License as Default check box to save
the selected license as the default license to be used for future sessions.
Selecting this option skips the license selection step for future sessions. Use this
option if you want to use the same license features for future sessions.
- If you select a license that was acquired by another user, the following
message appears:
Figure 5-5. Message when a License was Acquired by Another User 
-
If you select a license for which there are no valid licenses available, the following message appears:
Figure 5-6. Message when No Valid Licenses are Available 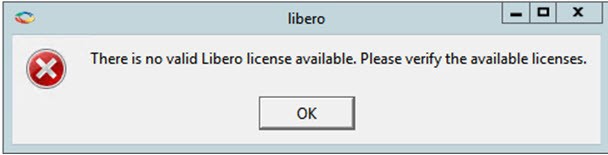
- If you select a license that was acquired by another user, the following
message appears:
- To close the license selection window and exit Libero, click Cancel. To view the online help topic for License Selection, click Help.
License Expiration
If a license will expire within 15 days, a warning appears in the Comments column of the dialog box and in the Log window (see the following examples).

5.2.3 Setting a Default License
(Ask a Question)- Click to change the default license.
Figure 5-9. Selecting Help > Select Default License 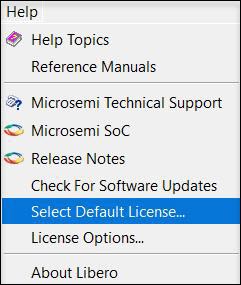
- When the Select License dialog box appears, click a row, and then click
Set Default License to specify the Libero license you
selected as the default.
Figure 5-10. Select License Dialog Box 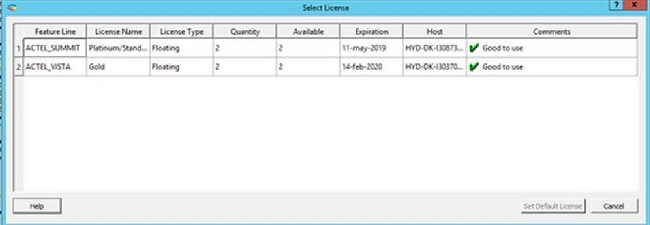
- Close the dialog box.
- After you select a default Libero license, click Project >
Preferences to set license options in the Libero Preferences
dialog box. The following table describes the options.
Figure 5-11. License Options in Libero Preferences Dialog Box 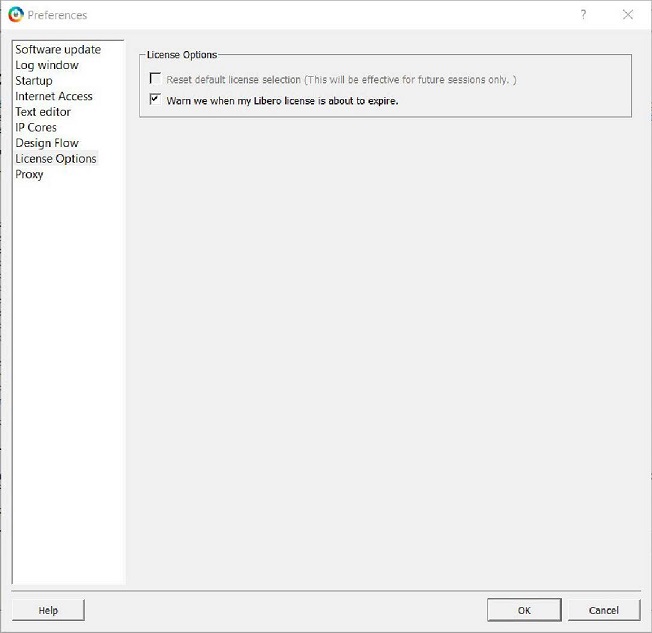
| Option | Description |
|---|---|
| Reset Default License Selection | This option is selected when a default license is available. When checked, the default license is cleared and the check box is disabled. |
| Warn we when my Libero license is about to expire | Enables or disables Notification of License expiry. When checked, a message appears when the selected license’s expiration date is within 15 days. Use this option only when the license’s expiration date is longer than 5 days and shorter than 15 days. |
5.2.4 Viewing License Details
(Ask a Question)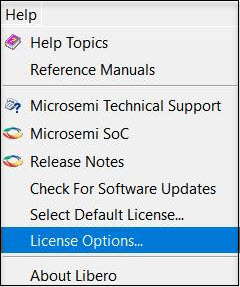
The License Details dialog box has the following two tabs:
- The Tools tab displays tool license details.
- The IP Cores tab displays IP Cores license details, as shown in the following example.

| Element | Description |
|---|---|
| Close | Closes the dialog box. |
| Help | Displays the online help topic for License Selection. |
| Filter | Searches for the pattern entered in the text edit box. Filtered rows appear in the Cores table. |
| Lookup Path | Shows the list of License hosts included in the LM_LICENSE_FILE. |
5.2.5 Libero SoC Online Help
(Ask a Question)The Libero SoC online help system is designed to open in the HTML Help Viewer – Microsoft's Help window for viewing compiled HTML Help. If you do not have the HTML Help Viewer components installed on your system, you can view the help using Microsoft Internet Explorer browser version 4.x or later.
- The Contents tab shows books and pages that represent the categories of information in the online help system. When you click a closed book, it opens to display its content of sub-books and pages. When you click an open book, it closes. When you click pages, you select topics to view in the right-hand pane of the HTML Help viewer.
- The Search tab allows you to find topics that contain key words. Full-text searching searches through every word in the online help to find matches. When the search is completed, a list of topics appears, so you can select a topic to view.
LINUX_HTMLREADER variable to enable an HTML viewer. For example:
setenv LINUX_HTMLREADER/usr/bin/firefox. If you do not set this variable,
HTML files, such as the online help, will not be available from within the software.5.2.6 Libero SoC User Guides
(Ask a Question)LINUX_PDFREADER variable to enable a
PDF viewer. For example: setenv LINUX_PDFREADER /usr/bin/kpdf. If
you do not set this variable, some PDF files will not be available from within the
software.