1.50 TrustZone Silent Access and RTC Tamper Detection - PIC32CMLS60
This example application displays the Data Flash content on a console which is refreshed every seconds. The Silent Access and Tamper Erase security features of the Data Flash are enabled.
Description
This demonstrates TrustZone feature and uses two projects viz., Secure and Non-Secure Project that work together on the same MCU and offering security isolation between the Trusted and the Non-trusted resources in the device.
- Secure project configures the RTC peripheral for tamper detection and SERCOM3 peripheral to display content on console through UART pins.
- Secure project configures the Secure Data Flash security features (Silent Access - Tamper Erase).
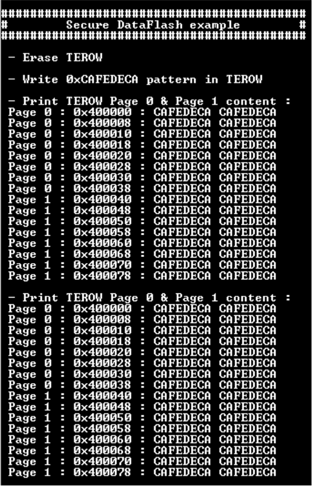
- Non-secure project uses veneers to request from Secure project, to erase Secure Data Flash, fill it with 0xCAFEDECA pattern and display its content on console every seconds. When a Tamper is detected, Non-Secure application is halted and Secure Data Flash content is fully erased.
Components Used
- Data Flash - Configured in Secure APPLICATION region
- RTC - Configured as Secure mode
- PA08 - Configured as Secure pin (RTC Tamper Pin)
- SERCOM3 - Configured as Secure mode (USART mode)
Downloading and Building the Application
To clone or download this application from Github, go to the main page of this repository and then click Clone button to clone this repository or download as zip file. This content can also be downloaded using content manager by following these instructions.
Path of the application within the repository is as shown below:
| Type | Path |
|---|---|
| Project Group | apps/trustZone/nvmctrl/secure_dataflash_SA_TE_ls60 |
| Secure Project | apps/trustZone/nvmctrl/secure_dataflash_SA_TE_ls60/Secure/firmware |
| Non-Secure Project | apps/trustZone/nvmctrl/secure_dataflash_SA_TE_ls60/NonSecure/firmware |
| Project Name | Description |
|---|---|
| pic32cm_ls60_cpro_Secure.X pic32cm_ls60_cpro_NonSecure.X | Secure and Non-secure MPLABX project for PIC32CM LS60 Curiosity Pro Evaluation Kit |
Setting Up the Hardware
The following table shows the target hardware for the application projects.
| Project Name | Board |
|---|---|
| pic32cm_ls60_cpro_Secure.X pic32cm_ls60_cpro_NonSecure.X | PIC32CM LS60 Curiosity Pro Evaluation Kit |
Setting Up PIC32CM LS60 Curiosity Pro Evaluation Kit
- Connect the Debug USB port on the board to the computer using a micro USB cable
- Short PA08 pin (EXT3, PIN 3) to VCC
Running the Application
- Open the Terminal application (Ex.:Tera term) on the computer
- Connect to the EDBG Virtual COM port and configure the serial settings as
follows:
- Baud : 115200
- Data : 8 Bits
- Parity : None
- Stop : 1 Bit
- Flow Control : None
- Open the project group in the MPLAB X IDE and set the non-secure project as main project
- Build and program the application
- The console should display the
following Secure Data Flash content:

- Tied down the PA08 pin with a jumper (Remove short from Vcc and connect it to GND to create a falling edge)
- The following Secure Data Flash
content should be observed on console, meaning the Secure Data Flash Tamper
Erase Row 0 was performed because of RTC Tamper Detection:

