
13.15.4 Simplifying the Display of Pins on an Instance using Pin Groups
The Canvas enables you to group and ungroup pins on a single instance to simplify the display. This feature is useful when you have many pins in an instance, or if you want to group pins at the top level. Pin groups are cosmetic and affect only the Canvas view; other SmartDesign views and the underlying design are not affected by the pin groups.
- Hide pins that you have already connected
- Hide pins that you intend to work on later
- Group pins with similar functionality
- Group unused pins
- Promote several pins to Top Level at once
- Ctrl + click to select the pins you wish to group. If you try to click-and-drag inside the instance you will move the instance on the canvas instead of selecting pins.
- Right-click and choose Add pins to
group to create a group. Click + to expand a group. The icon associated with the
group indicates if the pins are connected, partially connected, or unconnected (as shown
in the figure below).
Figure 13-33. Groups in an Instance on the Canvas 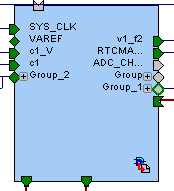
To add a pin to a group, Ctrl + click to select both the pin and the group, right-click and choose Add pin to group.
To name a group, click the group name on the instance and type in a different name.
To ungroup pins:
- Click + to expand the group.
- Right-click the pin you wish to remove from the group and choose Ungroup selected pins. Ctrl + click to select and remove more than one pin in a group.
A group remains in your instance after you remove all the pins. It has no effect on the instance; you can leave it if you wish to add pins to the group later, or you can right-click the group and choose Delete to remove it from your instance.
If you delete a group from your instance any pins still in the group are unaffected.
- Create a group of pins.
- Right-click the group and choose Promote to Top level.