
6.3.5.2 Create a Secondary Project
How to Create a Secondary Project - Video (NO AUDIO)
Launch MPLAB X IDE and create the Secondary core project first.
Click on the New Project button  and the
wizard will launch to guide you through new project set up. Click
Next to move to the next step.
and the
wizard will launch to guide you through new project set up. Click
Next to move to the next step.
- Step 1. Choose Project. Select the Microchip Embedded category and choose Application Project.
- Step 2. Select Device (and Tool). Select the secondary device, e.g., PIC32CX2051MTSH128S1, and then select your debug tool.
- Steps 3 and 4. These steps are skipped for the selected devices.
- Step 5. Select Compiler. Select the compiler and compiler version you will be using to develop your application from the list, i.e., XC32 v4.21.
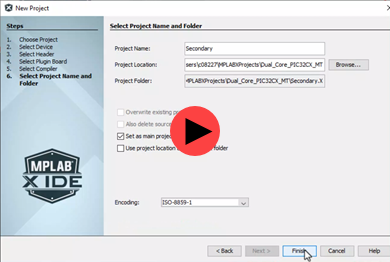
- Step 6. Select Project Name and
Folder. Select a name (Secondary) and location for your new project. You may
browse to a location. When done, choose one of the following:
- Click Finish to create the Secondary project. The new project will open in the Projects window.
- Click Add Project to create the Primary project. Follow the instructions in Create a Primary Project. When done, click Finish and both projects will be created. Return here to proceed.
To add a main file to the project:
- In the Projects window under the Secondary project, right click on the Source Files folder and select .
- In the wizard, name the main file, e.g., secondary.c, and click Finish. The new file will open in an Editor tab.
To use example code:
- Click in the file window, press CTRL+A keys and then Delete to remove the contents of this file.
- Copy and paste example code found in the topic PIC32CXMTSH Example Code.