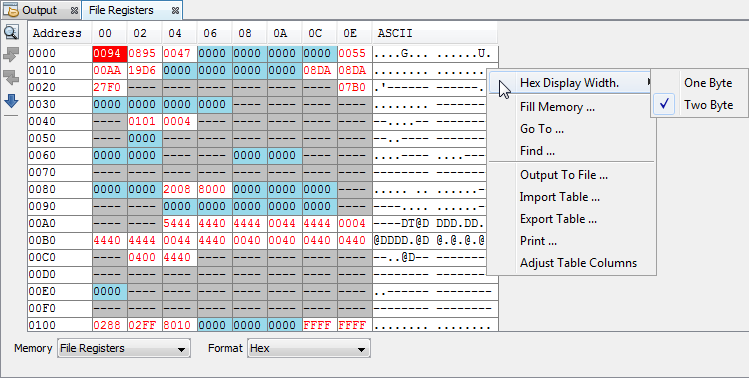
14.16.2 File Registers Window
The File Registers window displays all the file registers of the selected device. When a file register value changes, or the processor is interrogated, the data in the File Registers window is updated (values updated shown in red).
Some data has colored cells:
- Blue cells represent SFRs.
- Green cells represent project variables.
- Gray cells represent reserved memory.

File Registers Window Displays
You may specify how memory is displayed in the window by selecting from the Format drop-down box on the bottom of the window.
When using a hardware tool for debug, some registers may show an R for each nibble of data to represent a reserved resource.
Hex
This format displays file register information as hex data. The window has the following columns:
- Address – Hexadecimal address of the data in the next column.
- Data Blocks – Hexadecimal data, shown in 1- or 2-byte blocks.
- ASCII – ASCII representation of the corresponding line of data.
Symbol
This format displays each file register symbolically with corresponding data in hex, decimal, binary and character formats. The window has the following columns:
- Address – Data hexadecimal address.
- Symbol Name – Symbolic name for the data.
- Radix Information – Hex, Decimal, Binary, Char Radix information is displayed in these four columns. Hex is shown in 1- or 2-byte blocks.
Dual Port (dsPIC33FJ DSC/PIC24HJ MCU devices only)
This format displays file register information as hex data. The window has the following columns:
- Address – Data hexadecimal address.
- DMA Address – Offset from the silicon DMA address.
- Data Blocks – Hexadecimal data, shown in 1- or 2-byte blocks.
- ASCII – ASCII representation of the corresponding line of data.
For information on dsPIC33F DSC and PIC24H MCU devices, see the Microchip website for device data sheets and the dsPIC33/PIC24 Family Reference Manual (DS-70000618, etc.)
XY Data (dsPIC DSC devices only)
This format displays file register information as hex data. The window has the following columns:
- Address – X hexadecimal address of the data.
- Y Bus – Y hexadecimal address of data, if supported.
- Data Blocks – Hexadecimal data, shown in 2-byte blocks.
- ASCII – ASCII representation of the corresponding line of data.
For more information, see the dsPIC30F Family Reference Manual (DS-70046).
File Registers Window Icons
Icons are located on the left side of the window.
| Icon | Icon Text | Function |
|---|---|---|
 | Find | Specify a string to find in the window. Select to match whole word or case. |
 | Find Next | Find next instance of string from Find. |
 | Find Previous | Find previous instance of string from Find. |
 | Go To | Go to specified line number or address. |
File Registers Window Menu
Right click in the memory window data area to pop up this menu. Not all items may be visible for all devices.
| Item | Description |
|---|---|
| Hex Display Width | Hex
Format Only Set the hexadecimal display width (options depend on the device selected). |
| Fill Memory | Fill memory from Start Address to End Address with the value in Data. Specify other options in the Fill Memory dialog. |
| Go To | Go to the address/function specified using the Go To dialog. |
| Find | Find text specified using the Find dialog. |
| Output To File | Write the displayed window contents to a text file using the Output to File dialog. |
| Import Table | Hex,
Dual Port or XY Data Formats Only Import tabular data from a file into a Memory window using the Import Table dialog. |
| Export Table | Hex,
Dual Port or XY Data Formats Only Export tabular data from a Memory window into a file using the Export Table dialog. |
| Print the
contents of this window using the Print
dialog. Note: If
you have a large memory device, the number of pages printed can
become very large. A suggestion is to print the window contents
to a file (Print dialog,
General tab, Print to
File check box) and then select which pages from
the file you need to print. | |
| Adjust Table Columns | Adjust the columns automatically. |
