This tutorial provides step‑by‑step instructions for programming a single device using
serialization. Before starting this tutorial, ensure that FlashPro®
software is installed and that you are familiar with the basic FlashPro workflow.
This tutorial also assumes that you have access to Libero® IDE
version 8.0 or later.
To Configure the FROM data for serialization:
Generate FROM using the Catalog.
In the FlashROM Settings dialog box, under the
Properties section, select either an Auto Increment (Auto Inc)
region or a Read From File region.
For an Auto Inc region, specify the step value. This value cannot be modified later in
FlashPoint.
Complete the normal design flow and finish place‑and‑route.
Select Program FlashROM.
Click Browse to locate the UFC file.
Select the FPGA Array option and click
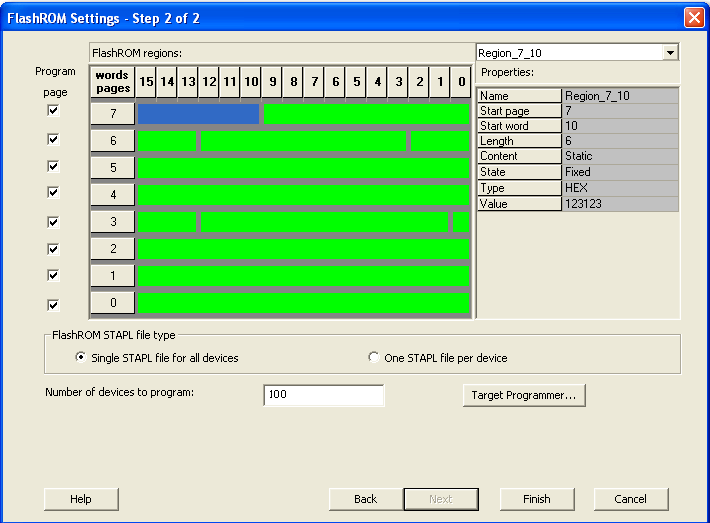
Next. The FlashROM Settings window appears.Figure 9-23. FlashROM Settings- Step 2 of 2
Select the FROM page to be programmed and specify the data value for the configured
regions.
Note: The generated STAPL file contains only the data that targets the selected
FROM page.
Configure serialization properties by specifying the Start and Max values.
For an Auto Inc region, enter the Start and
Max values.
For a Read From File region, select the custom serialization
file.
Select the FlashROM programming file type to generate:
Choose single STAPL file for all devices to generate one programming file
containing all FROM values.
Choose one STAPL file per device to generate a separate programming file for each
FROM value.
Enter the number of devices to be programmed and generate the required programming
file.
Click Finish.
You have completed the steps to enable device serialization. Now you are ready to program a
device using Device Serialization in FlashPro.
To program a device using device serialization:
Click the New Project
button in the FlashPro.
In the New Project dialog
box, type Tutorial in the Project Name field.
Check the Single STAPL
file option from the Programming Mode area.
If necessary, change the default location of your
project in the Project Location field.
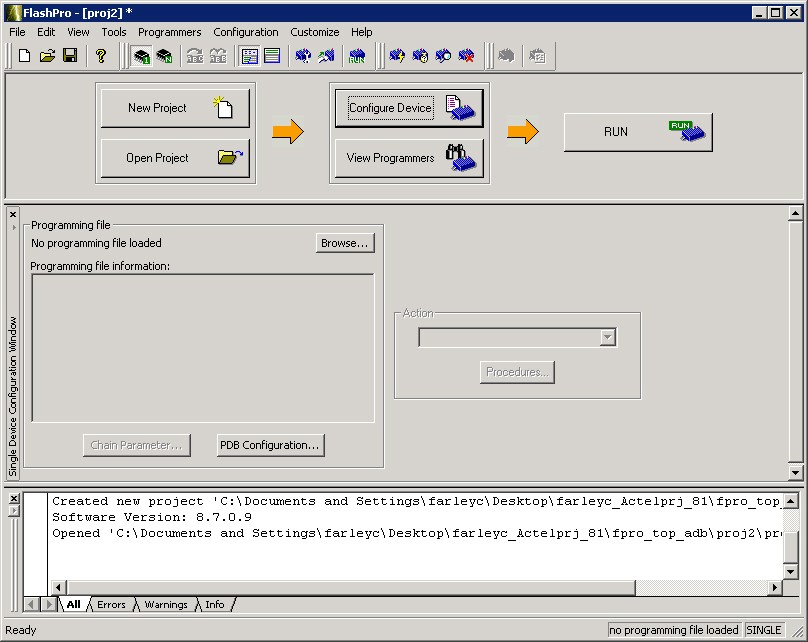
Click OK. The FlashPro GUI appears.Figure 9-24. FlashPro Main GUIThe Programmer List window updates to display the connected
programmer information.
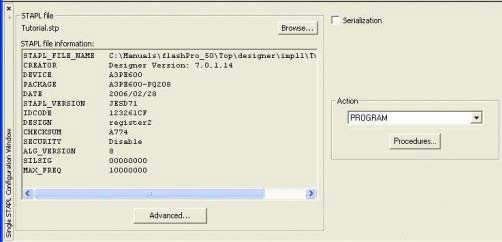
Click the Configure STAPL
File button to load the STAPL file. The Single STAPL Configuration
Window appears in the FlashPro GUI.
Click the Browse
button to find your STAPL file.
From the Load STAPL
File dialog box, find your STAPL file and click Open.
The Single STAPL Configuration Window updates to list your STAPL file
information and the actions available with your STAPL file in the
Action list box.Figure 9-25. Single STAPL Configuration Window with STAPL File Uploaded
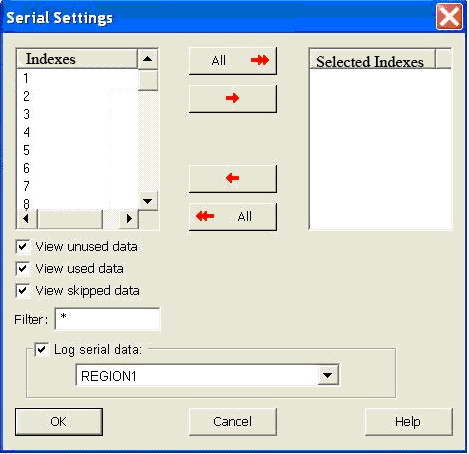
From the Single Device
Configuration Window in FlashPro, check the
Serialization box and click the Select Serialization
Indexes button.
The Serial Settings dialog box
appears.
Figure 9-26. Serial Settings Dialog Box
From the Serial
Settings dialog box, click All to select all the serial
data.
Click OK. The
Serialization Indexes text box updates.Figure 9-27. Single STAPL File Configuration Window- Serialization Indexes Update
Click the Program
button to program your device using serialization.