21.8.9 Cross-probing between ChipPlanner and SmartTime
Use ChipPlanner with SmartTime to identify the signal path or individual instances in ChipPlanner.
To identify paths in ChipPlanner:
In the Design Flow
window, click ChipPlanner to display the chip
view, and then click Timing Analyzer to display the
SmartTime Timing Analyzer.
In the SmartTimeTiming
Analyzer, select the clock domain in the Domain
Browser.
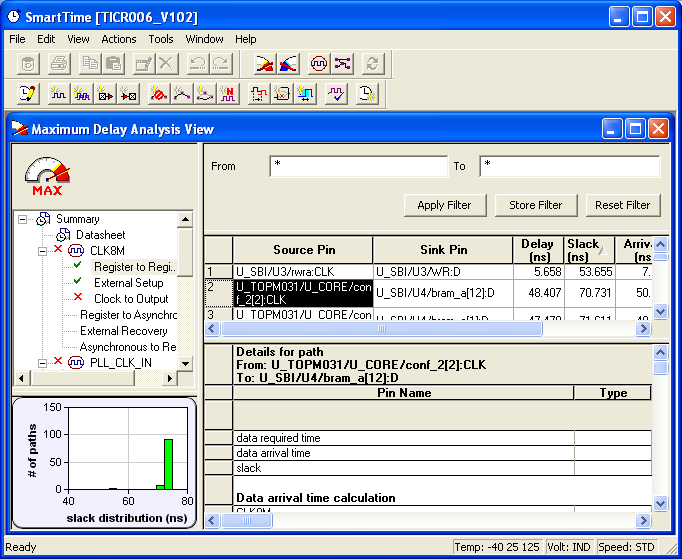
Select a set in the Path list (as
shown in the following figure) and the paths within that set are displayed in
the Path Details (lower table). The Paths List
displays timing information for various categories.Figure 21-52. Path Details of Selected Path Highlighted
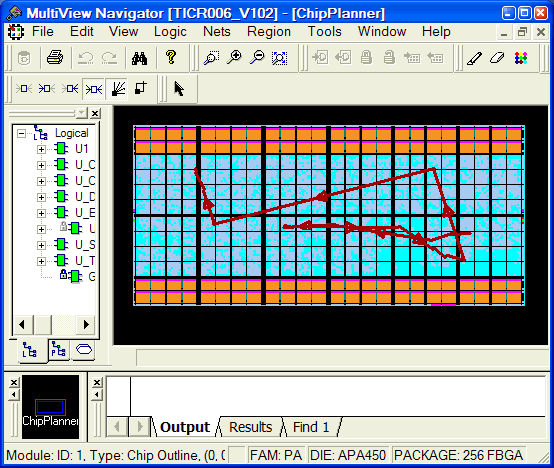
Select the path to cross-probe.
Right-click the selected path,
and choose Cross-probe selected paths from the
right-click menu. All objects in the selected path appear highlighted in
ChipPlanner (as shown in the following figure).Figure 21-53. Objects in Selected Path Appear Highlighted in ChipPlanner
Note:
Logic must be either placed or placed-and-routed before you can cross-probe
paths.
From the Edit menu, choose Unhighlight All
to remove the highlighting from the cross-probed paths in
ChipPlanner.
To cross-probe an object with ChipPlanner:
In the Design Flow window,
click ChipPlanner to display the chip view, and then click
Timing Analyzer to display the SmartTime
Timing Analyzer.
In the SmartTimeTiming
Analyzer, select the clock domain in the Domain Browser.
Select a path in the Paths
List, right-click it, and choose Expand selected paths from the
right-click menu.
Select any instance in the SmartTime
Expanded Path View. The instance appears highlighted in both SmartTime
and ChipPlanner.
To cross-probe the path of the
selected object, right-click the instance, and choose Cross-probe Path from
the right-click menu. All objects in the selected path appear highlighted in
ChipPlanner.
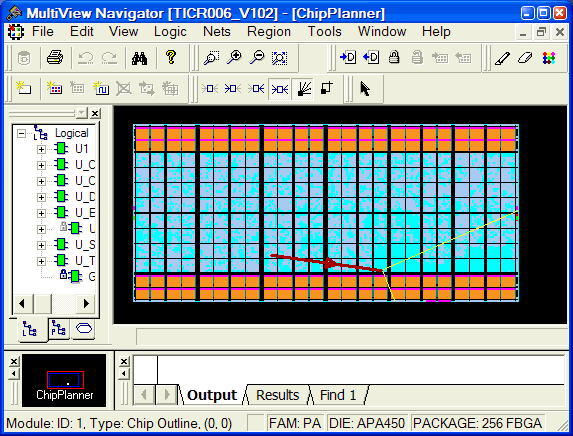
When you cross-probe a path in ChipPlanner, the default view is the Ratsnest view, shown in the
following example.Figure 21-54. Ratsnest view in ChipPlanner showing cross-probed path
Note: To select multiple instances, hold down the Shift key as you
click each instance.
The critical cross-probed path appears highlighted in ChipPlanner as a solid line with arrows indicating the direction of the path. The color of the line is the color you selected for the highlight color.
You can right-click a selected cross-probed path, choose Properties to
display the Path Properties dialog box, and do one of the
following:
Rename the cross-probed path
Assign a different color to the
cross-probed path
You can create more than one cross-probed path in ChipPlanner, building one path on top of another. ChipPlanner does not delete paths you have cross-probed. When you save your design, the cross-probed paths are also saved in your design (.ADB) file.
Note: In SmartTime, you can select several paths at one time by
clicking the top-left corner square in the Maximum Delay Analysis View
window.
For more information, see the SmartTime User’s Guide .