
21.7.8 Specifying Clock Constraints
Specifying clock constraints is the most effective way to constrain and verify the timing behavior of a sequential design. Use clock constraints to meet your performance goals.
- Add the constraint in the editable constraints grid or open the Create Clock Constraint dialog box using one of the following methods:
- From the Actions menu, choose .
- Click the
 icon.
icon. - Right-click the Clock in the Constraint Browser.
- Double-click any field in the Generated Clock Constraints grid. The
Create Clock Constraint dialog box appears (as shown in the
following figure).
Figure 21-29. Create Clock Constraint Dialog Box 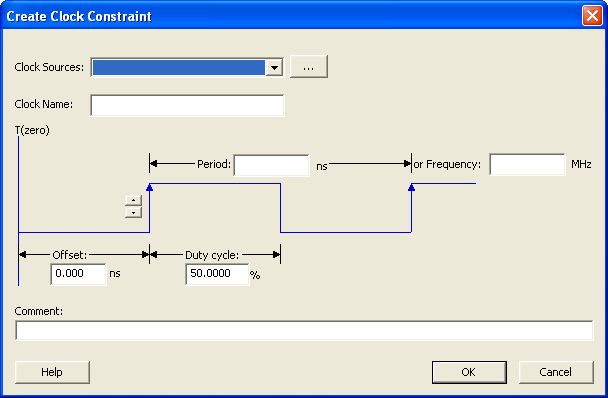
- Select the pin to use as the clock
source. You can click the Browse button to display the Select Source Pins for Clock Constraint dialog box (as shown in the following figure).Note: Do not select a source pin when you specify a virtual clock. Virtual clocks can be used to define a clock outside the FPGA that it is used to synchronize I/Os.
Use the Choose the Clock Source Pin dialog box to display a list of source pins from which you can choose. By default, it displays the explicit clock sources of the design. To choose other pins in the design as clock source pins, select Filter available objects - Pin Type as Explicit clocks, Potential clocks, Input ports, All Pins, All Nets, Pins on clock network, or Nets in clock network. To display a subset of the displayed clock source pins, you can create and apply a filter.
Multiple source pins can be specified for the same clock when a single clock is entering the FPGA using multiple inputs with different delays.
Click OK to save these dialog box settings.
- Specify the Period in nanoseconds (ns) or Frequency in megahertz (MHz).
- Modify the Clock Name. The name of the first clock source is provided as default.
- Modify the Duty cycle, if needed.
- Modify the Offset of the clock, if needed.
- Modify the first edge direction of the clock, if needed.
- Click OK. The new constraint appears in the Constraints List.
